Under the ExhibitDay Enterprise plan, you can customize the properties of Capital Assets (like your booth or displays) and Collateral/Multi-quantity Items (like giveaways and swag) by adding Custom Asset Fields. These custom fields can be used to capture relevant data that best support your organization’s inventory management processes.
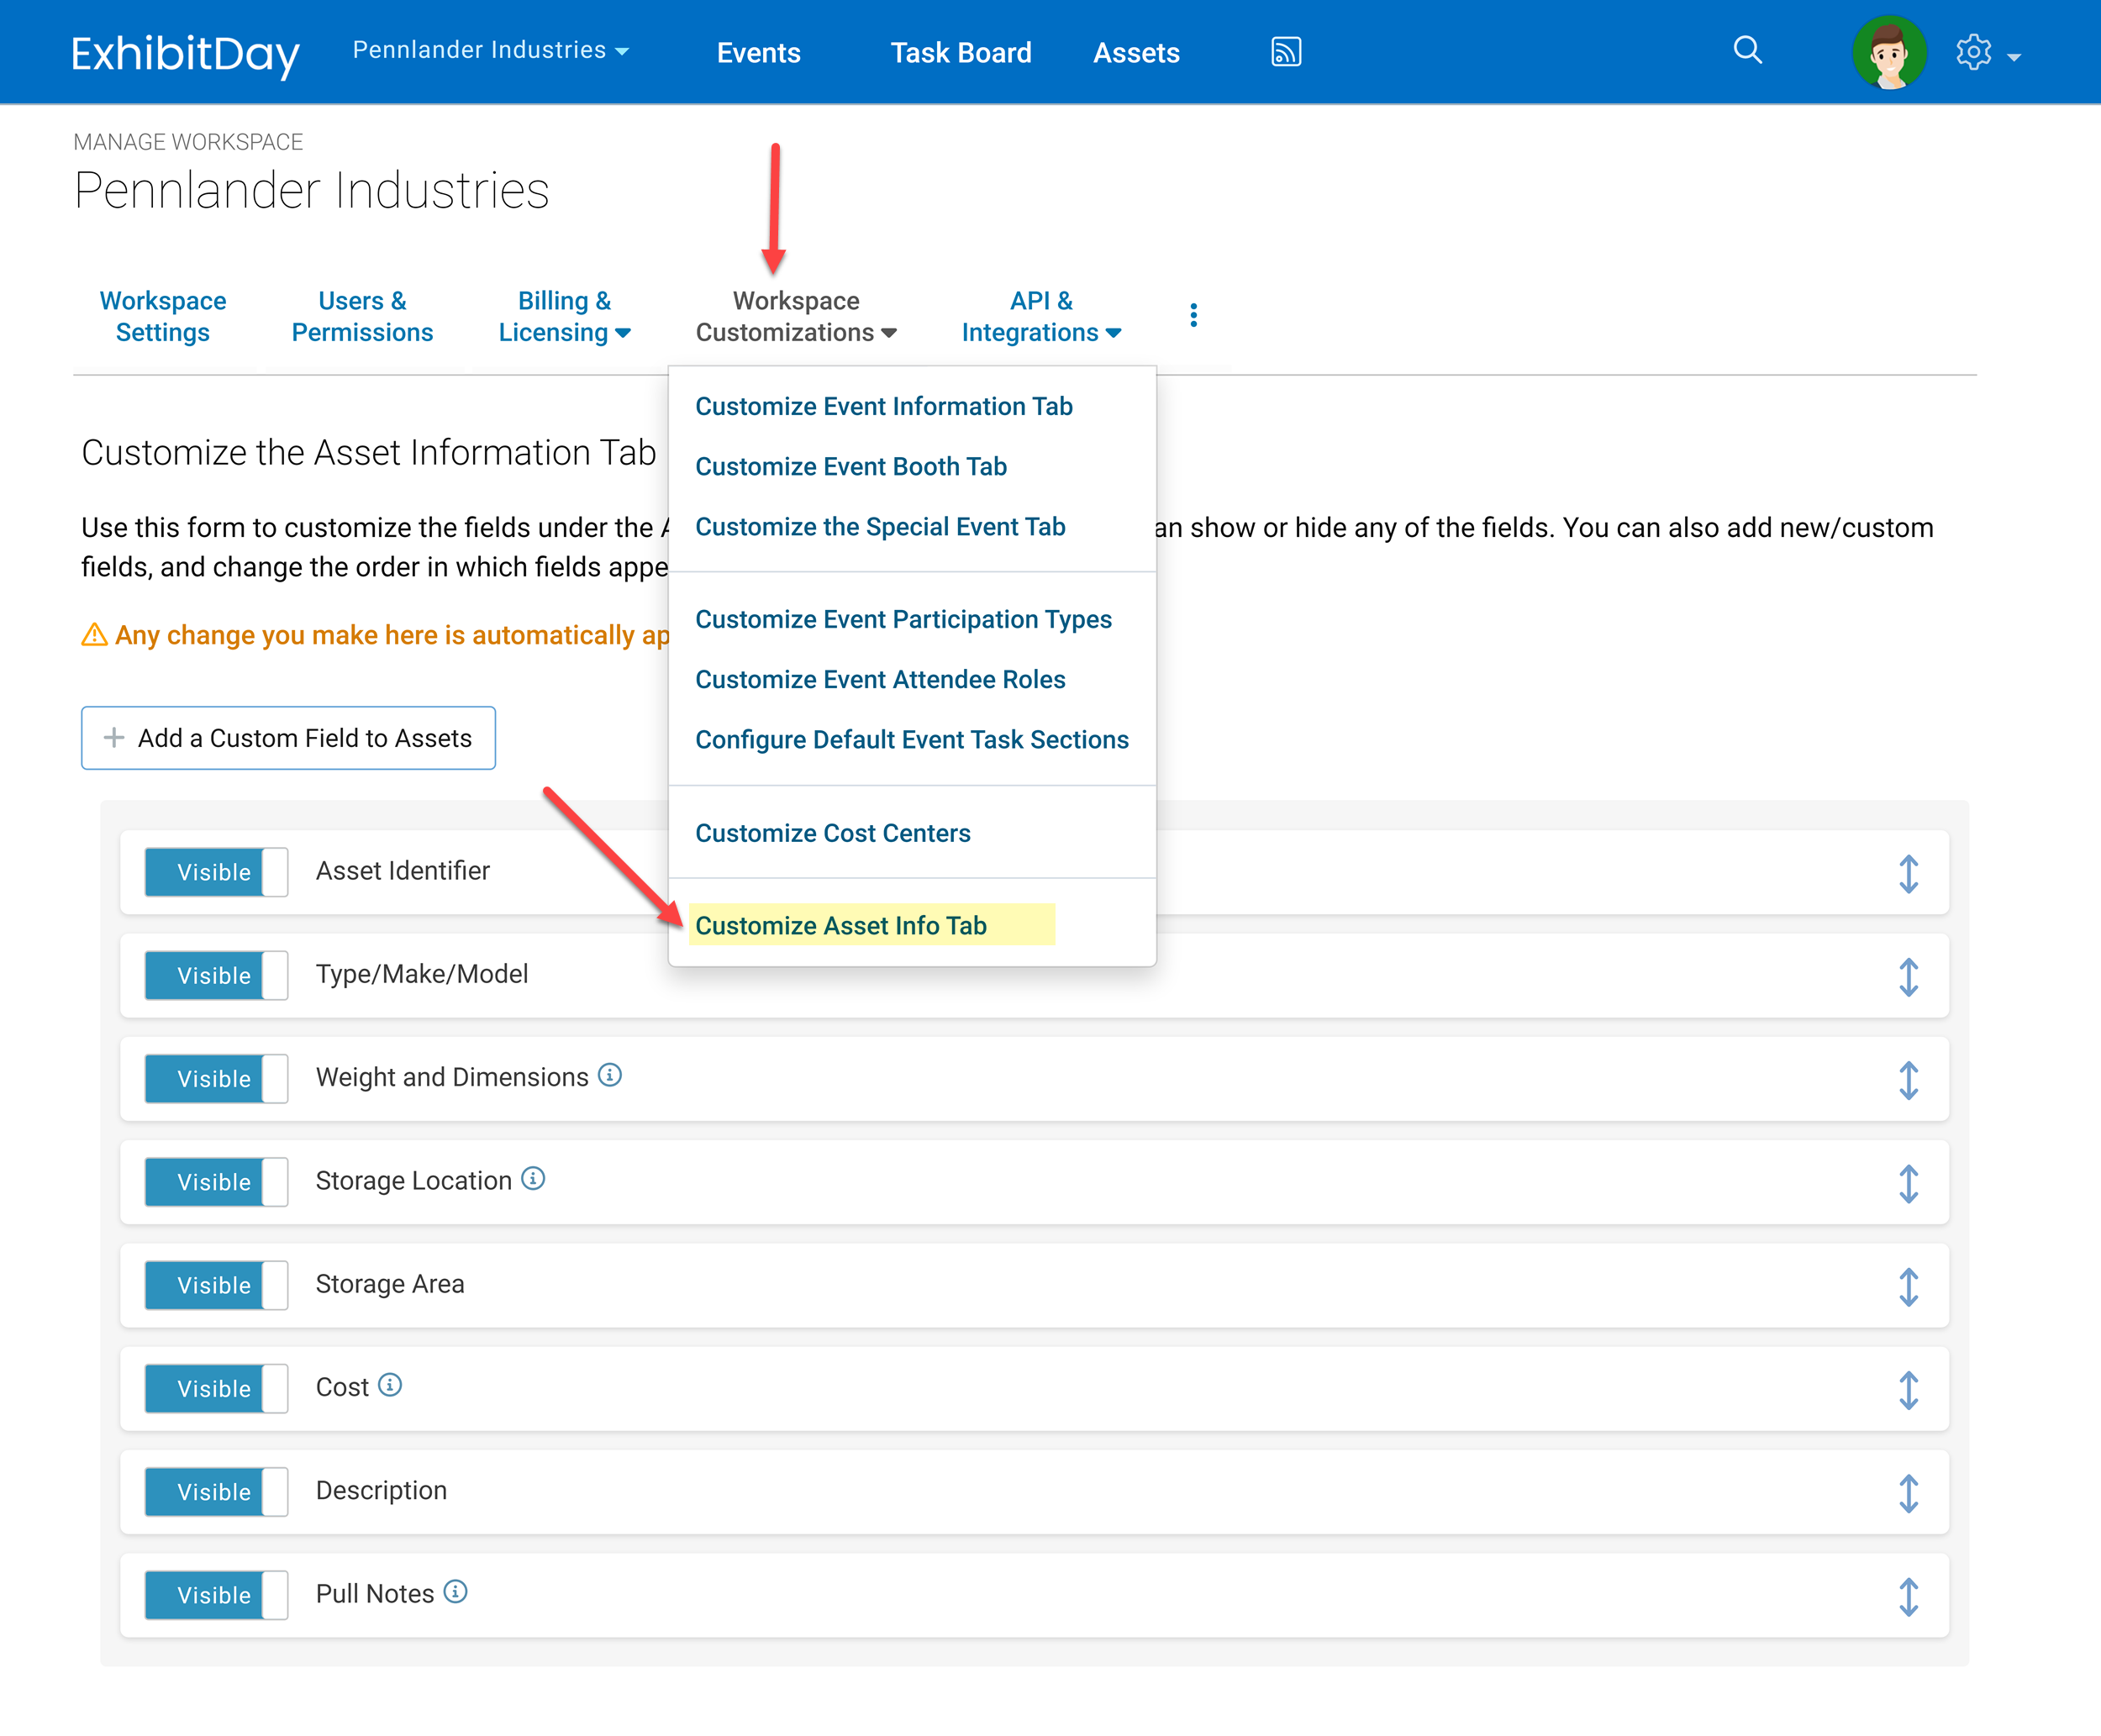
To add custom fields to the Asset information tab, go to Workspace Settings > Workspace Customizations > Customize Asset Info tab. There, you can add any number of custom fields (e.g. text field, date field, dropdown, file attachment, etc.) to your assets in ExhibitDay. You can also change the order in which the fields appear when you view the Asset Info tab (by grab-and-dragging the handle to right of each field) . Note: any change you make on this page will automatically apply to all of the assets in your ExhibitDay workspace.
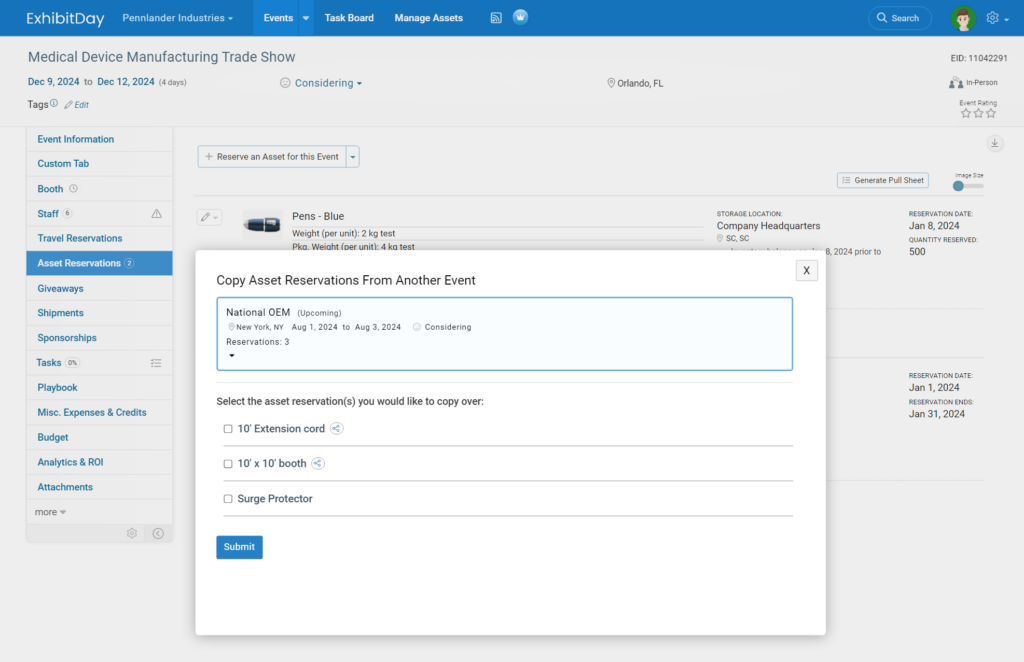
To save some data entry time, you can copy asset reservations from another event that has similar assets reserved. Use the extended menu of the “Reserve an Asset for this Event” button on the event “Asset Reservation” tab in order to start the copy process.
Once the copy dialog appears, select the event you would like to copy asset reservations from. Then, select each asset reservation you would like to copy over and enter the reservation details. When you’re done making your selections, click the “Submit” button at the bottom of the dialog to complete the copy process.
Note: the ability to copy asset reservations from another event is only available if you are on the Premium or the Enterprise plan.
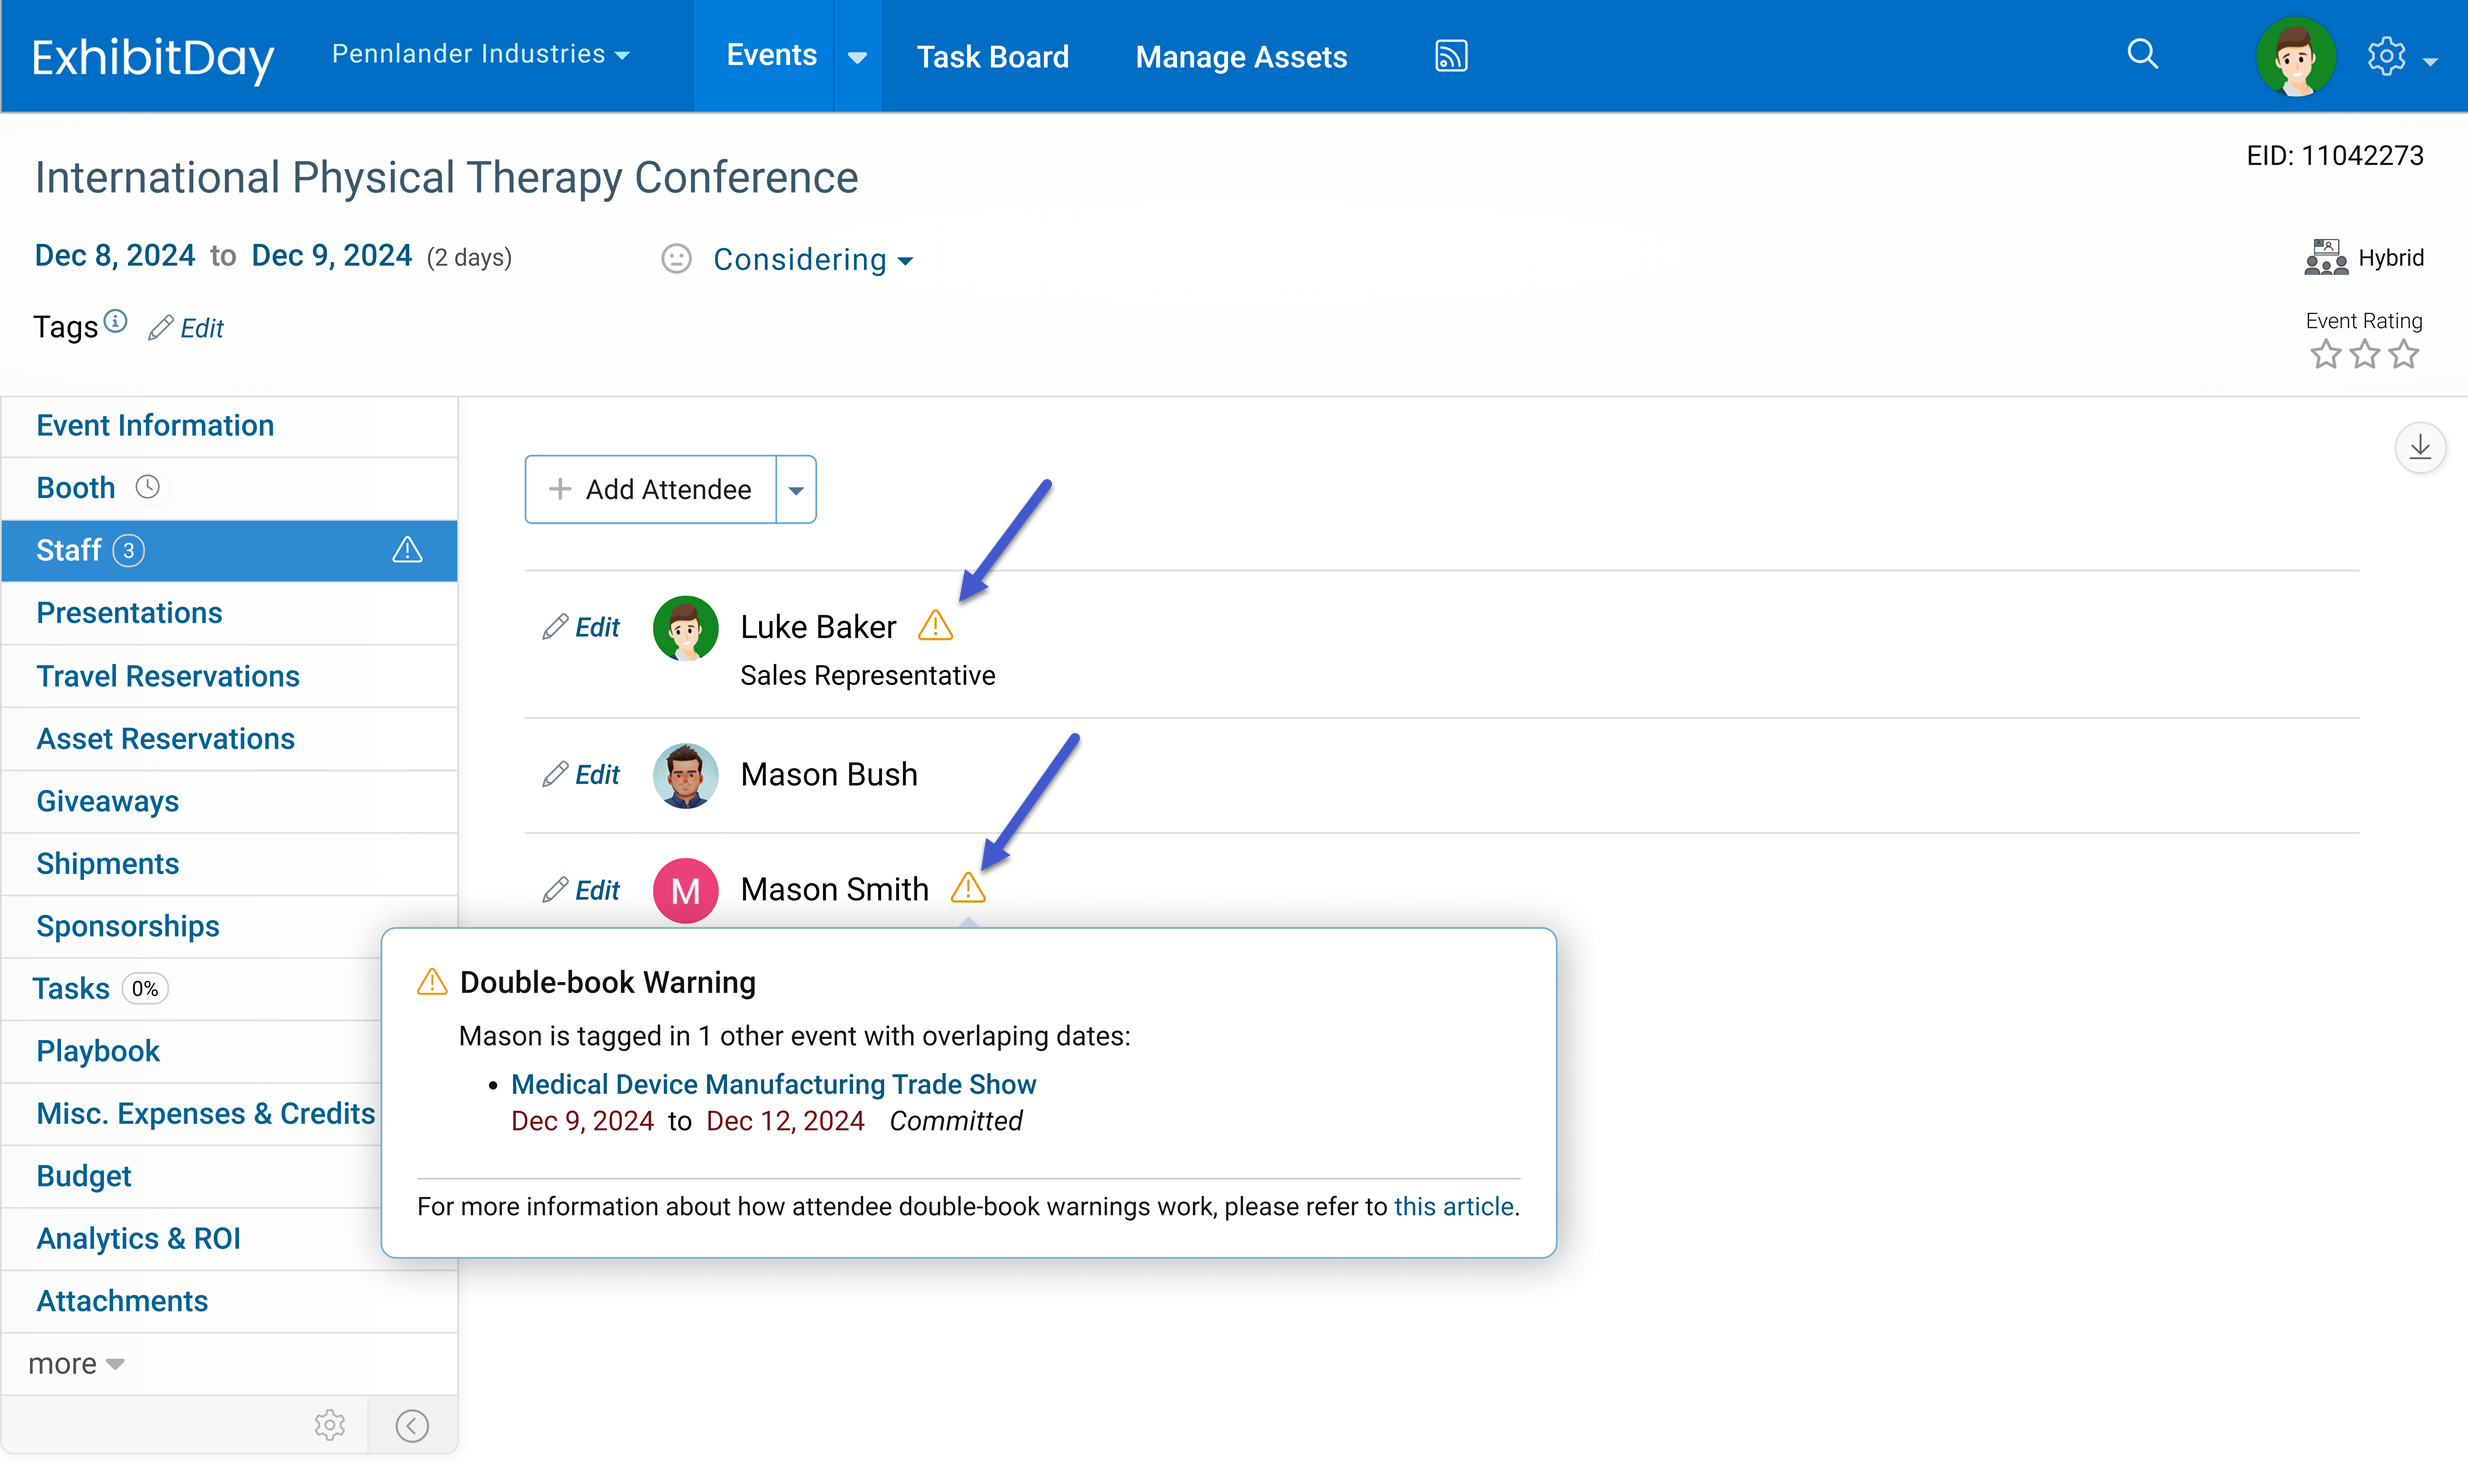
The event Attendee Double-book Warning is a visual indicator (a warning icon) that is displayed next to the attendee’s name (under the Event Staff tab) in case they are tagged as an attendee of another overlapping event – an event with at least one overlapping day based on the event start/end dates. This indicator helps you identify potential scheduling conflicts for attendees who may have accidentally been tagged in more than one event during the same period.
When you click on the warning icon next to an attendee’s name, a tooltip dialog will pop open and display the event(s) causing the conflict.
Customizing the Double-book Warning Behavior
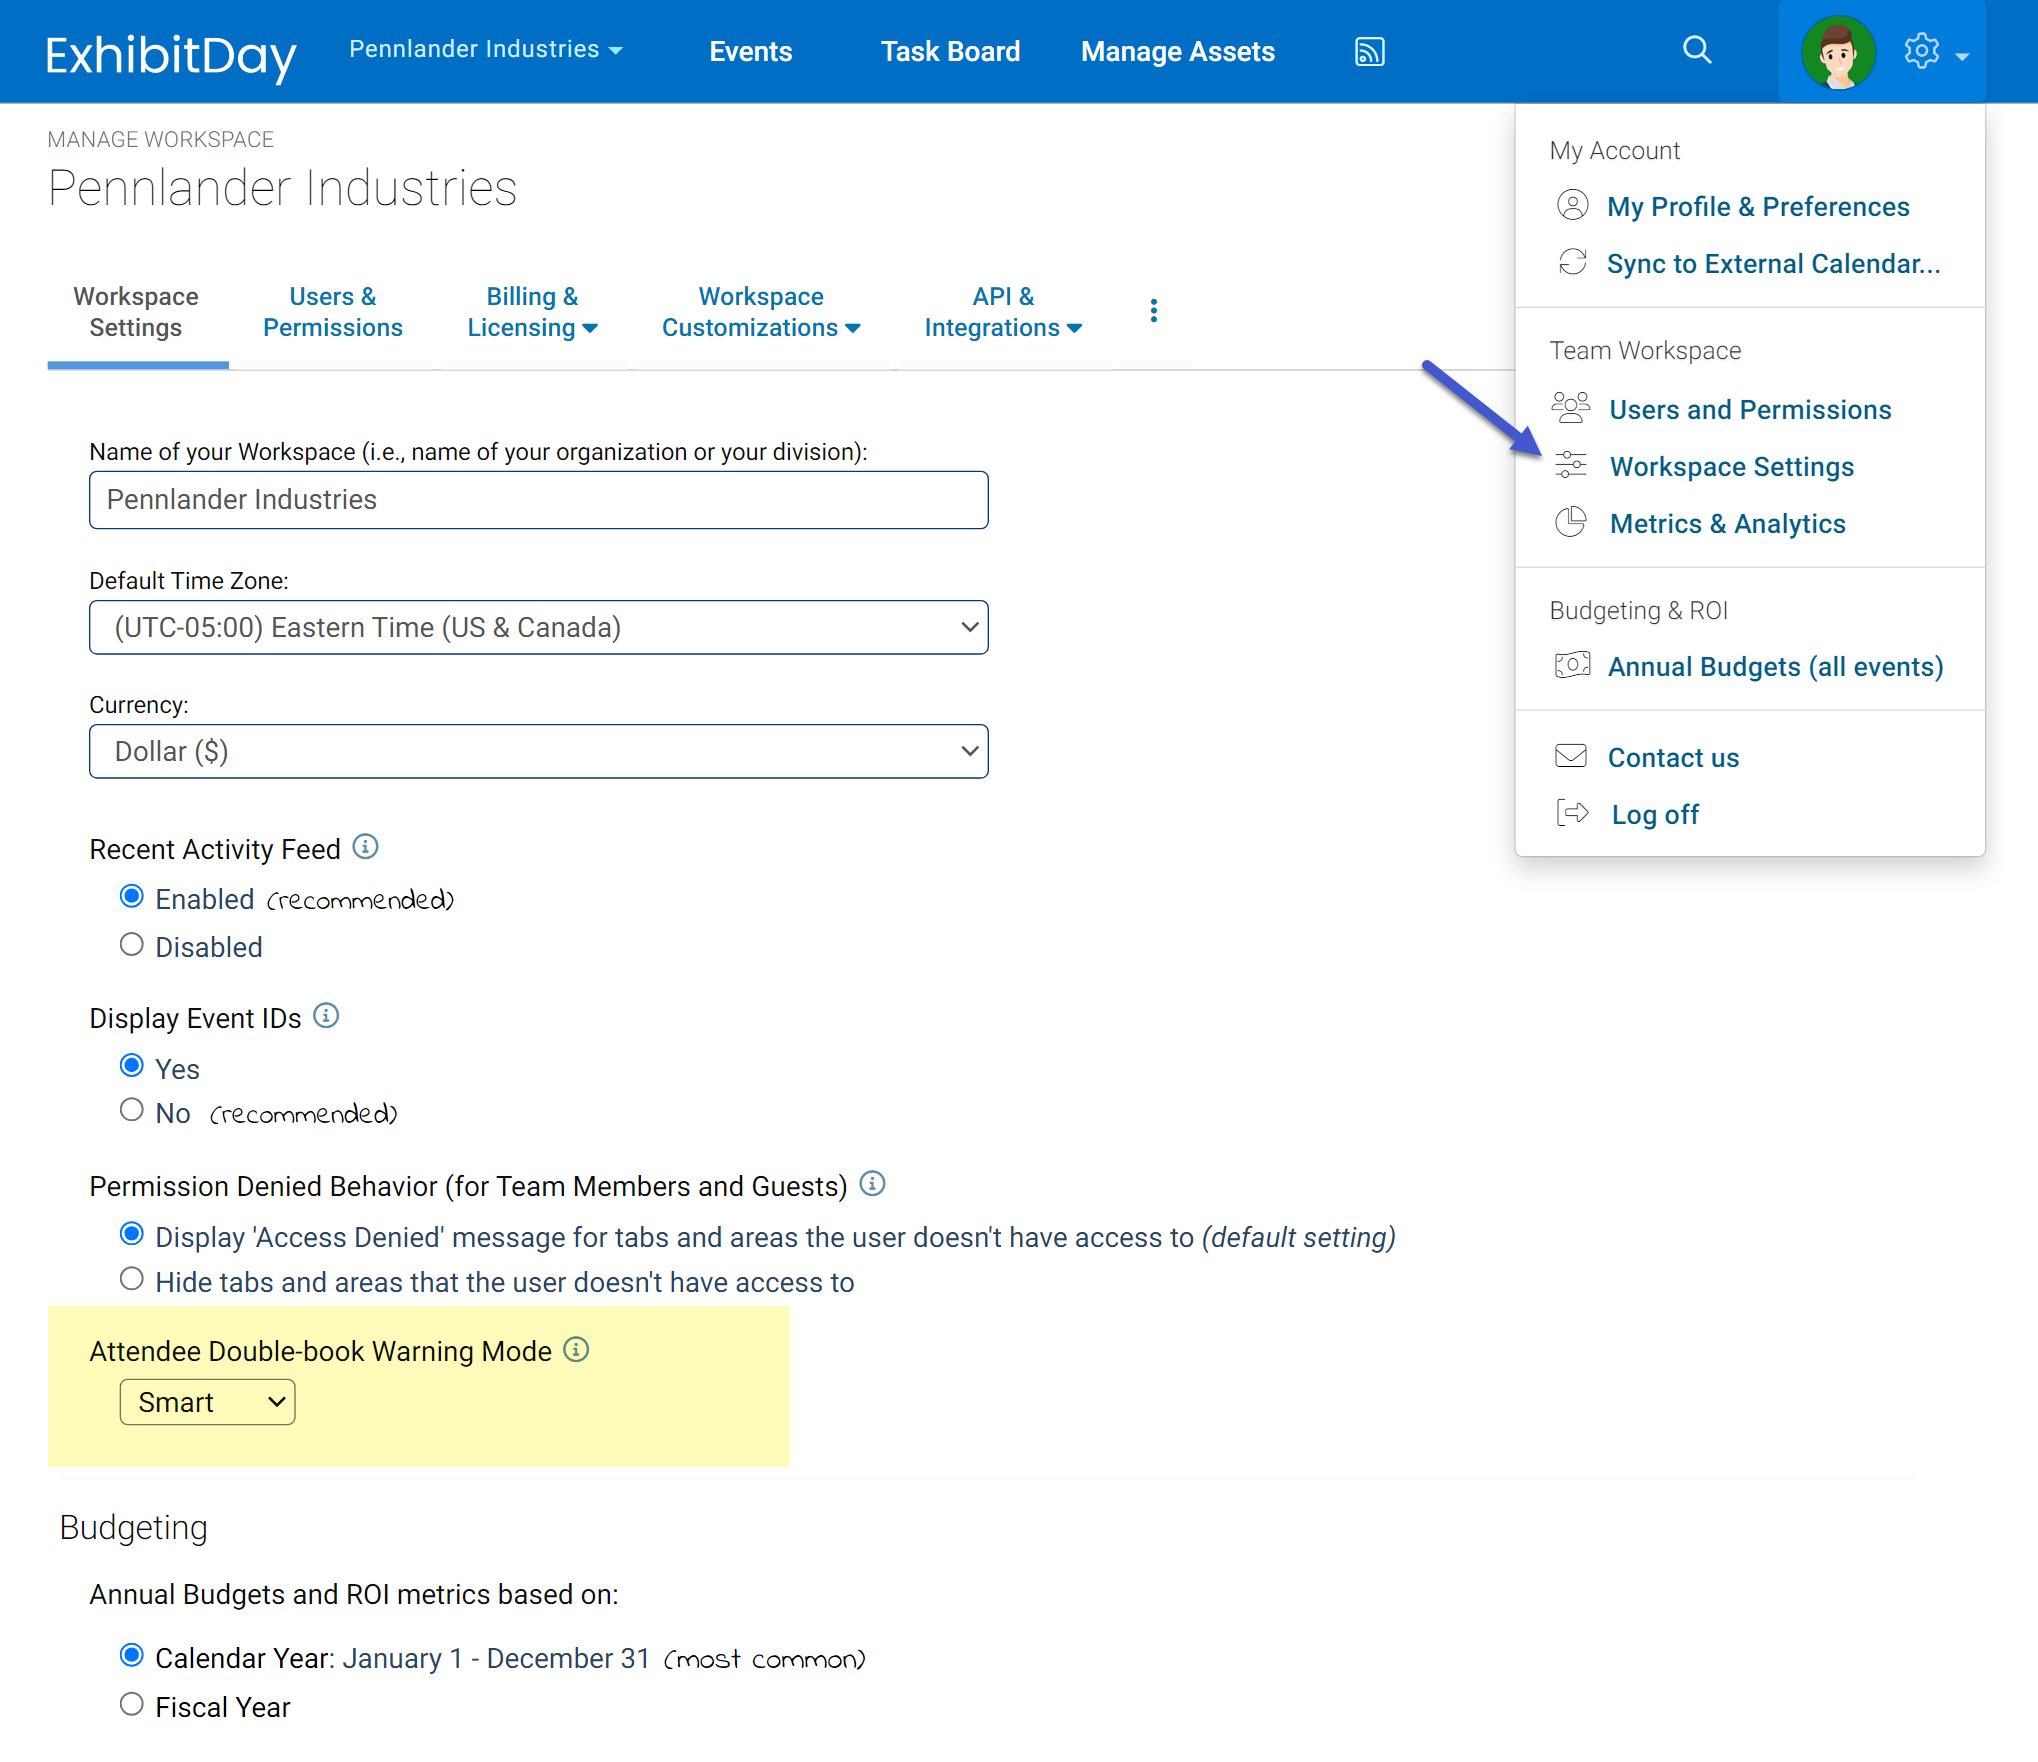
You can customize the way you’d like to have Attendee Double-book Warnings work by going to Workspace Settings > “Attendee Double-book Warning Mode”.
Smart Mode (default setting)
When Smart mode is enabled, the system considers the event’s Participation Type to determine if double-book warnings should be displayed in case of attendee scheduling conflicts.
Specifically:
When viewing the event Staff tab, if a given attendee is also tagged in another event with at least one overlapping day (based on the event start/end dates), a warning icon is displayed next to the attendee’s name. This warning is only displayed if:
1) The event you are viewing is NOTmarked as “Not Going”, and,
2) The other event that causes the conflict is marked as “Committed” (or marked with a custom event Participation Type).
Consider the following example:
John Doe is tagged as an attendee of Event A (which is marked as “Committed”). You create a new event, Event B, that has overlapping days with Event A. You go to Event B and mark it as “Considering” and you tag John Doe as an Attendee. The system will display a double-book warning icon next to John’s name when viewing the Staff tab of Event B (because John is already tagged in another event that is marked as “Committed”). Note: in this scenario, if you view the Staff tab of Event A, the system will not display a double-book warning icon next to John’s name (because the other overlapping event that John is tagged in, Event B, is marked as “Considering”). Let’s say you proceed to mark Event B as “Committed”; now, the system will display a double-book warning next to John Doe’s name when viewing the Staff tab of either Event A or Event B (because no matter which event you view, the other overlapping event John is tagged in is marked as “Committed”).
Strict Mode
When Strict Mode is enabled, the system displays double-book warnings for all event staff scheduling conflicts — regardless of the event’s Participation Type. Under any given event’s Staff tab, if any given attendee is also tagged as an attendee of another event with at least one overlapping day (based on the event start/end dates), a warning icon is displayed next to that attendee’s name.
Disabled
If Disabled is selected, the system will never display a double-book warning icon next to attendee names under the event Staff tab.
You can view metrics and analytics for your events using the Workspace Metrics & Analytics page. To view the Workspace Metrics & Analytics page, click on the “Metrics & Analytics” link in the dropdown menu of the top navigation bar.
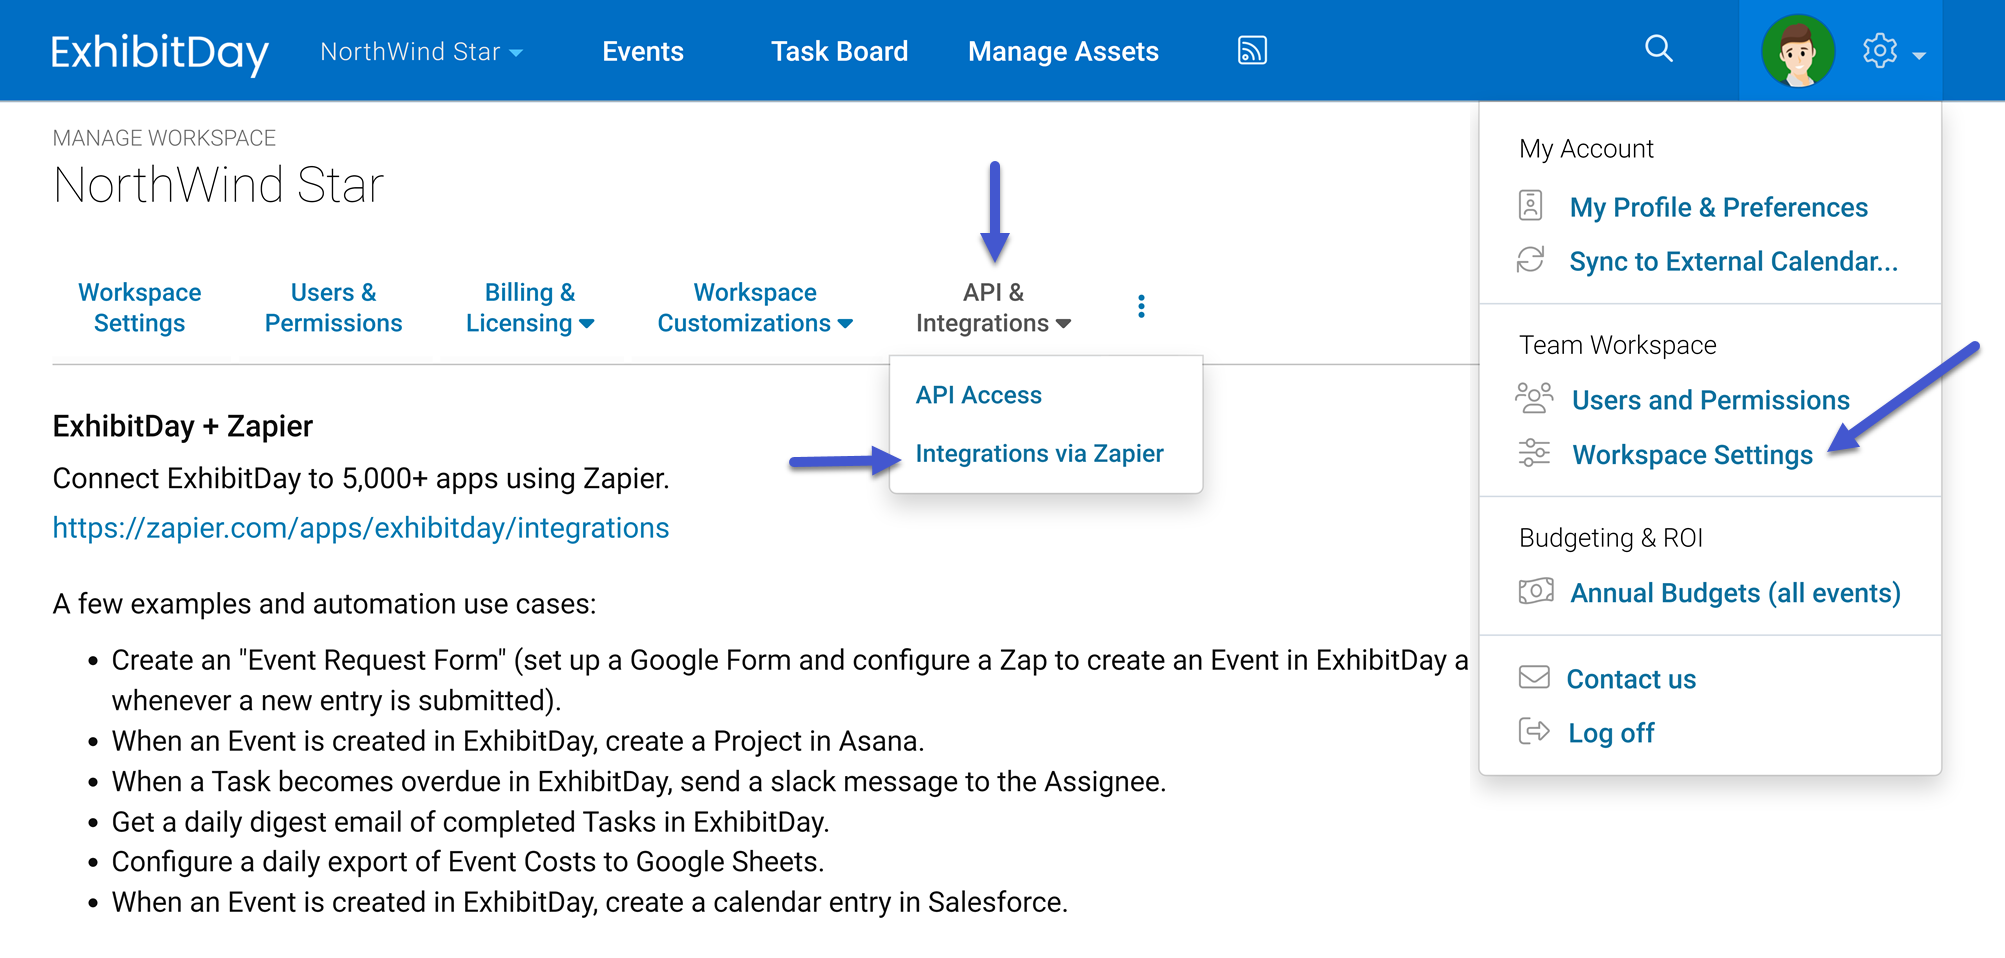
You can create automation between ExhibitDay and 8,000+ apps connected on the Zapier platform.
Here are a few use cases:
When an Event is created in ExhibitDay, create a Project in Asana.
When a Task becomes overdue in ExhibitDay, send a slack message to the Assignee.
Get a daily digest email of completed Tasks in ExhibitDay.
Create an “Event Request Form” (set up a Google Form and configure a Zap to create an Event in ExhibitDay and mark it as “Considering” whenever a new entry is submitted).
Configure a daily export of Event Costs to Google Sheets.
When an Event is created in ExhibitDay, create a calendar entry in Salesforce.
To get started, you’ll need an ExhibitDay API Key. You can obtain your API Key from your ExhibitDay account (under Workspace Settings > API & Integrations > API Access). Once, you have your ExhibitDay API key, you can log into Zapier and start creating Zaps between ExhibitDay and other apps on Zapier.