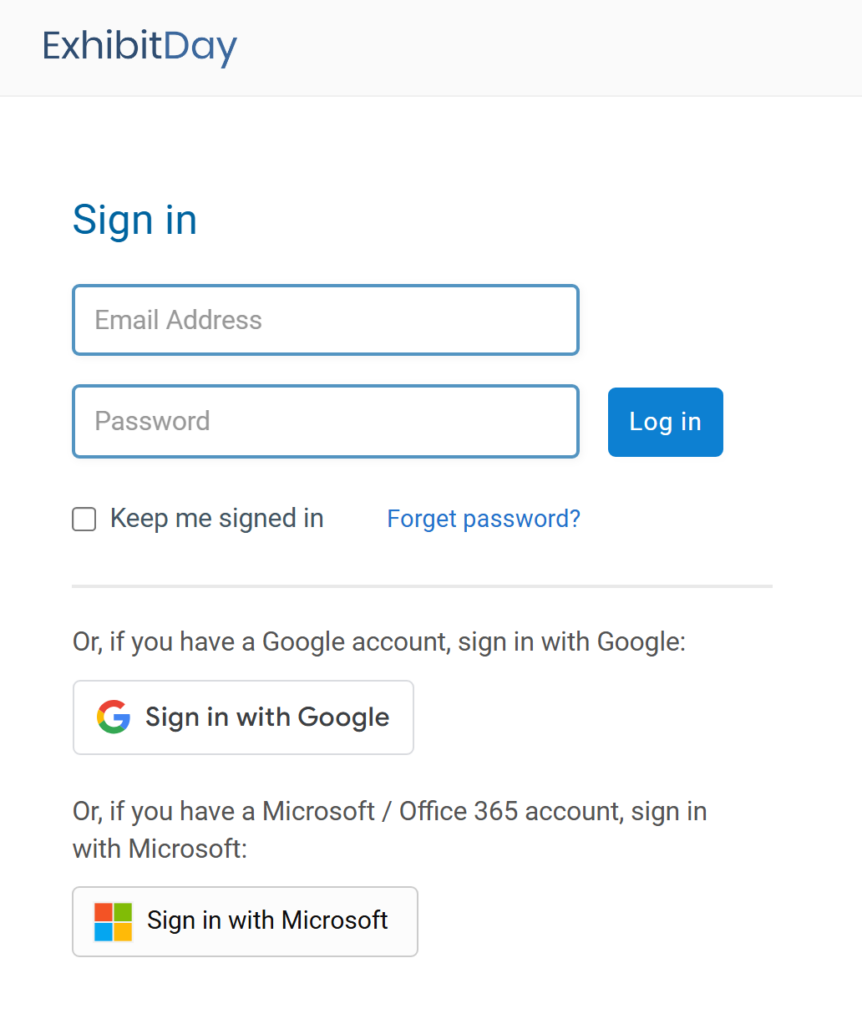
Categorizing Event Tasks Using Sections

Task Sections help you categorize tasks (under a given event’s Tasks tab) by grouping them together. For example, you can create a “High Priority” section for urgent tasks or an “In-progress” section for tasks currently being worked on.

Adding a Task Section to an Event

You can add sections to an event’s tasks tab using the dropdown menu of the “Add Task” button.

Note: Task sections are event-specific. When you add/rename/reorder/delete task sections for a given event, the task sections for other events are not affected.

Add a task section

Once you add your first section to an event’s Tasks tab, the system automatically adds a section called “Uncategorized”. This section is used for tasks that haven’t been categorized yet.

Configurating Task Sections for an Event

After you create task sections for an event, you can rename, reorder, or delete the sections using the “Configure Task Sections” popup dialog. To open the “Configure Task Sections” dialog, click the pencil icon next to any of the task section names on the board.

Edit Task Sections

Once the “Configure Task Sections” dialog appears, make your changes to the list of sections and simply close the dialog.

Configure Task Sections for an Event

You can reorder the task sections by grab-and-dragging the handle to the right of each section. The “Uncategorized Tasks” section can only be placed either at the top or at the bottom of the list.

Creating Default Task Sections (sections that automatically get created whenever you add a new event).

Default Event Task Sections are task sections that automatically get created whenever you add a new event to your workspace. You can configure default task sections for your workspace under: Workspace Settings > Workspace Customizations > Configure Default Event Task Sections.

Applying Default Task Sections to Existing Events

Once you have created default task sections for new events in your workspace, you can also apply them to existing events using the “Apply to all existing events” button at the bottom of the default sections list.

What happens when you apply the default task sections to all existing events

When you click the “Apply to all existing events” button, this is how the default task sections get applied to each existing event: 

  • If the existing event has no task sections, all of the default task sections will be added to it (in the same order as listed on the workspace settings page).
  • If the event already has at least one task section:
    • The default task sections will be added to top of the list of sections for the event.
    • To avoid duplicate sections, if the event already has a task section that matches the name of one of the default sections, that section will not get added to the event.
    • The position of the Uncategorized section for the event will be updated to match the position of the Uncategorized tasks in the default task sections (i.e. if the Uncategorized section in the default task sections is at the top, the Uncategorized tasks for the event will be moved to the top; if the Uncategorized section is at the bottom, the Uncategorized tasks for the event will be moved to the bottom).

Note: Once you apply the default task sections to your existing events, you won’t be able to rename or delete them in bulk (you’d have to go to each event’s Tasks tab in order to make changes to the task sections for that event).

Travel Reservations: Multi-select and Bulk Export / Delete

You can selectively choose multiple travel reservations to export or delete.

In order to enable multi-select, click on the multi-select button located at the top-right of the event Travel Reservations tab; when the checkboxes appear (to the right of each travel reservation), choose the reservation(s) that you’d like to export or delete. Then, click on the “Bulk Action” dropdown button and choose the action you’d like to apply to your selection.

Event Custom Date/Time Fields

You can now add custom Date/Time fields to the “Info” and “Booth” tabs of your Events in ExhibitDay.

Custom Date Time Field Settings

Custom Date/Time Field Types

There are 6 different Date/Time field types that you can add to your events.

1. Date

The Date field adds a Calendar control to your events. There is also an optional Notes field that can be used to add notes about the selected date.

Custom Date Exmaple
2. Time

The Time field adds a time-selector control to your events. The custom Time field also comes with an optional Time Zone field and an optional Notes field.

Custom Time Example
3. Date + Time

The “Date + Time” custom field lets you specify a date and a time (i.e. a timestamp). This field provides a calendar control for selecting a date and a time-selector control for specifying a time. This custom field also comes with an optional Time Zone field and an optional Notes field.

Date Time field Example
4. Date + Time Period

The “Date + Time Period” custom field lets you specify a date and start/end times. This field provides a calendar control for selecting a date and time-selector controls for specifying a start time and an end time. This custom field also comes with an optional Time Zone field and an optional Notes field.

Date + time Period Exmaple
5. Date Range

The “Date Range” custom field lets you specify a start date and an end date using calendar controls. This custom field also comes with an optional Notes field.

Date Range Example
5. Date Range with Time

The “Date Range with Time” custom field lets you specify a start date/time and an end date/time using calendar and time-selector controls. This custom field also comes with an optional Time Zone field and an optional Notes field.

Specifying the Location for Scheduled Items in the Event Playbook

We just released the ability to specify the location for a scheduled item in your Event Playbook in ExhibitDay.

The New Location Field

You can now use the new Location field in the scheduled items in your Event Playbook to specify where the scheduled item takes place. For example, for a meeting with a client, you can specify which meeting room the meeting will take place in; or, for speaking engagements, you can specify where the speaker will be presenting.

Location for Scheduled Playbook Items for Trade Shows and Exhibits

Sign up for a free ExhibitDay account to plan your trade shows and collaborate on tasks with your event team.

A Few More ExhibitDay Enhancements

We recently made the following Enhancements to ExhibitDay:

Travel Reservation File Attachments

In addition to the reservation invoice, you can now attach any number of files (e.g. itinerary, boarding pass, etc.) to a travel reservation.

Trade Show Trade Reservation Attachment

Rearranging Travel Reservations

Similar to how ExhibitDay tasks can be rearranged on the task board, you can now re-arrange travel reservations (under the Event [Travel] tab). Use the move-arrows (at the top-right corner) to drag-and-drop reservations into any display order you prefer to see them in.

Rearrange Travel Reservations

Note: the functionality for Re-arranging travel reservations is not available on mobile browsers (only available on desktop).

Tracking Connections/Layover Information for flights

We have added new text fields to Flight Reservations in order to track connection information for flights with layovers.

Flight Layover Connection Information

Shipment File Attachments

In addition to the shipment invoice, you can now attach any number of files (e.g. proof of shipment/delivery, etc.) under the Event [Shipments] tab.

Shipment File Attachment

“Attach-able” Custom Fields (file upload control)

When you customize the [Info] and the [Booth] tabs for your events, in addition to the standard text fields, you now have the option to add a file upload control as a custom field. The custom file upload control field allows you to attach documents like your “Insurance Contract Document” or “Lead Retrieval File” to your Events.

Custom File Upload Control

Once you’ve added a custom File Attachment field to your ExhibitDay Workspace, it will automatically show up in your events as file upload control. You can use the file upload control to attach documents under the Info/Booth tabs.

Attach files to your Trade Shows and Exhibits

Sign up for a free ExhibitDay account to plan your trade shows and collaborate on tasks with your event team.