
You can filter the event Travel Reservations tab by anyone who is tagged in your travel reservations. Use the filter button at the top-right corner of the event Travel Reservations tab to filter your list of reservations by traveler.
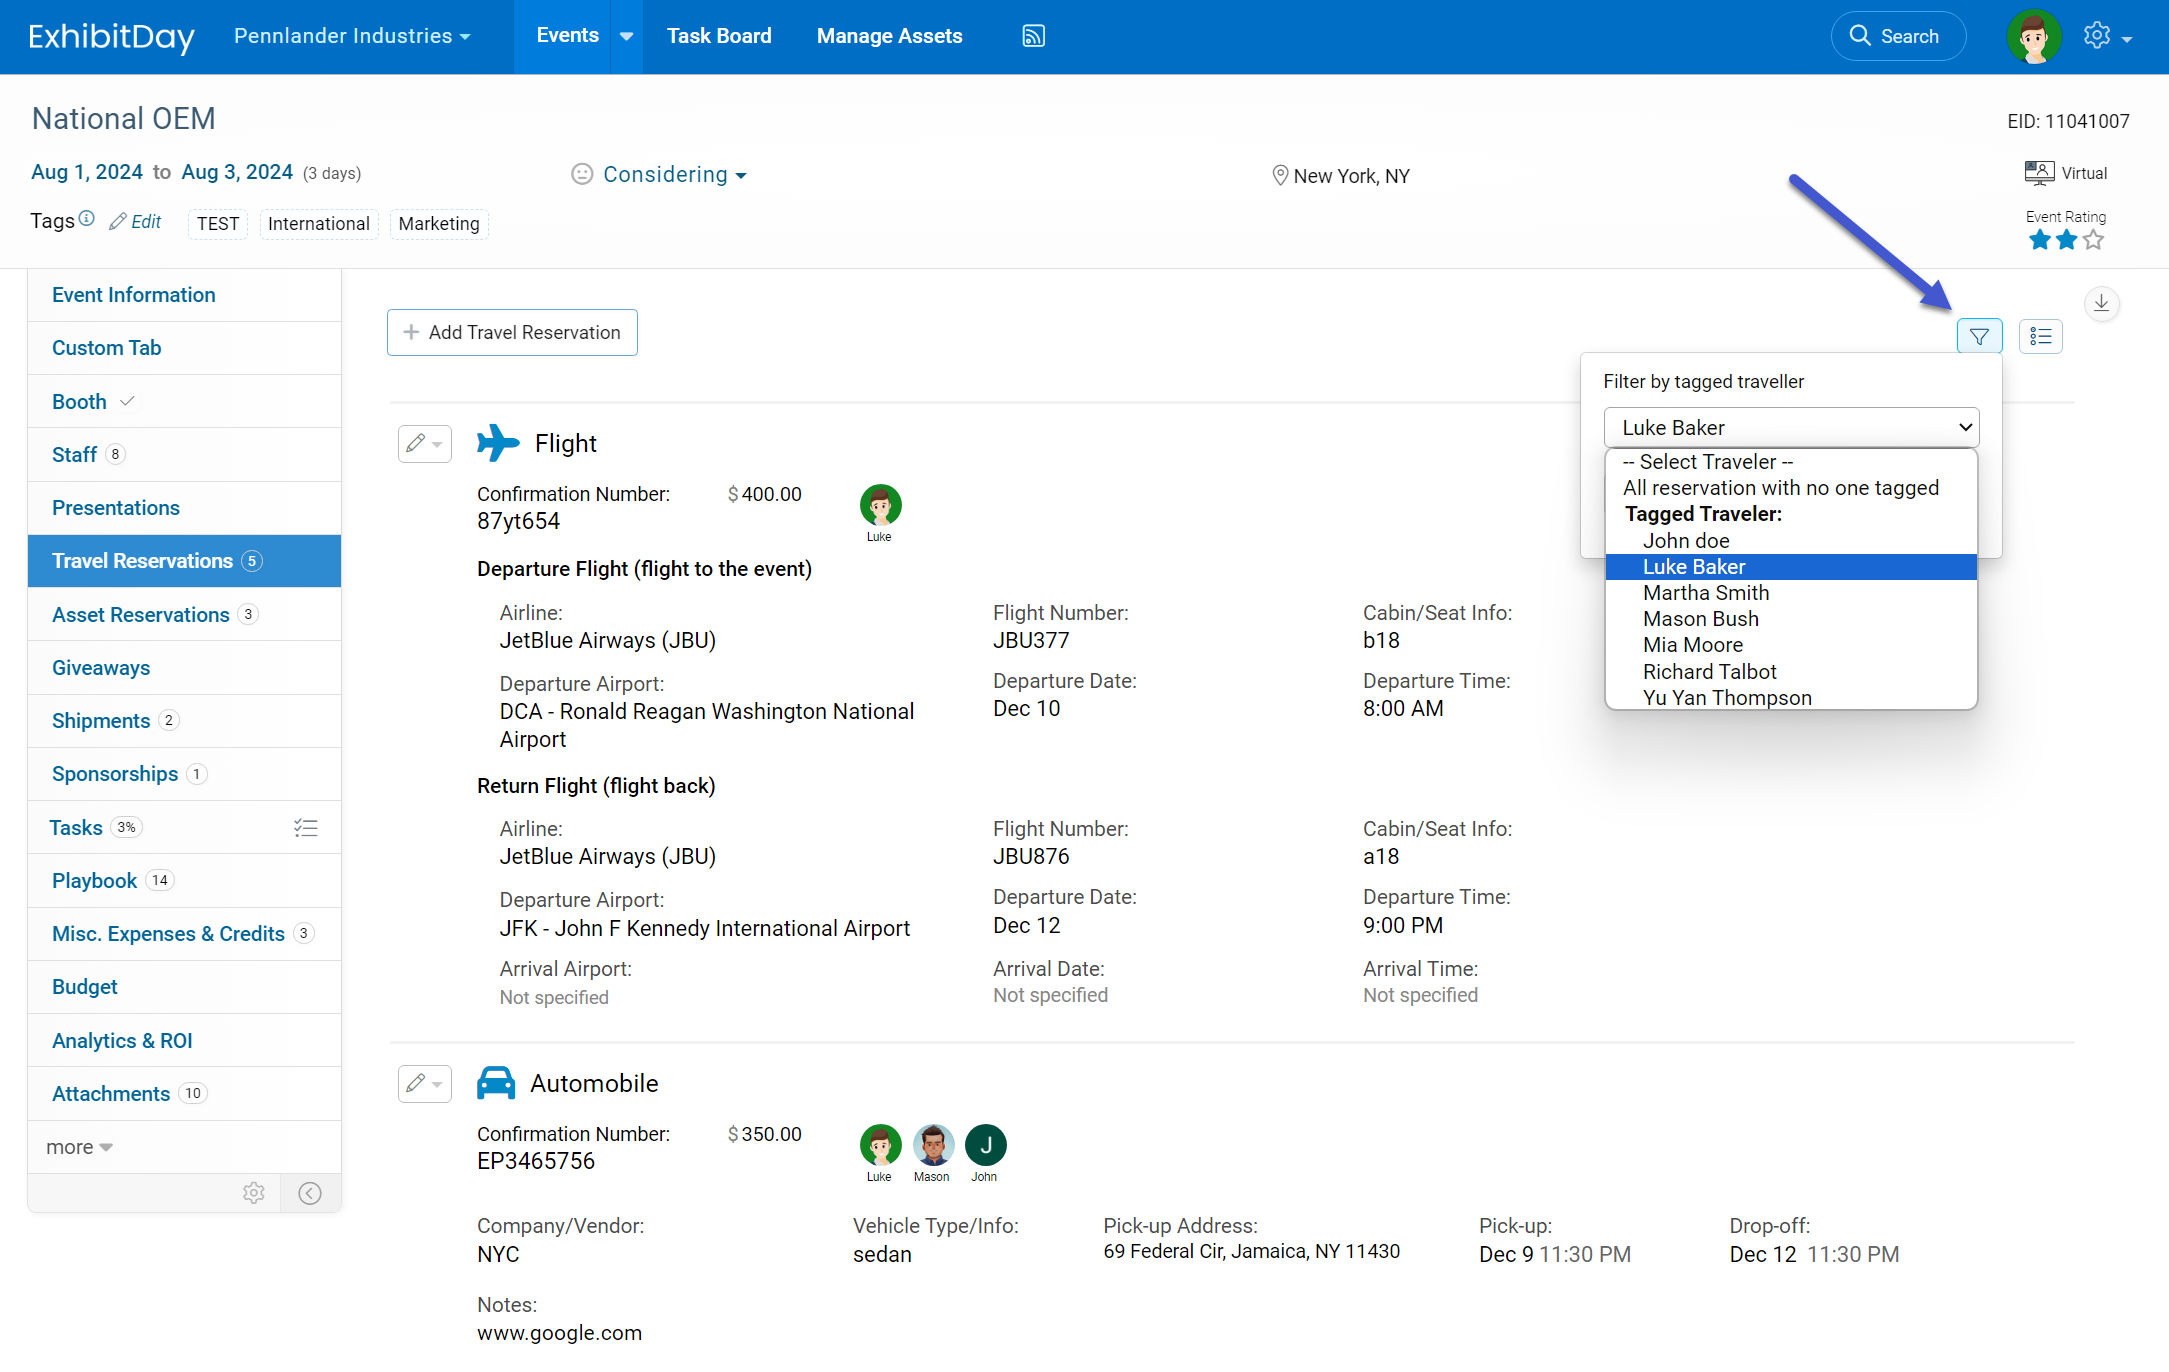
You can filter the event Travel Reservations tab by anyone who is tagged in your travel reservations. Use the filter button at the top-right corner of the event Travel Reservations tab to filter your list of reservations by traveler.
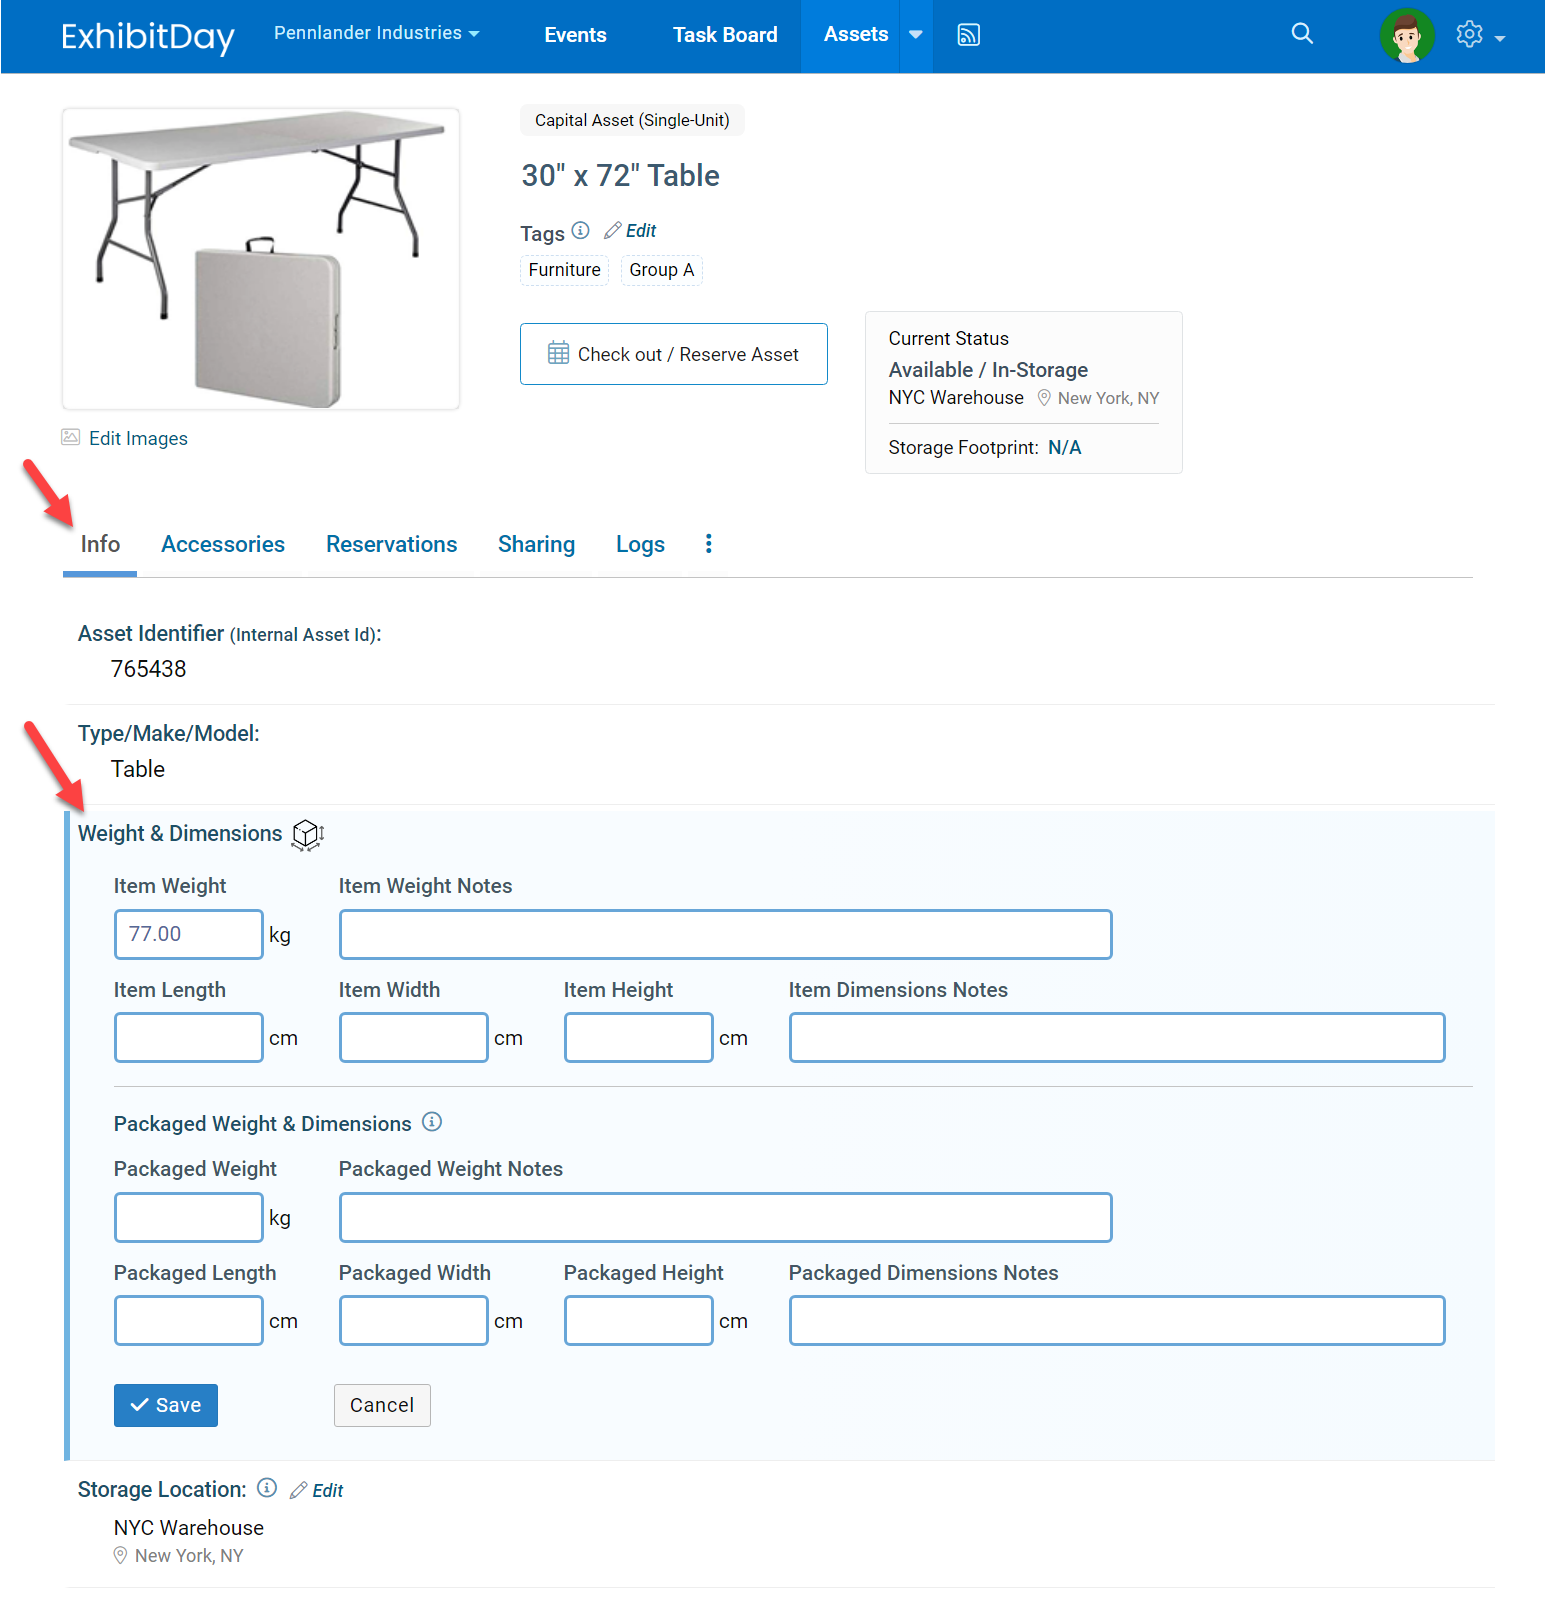
You can specify weight and dimensions (L x W x H) for an asset under the asset Info tab. Additionally, you can specify the Packaged Weight and Dimensions for the asset. Packaged Weight and Dimensions (L x W x H) are the weight and dimensions of the asset when the asset is packaged/unassembled (while in storage or during shipment).
The Storage Footprint is the amount of space (volume) this asset occupies in storage.
When viewing a Capital Asset (single-quantity items like your booth and display), the Storage Footprint is displayed underneath the Asset’s Status (right after the asset information).
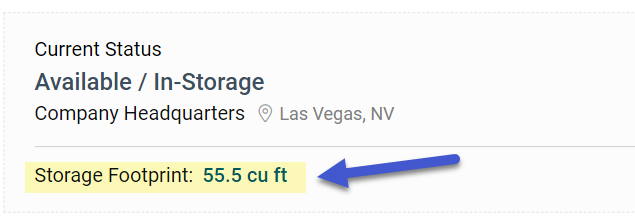
The Storage Footprint for Capital Assets is calculated based on the asset’s dimensions.
Storage Footprint = Length x Width x Height
Note: If Packaged Dimensions are specified for an asset, then Packaged Dimensions will be used for the calculation of the asset’s Storage Footprint. Otherwise, the Item Dimensions will be used for the calculation of the asset’s Storage Footprint.
When viewing a Collateral/Multi-quantity asset (like swag and marketing material), the Storage Footprint and the Projected/Future Storage Footprint are displayed underneath the Asset’s Quantity in Storage section of the page (right after the asset information).
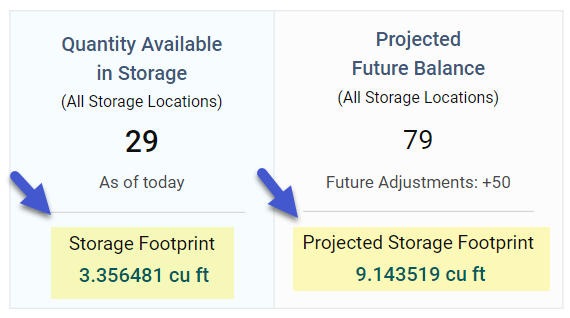
The Storage Footprint for Collateral/Multi-quantity assets is calculated based on dimensions and quantity in storage.

Storage Footprint = [Quantity in Storage] x Length x Width x Height
If Packaged Dimensions are specified for an asset, then Packaged Dimensions will be used for the calculation of the asset’s Storage Footprint. Otherwise, the Item Dimensions will be used for the calculation of the asset’s Storage Footprint.
Note: Typically, Packaged Dimensions are only specified for Capital Assets (single-unit items like your booth, display and furniture). For Collateral/Multi-quantity items (like swag and marketing material), Packaged Dimensions can be left blank. But, if you would like to enter the Packaged Dimensions for a Collateral/Multi-quantity asset, please enter the Packaged Dimension of a single unit of the item (not the Packaged Dimensions of a group/pack of the item); this is because the calculation of Storage Footprint for Collateral/Multi-quantity items will take into consideration the quantity of the item available in storage – meaning that if you enter the Packaged Dimensions of a group/pack of the item, the Storage Footprint will become erroneously inflated.
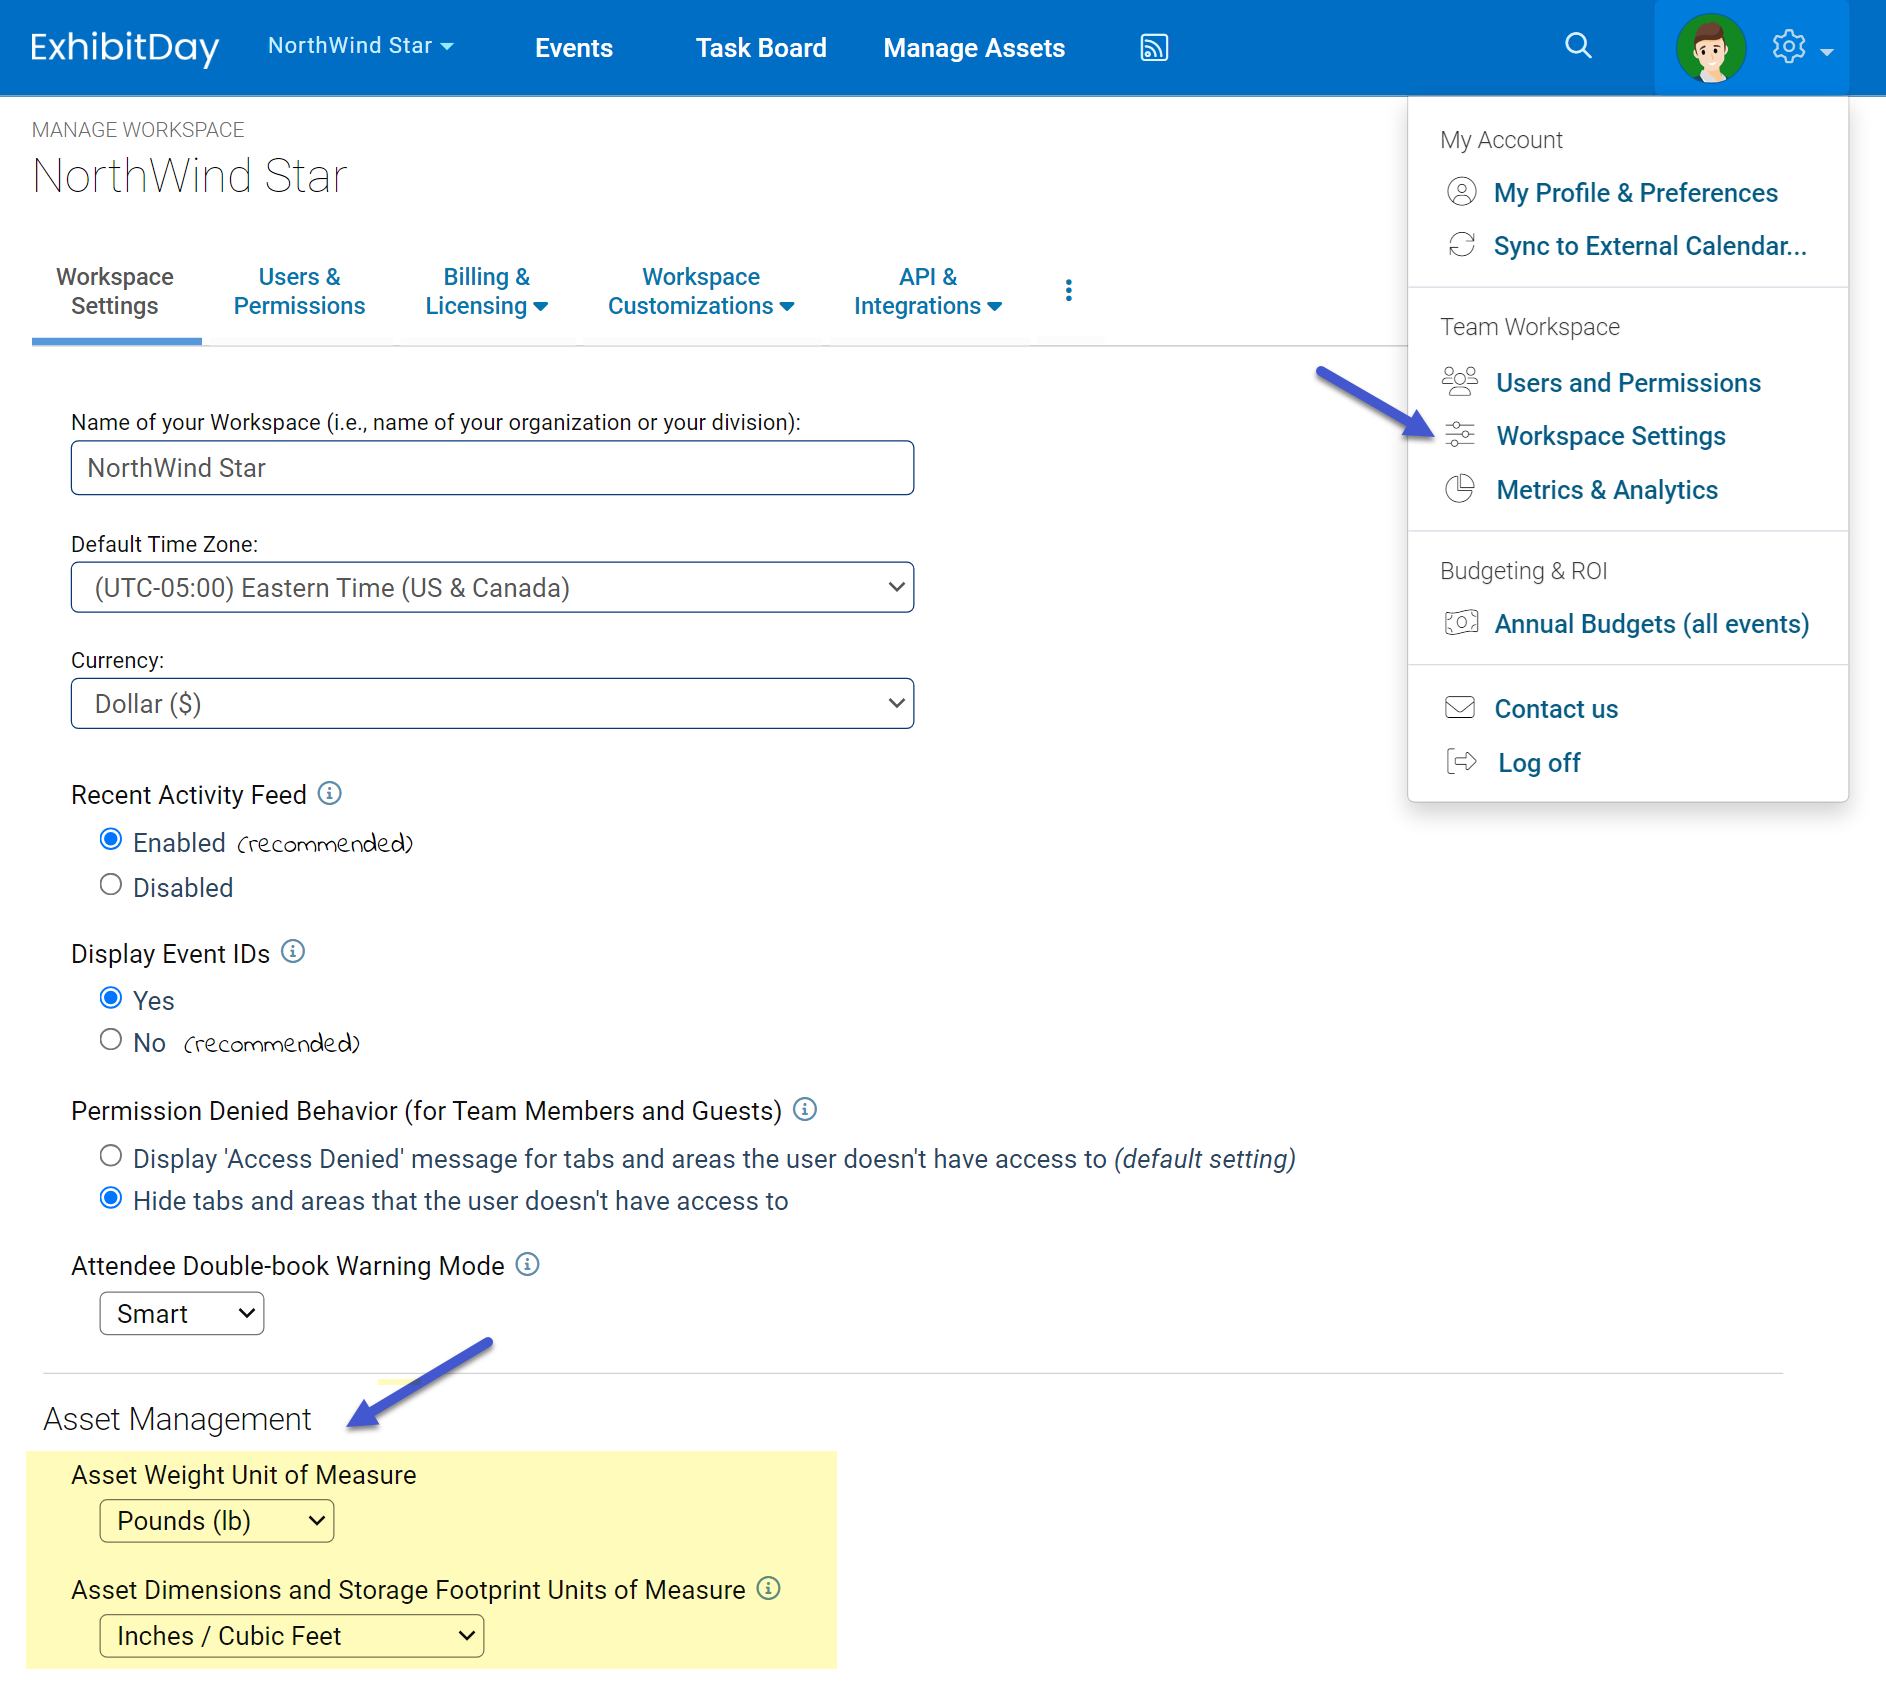
You can change the units of measurement for asset weight and dimensions under Workspace Settings.
The event Attendee Double-book Warning is a visual indicator (a warning icon) that is displayed next to the attendee’s name (under the Event Staff tab) in case they are tagged as an attendee of another overlapping event – an event with at least one overlapping day based on the event start/end dates. This indicator helps you identify potential scheduling conflicts for attendees who may have accidentally been tagged in more than one event during the same period.
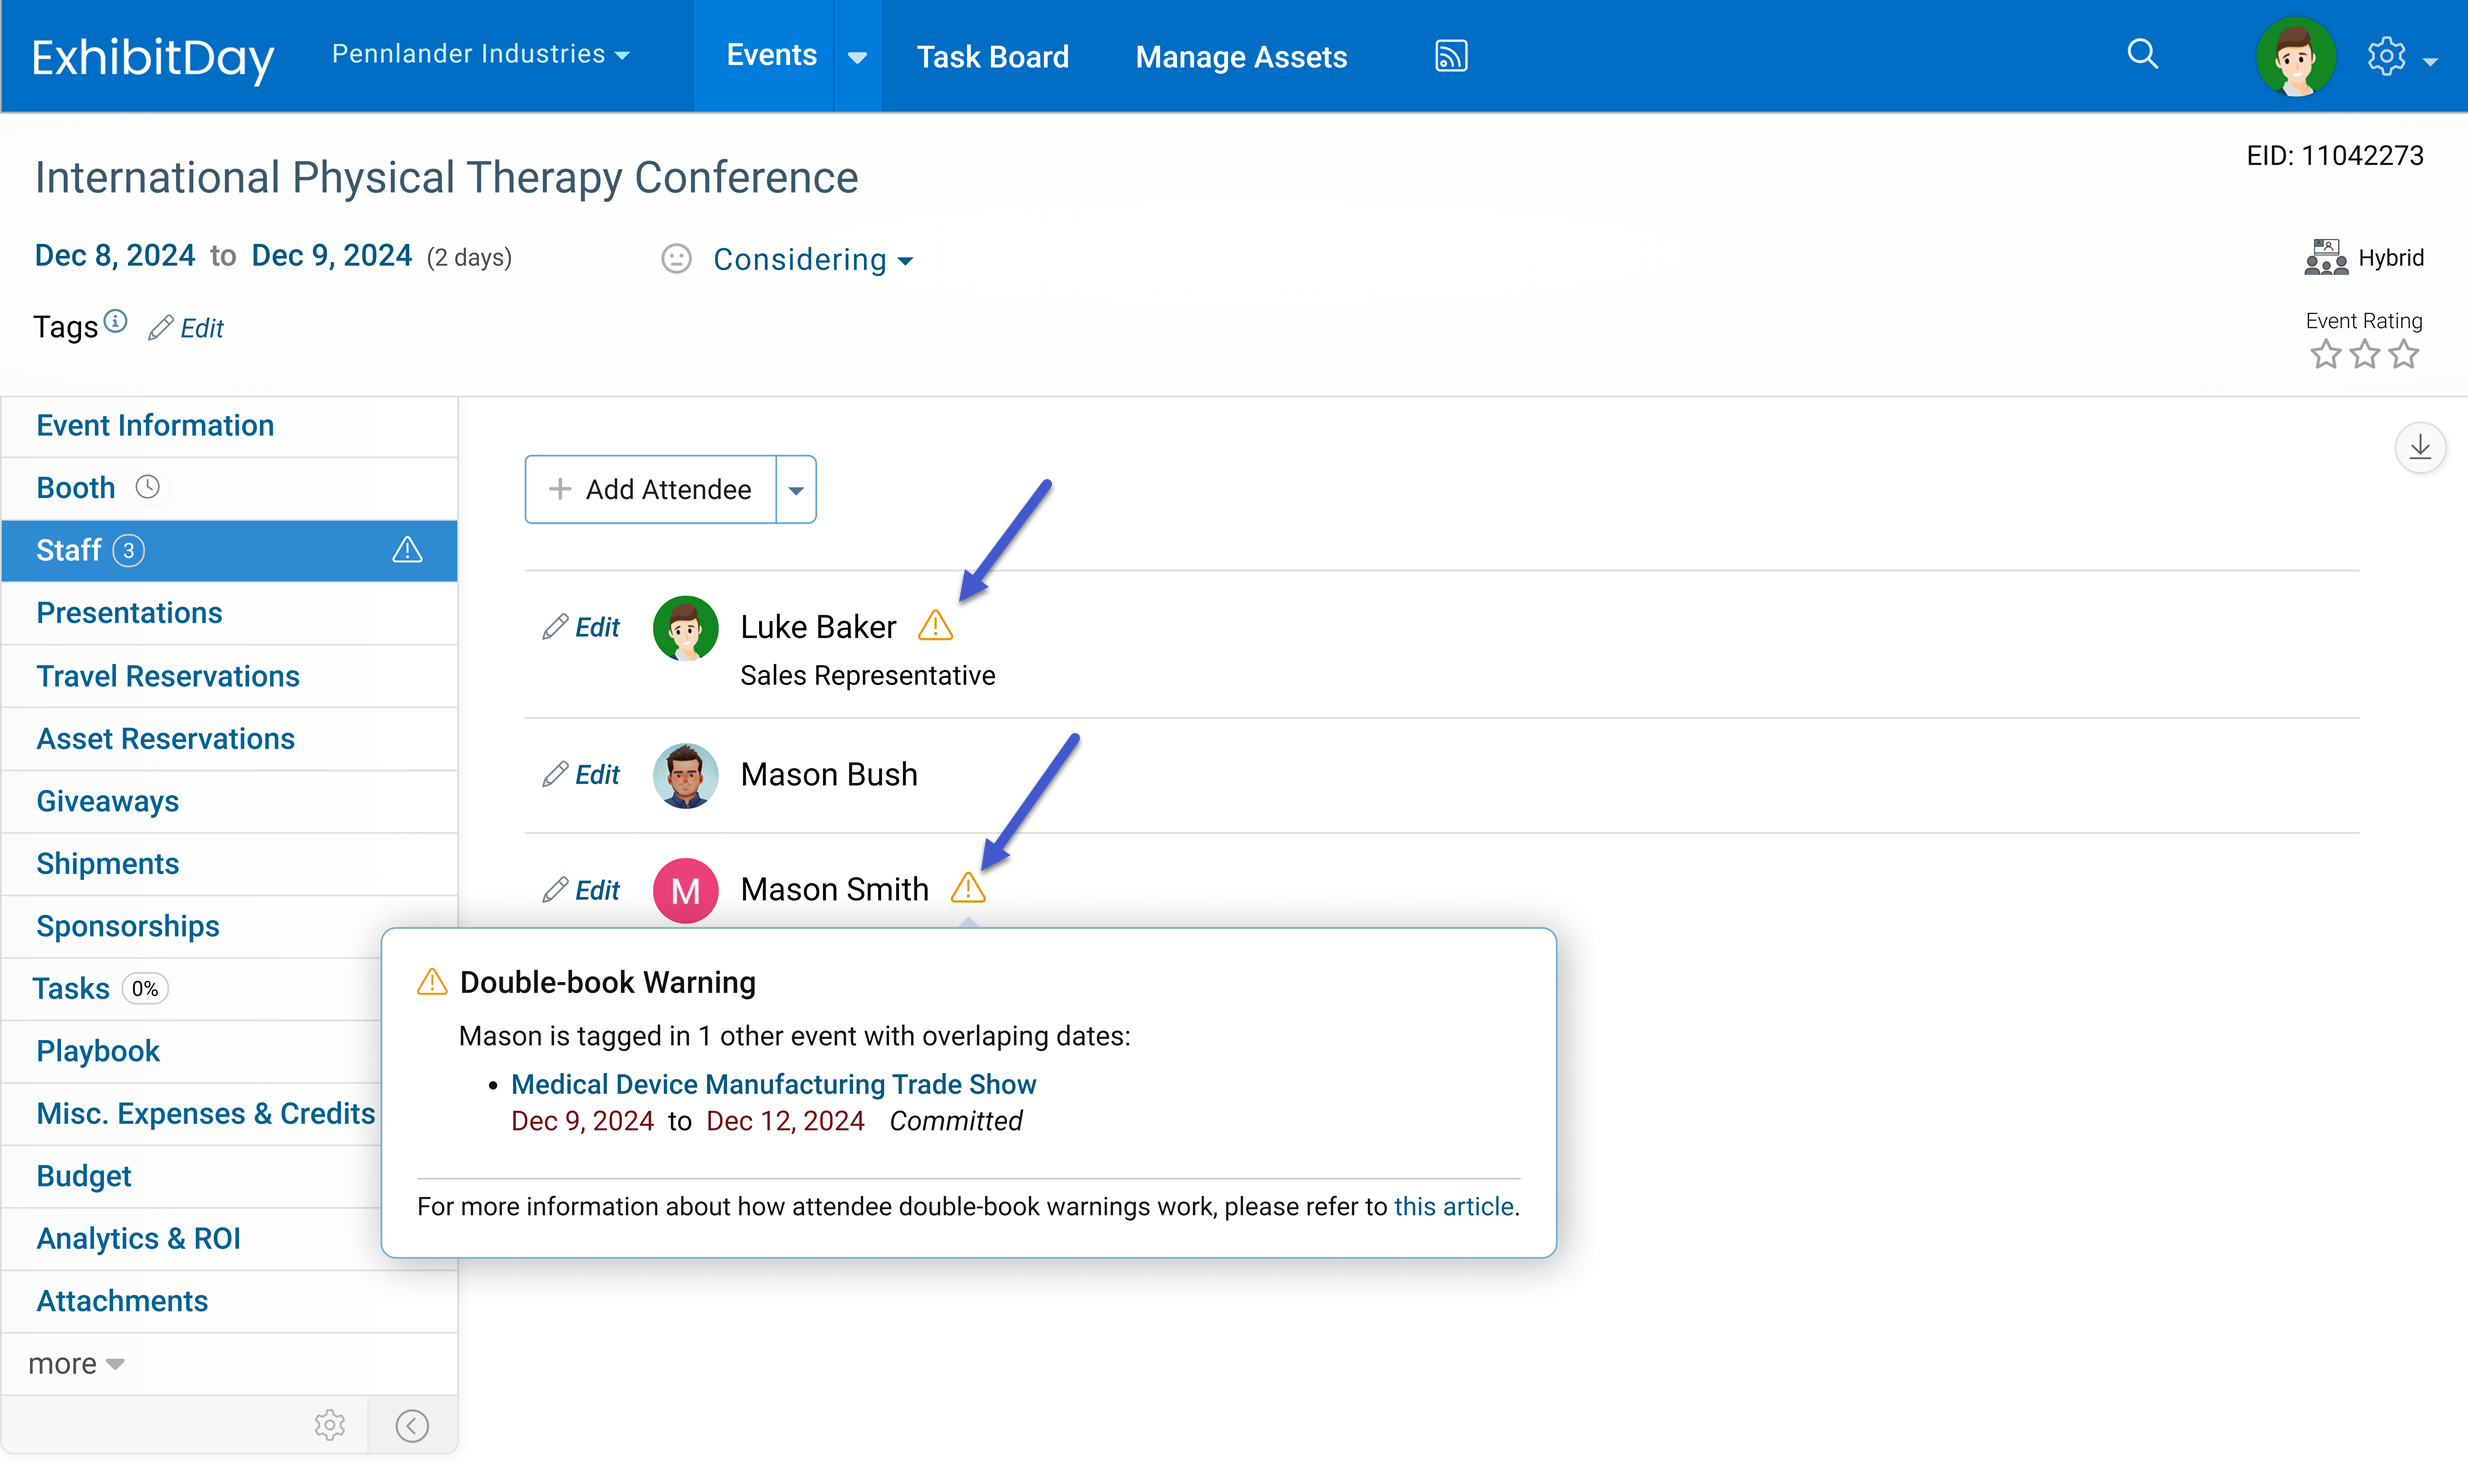
When you click on the warning icon next to an attendee’s name, a tooltip dialog will pop open and display the event(s) causing the conflict.
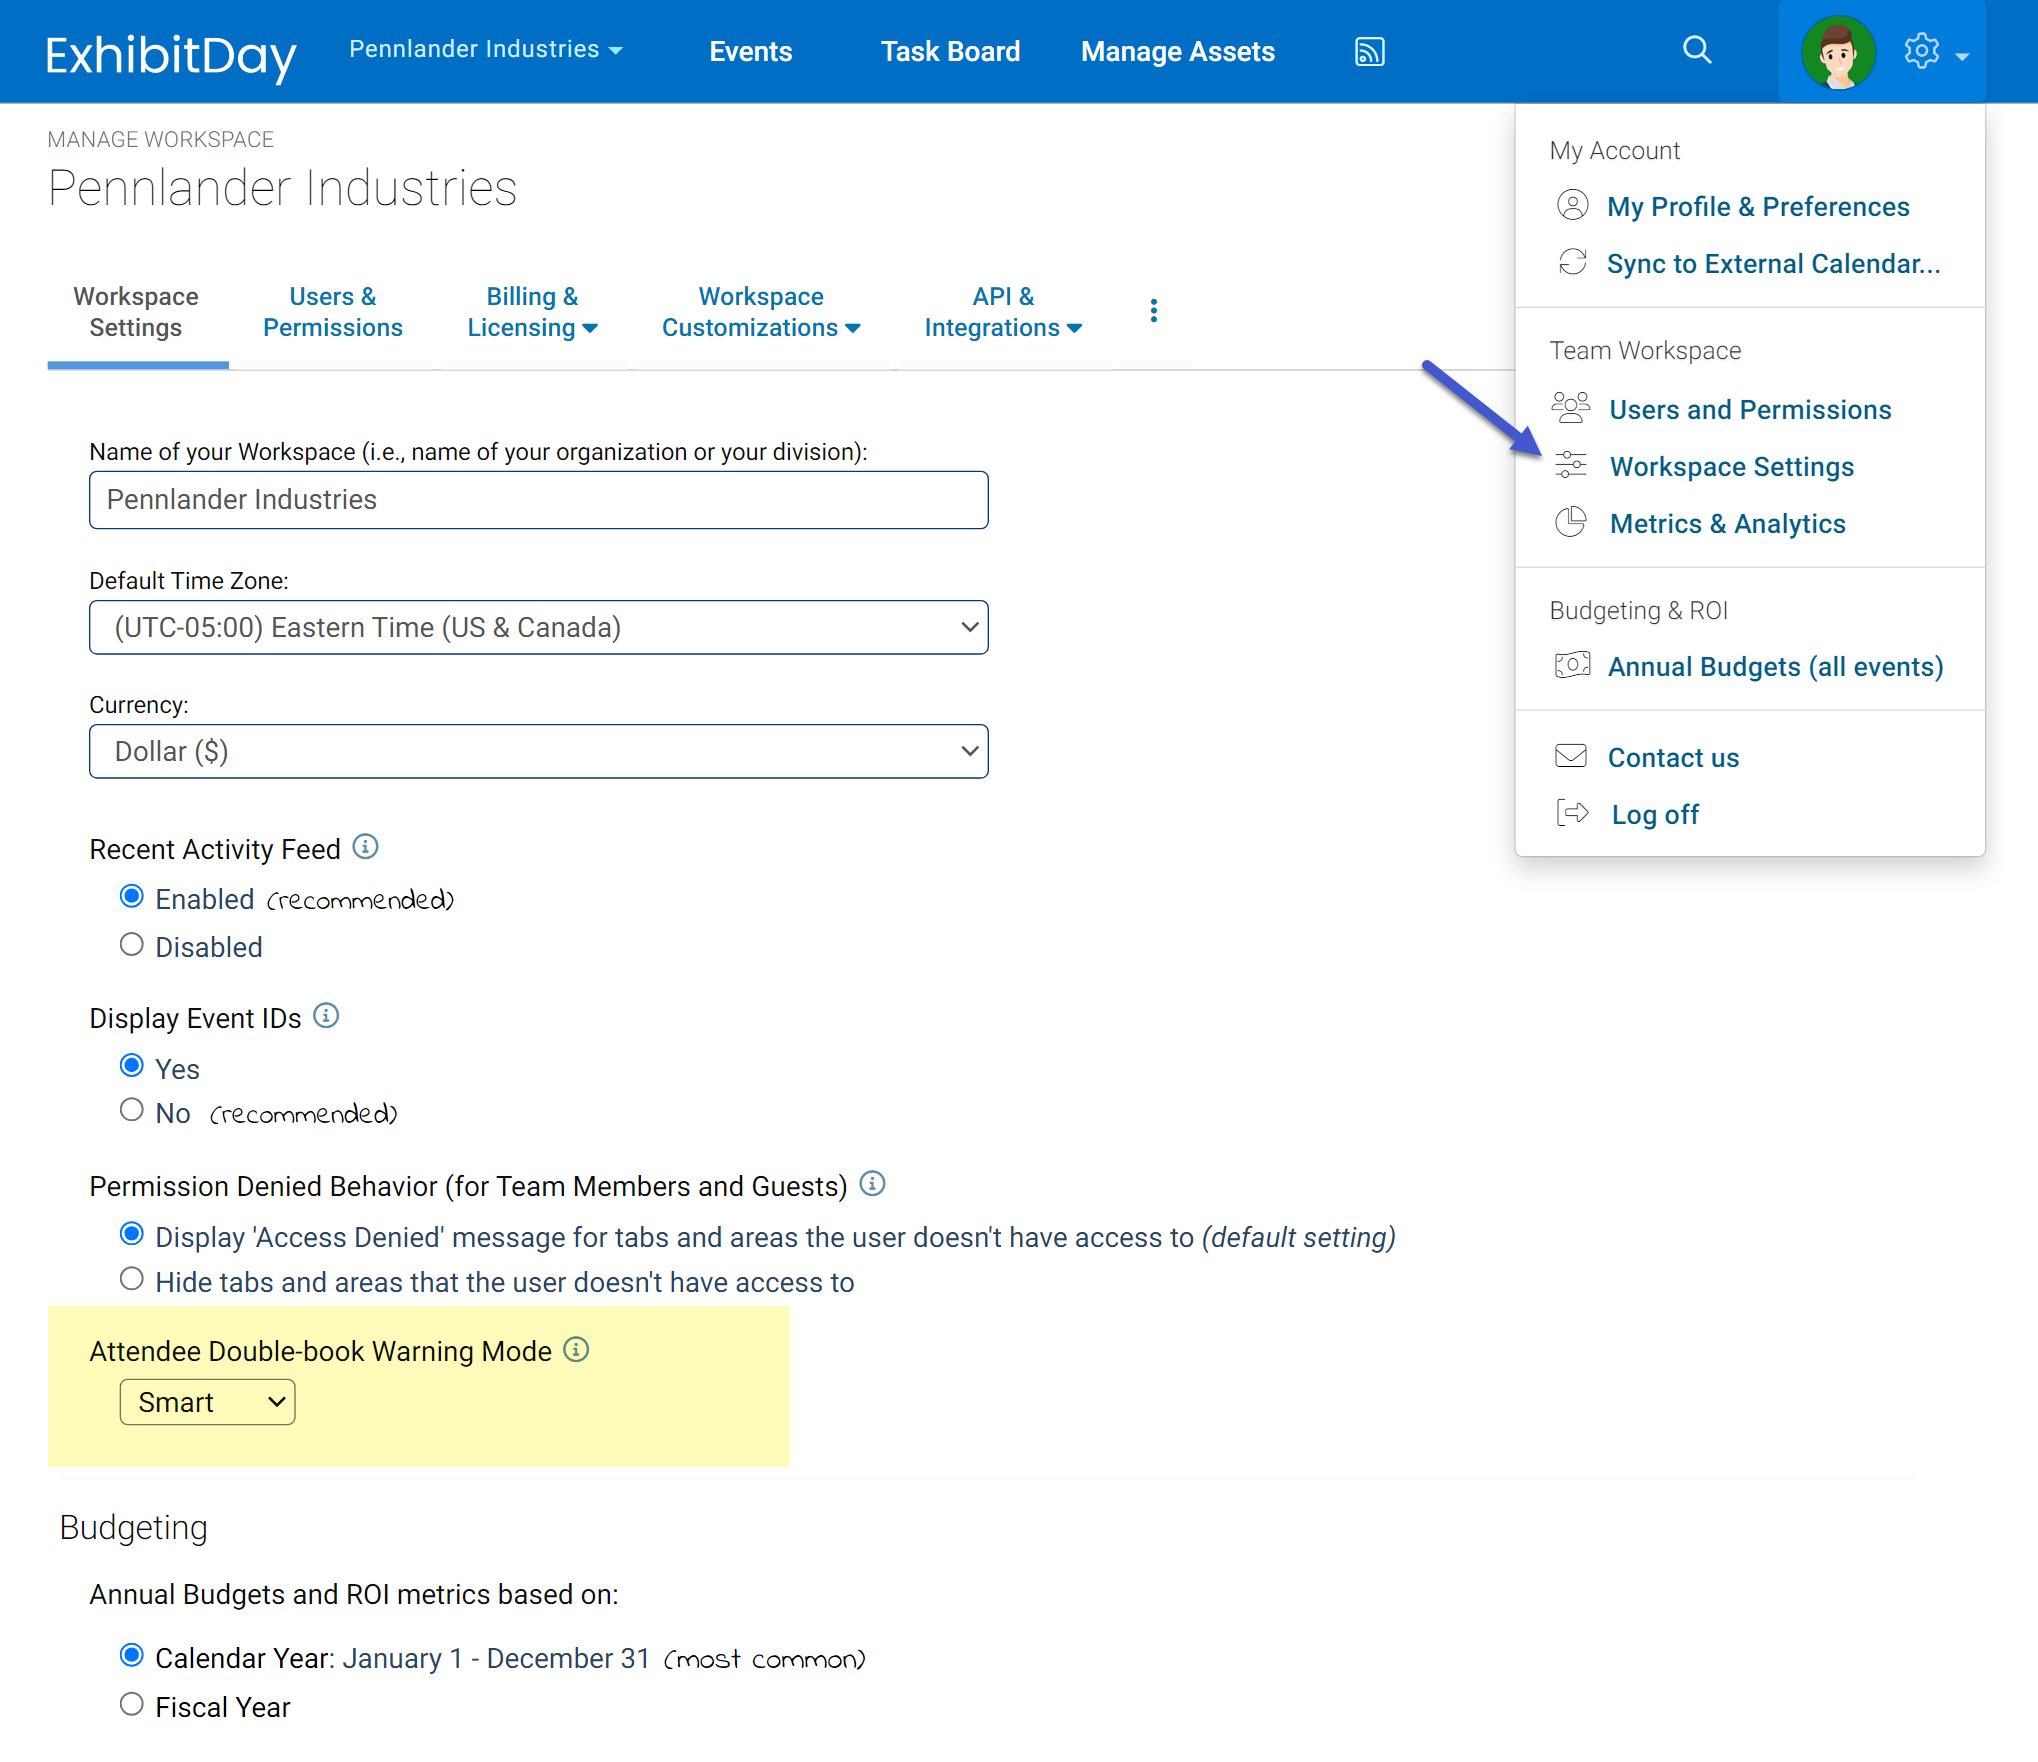
You can customize the way you’d like to have Attendee Double-book Warnings work by going to Workspace Settings > “Attendee Double-book Warning Mode”.
When Smart mode is enabled, the system considers the event’s Participation Type to determine if double-book warnings should be displayed in case of attendee scheduling conflicts.
Specifically:
When viewing the event Staff tab, if a given attendee is also tagged in another event with at least one overlapping day (based on the event start/end dates), a warning icon is displayed next to the attendee’s name. This warning is only displayed if:
1) The event you are viewing is NOT marked as “Not Going”, and,
2) The other event that causes the conflict is marked as “Committed” (or marked with a custom event Participation Type).
Consider the following example:
John Doe is tagged as an attendee of Event A (which is marked as “Committed”). You create a new event, Event B, that has overlapping days with Event A. You go to Event B and mark it as “Considering” and you tag John Doe as an Attendee. The system will display a double-book warning icon next to John’s name when viewing the Staff tab of Event B (because John is already tagged in another event that is marked as “Committed”). Note: in this scenario, if you view the Staff tab of Event A, the system will not display a double-book warning icon next to John’s name (because the other overlapping event that John is tagged in, Event B, is marked as “Considering”). Let’s say you proceed to mark Event B as “Committed”; now, the system will display a double-book warning next to John Doe’s name when viewing the Staff tab of either Event A or Event B (because no matter which event you view, the other overlapping event John is tagged in is marked as “Committed”).
When Strict Mode is enabled, the system displays double-book warnings for all event staff scheduling conflicts — regardless of the event’s Participation Type. Under any given event’s Staff tab, if any given attendee is also tagged as an attendee of another event with at least one overlapping day (based on the event start/end dates), a warning icon is displayed next to that attendee’s name.
If Disabled is selected, the system will never display a double-book warning icon next to attendee names under the event Staff tab.
You can now specify a Check-in/Return Date for Collateral and Multi-Quantity Asset reservations in ExhibitDay.
When reserving a Collateral/Multi-Quantity Asset for an event, use the “Return to Storage / Check-in” section of the reservation form to specify if/when the items will return back to storage.
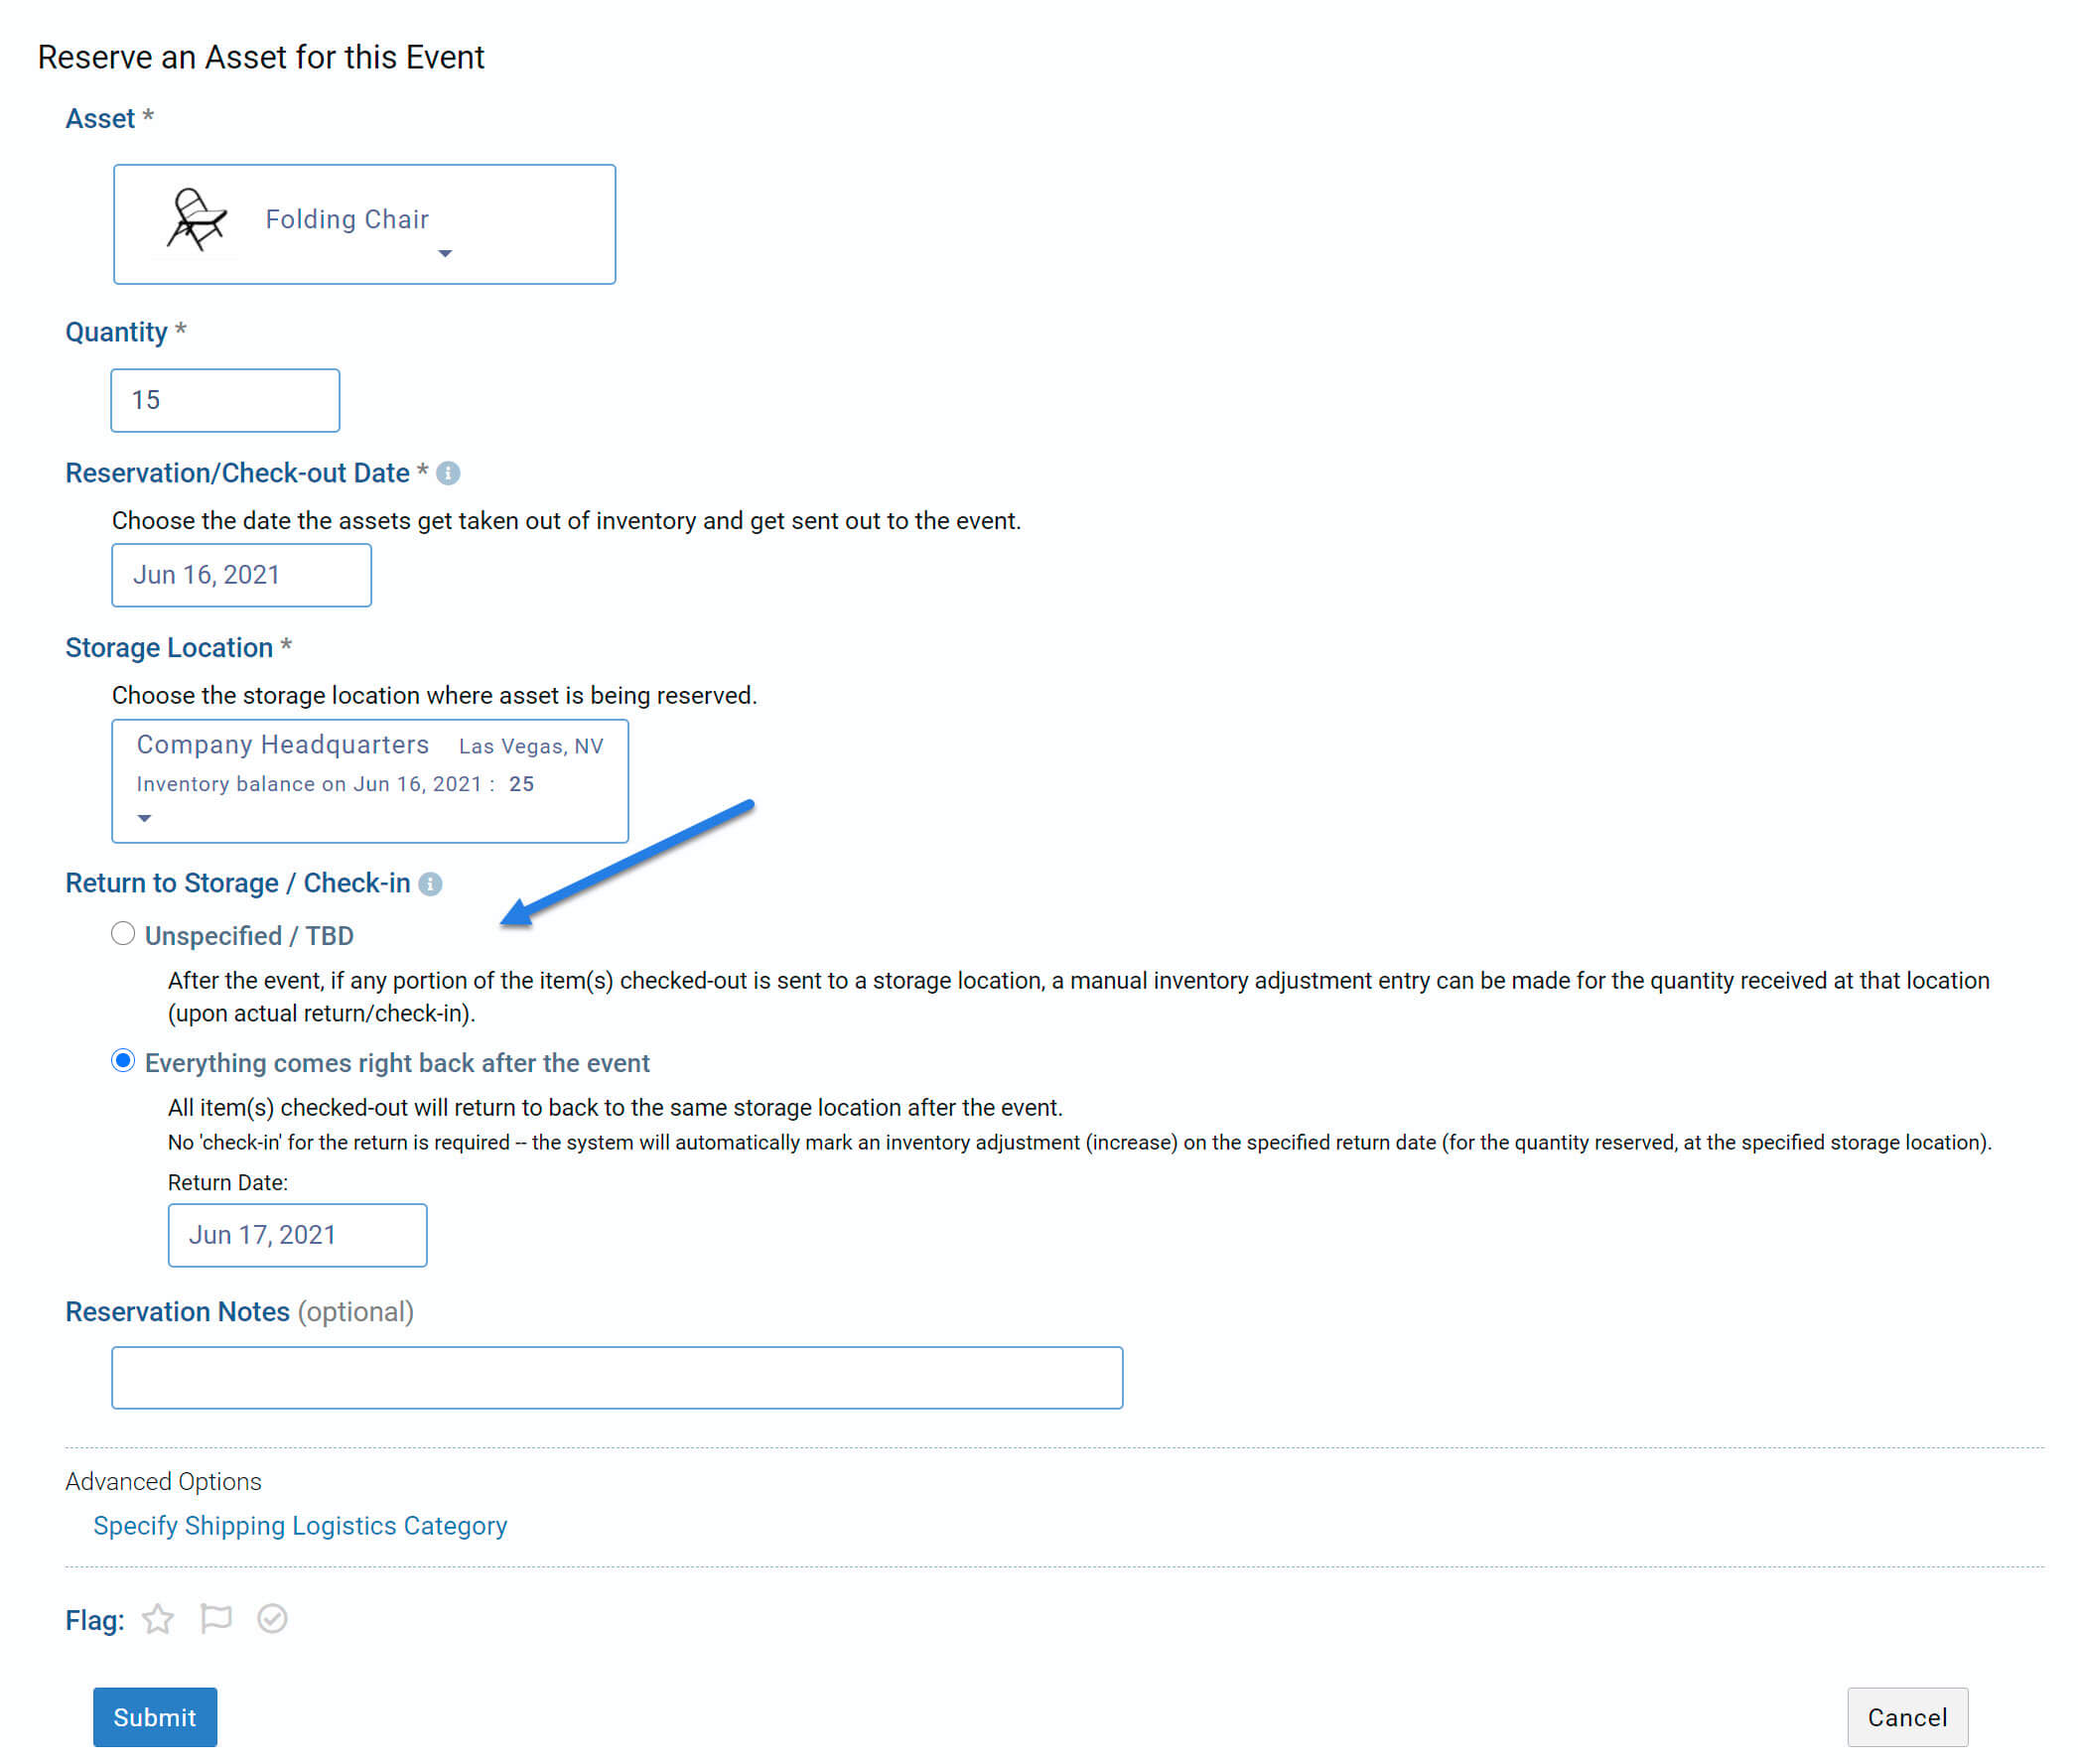
In certain cases, the items that get checked out either do not return back to storage at all, or, only some portion of the quantity checked-out gets returned back to storage. For example, if 500 Logo Pens are checked out for an event, some or none of the Logo Pens may return back to storage after the event. In such scenarios, choose the ‘Unspecified / TBD’ option. If/when any portion of item(s) end up getting sent back to storage, you can make a manual inventory adjustment entry for this asset at the storage location the items are returned to.
Also, in certain scenarios, some portion of the items checked-out may even go to a different location after the event (e.g. 15 chairs are checked out for an event, 5 of them return to the original storage location and 10 get shipped directly to a different event and get returned at a later date); in such cases, it is also recommended that the ‘Unspecified / TBD’ option be selected so that manual inventory adjustments are made upon actual arrival of the items at each location.
Choose this option only if you know that all quantities of this asset checked-out for this reservation will return back to the same storage location after the event. The system will automatically make the inventory adjustment entry (increase) for the check-in on the specified return date. For example, if 15 chairs are reserved for an event, and after the event, all 15 chairs will return to the same storage location they were checked-out from, then you can select this option and specify the return date — this way, the system will automatically mark an inventory increase on the return date, and you won’t have to ‘check-in’ (by adding an inventory adjustment entry for the return).
Sign up for a free ExhibitDay account to plan your trade shows, manage your trade show assets, and collaborate on tasks with your event team.
You can now add Optional Accessories to your Capital Assets in ExhibitDay.
Optional Accessories are supplemental add-on items that can be optionally requested when reserving a Capital Asset. The person making the reservation can specify the quantity for each Optional Accessory (depending on the specific nature of the reservation).
Example:
If the Asset is a Laptop Computer, the Optional Accessories could be a Carry-on Case, a Mouse, a Keyboard, or a Power Adapter; when a user reserves the Laptop, they may specify (1) Keyboard, and (2) Power Adapters to be included.
Optional Accessories for a Capital Asset can be configured from the Asset Edit page (in the Manage Assets area).

The Maximum Quantity (that can be requested) is the maximum number of units of an Optional Accessory that can be specified (by the person making the reservation) when reserving the underlying Asset.
Example:
If the Asset is a Laptop Computer and the Optional Accessory is a Power Adapter, and you want users to be able to request a maximum of only 2 Power Adapters when reserving the Laptop, then set the value of its Maximum Quantity to 2.
The Default Quantity is the quantity (of the Optional Accessory) that is selected by default when making a new reservation for the underlying Asset.
Example:
If the Asset is a Laptop Computer and the Optional Accessory is a Power Adapter with a Default Quantity of (1), whenever a new reservation for the Laptop Computer is made, by default the system will select (1) as the quantity for the Power Adapter. The user making the reservation may choose to change that quantity (depending on the specific nature of that reservation).
Note: If you don’t want to set a Default Quantity (i.e. you want the person reserving the underlying Asset to decide how many units of this Accessory they want to include in the reservation), then enter 0 for the Default Quantity.
The Availability Status of an Optional Accessory determines whether or not the Accessory is available when making new reservations for the underlying Asset.
If the Availability Status is set to ‘Active/Available’, then the Optional Accessory is included in the list of selectable Accessories.
If the Availability Status is changed to ‘Temporarily Unavailable’, then the Optional Accessory will not be included in the list of selectable Accessories (for any new reservations of the underlying Asset).
If a Capital Asset has Optional Accessories configured, the Asset Reservation screen will allow the user to select the quantity for each Optional Accessory they would like to add-on to the reservation.

If a reservation for a Capital Asset has Optional Accessories specified, the Requested Accessories will be listed on the Pull Sheet.

Sign up for a free ExhibitDay account to plan your trade shows, manage your trade show assets, and collaborate on tasks with your event team.