ExhibitDay News and Resources for Event Professionals
Category: Exhibit Management Software
ExhibitDay is the all-in-one Software-as-a-Service solution to track and manage your exhibits. Your trade shows, exhibit booths, travel plans, shipments, event sponsorships, and budgets– all managed in one place.
Available under the ExhibitDay Enterprise plan, event tab announcements are brief messages that you can place at the top of various tabs of a given event. These messages can be used to convey information about the event itself or special instructions for a given tab to users in your ExhibitDay workspace when they view the tab.
Examples:
You can add an announcement to the top of the “Event Information” tab with the message: “As a Gold sponsor of the event, we get access to meeting rooms A, B, and C during exhibit hall hours.”
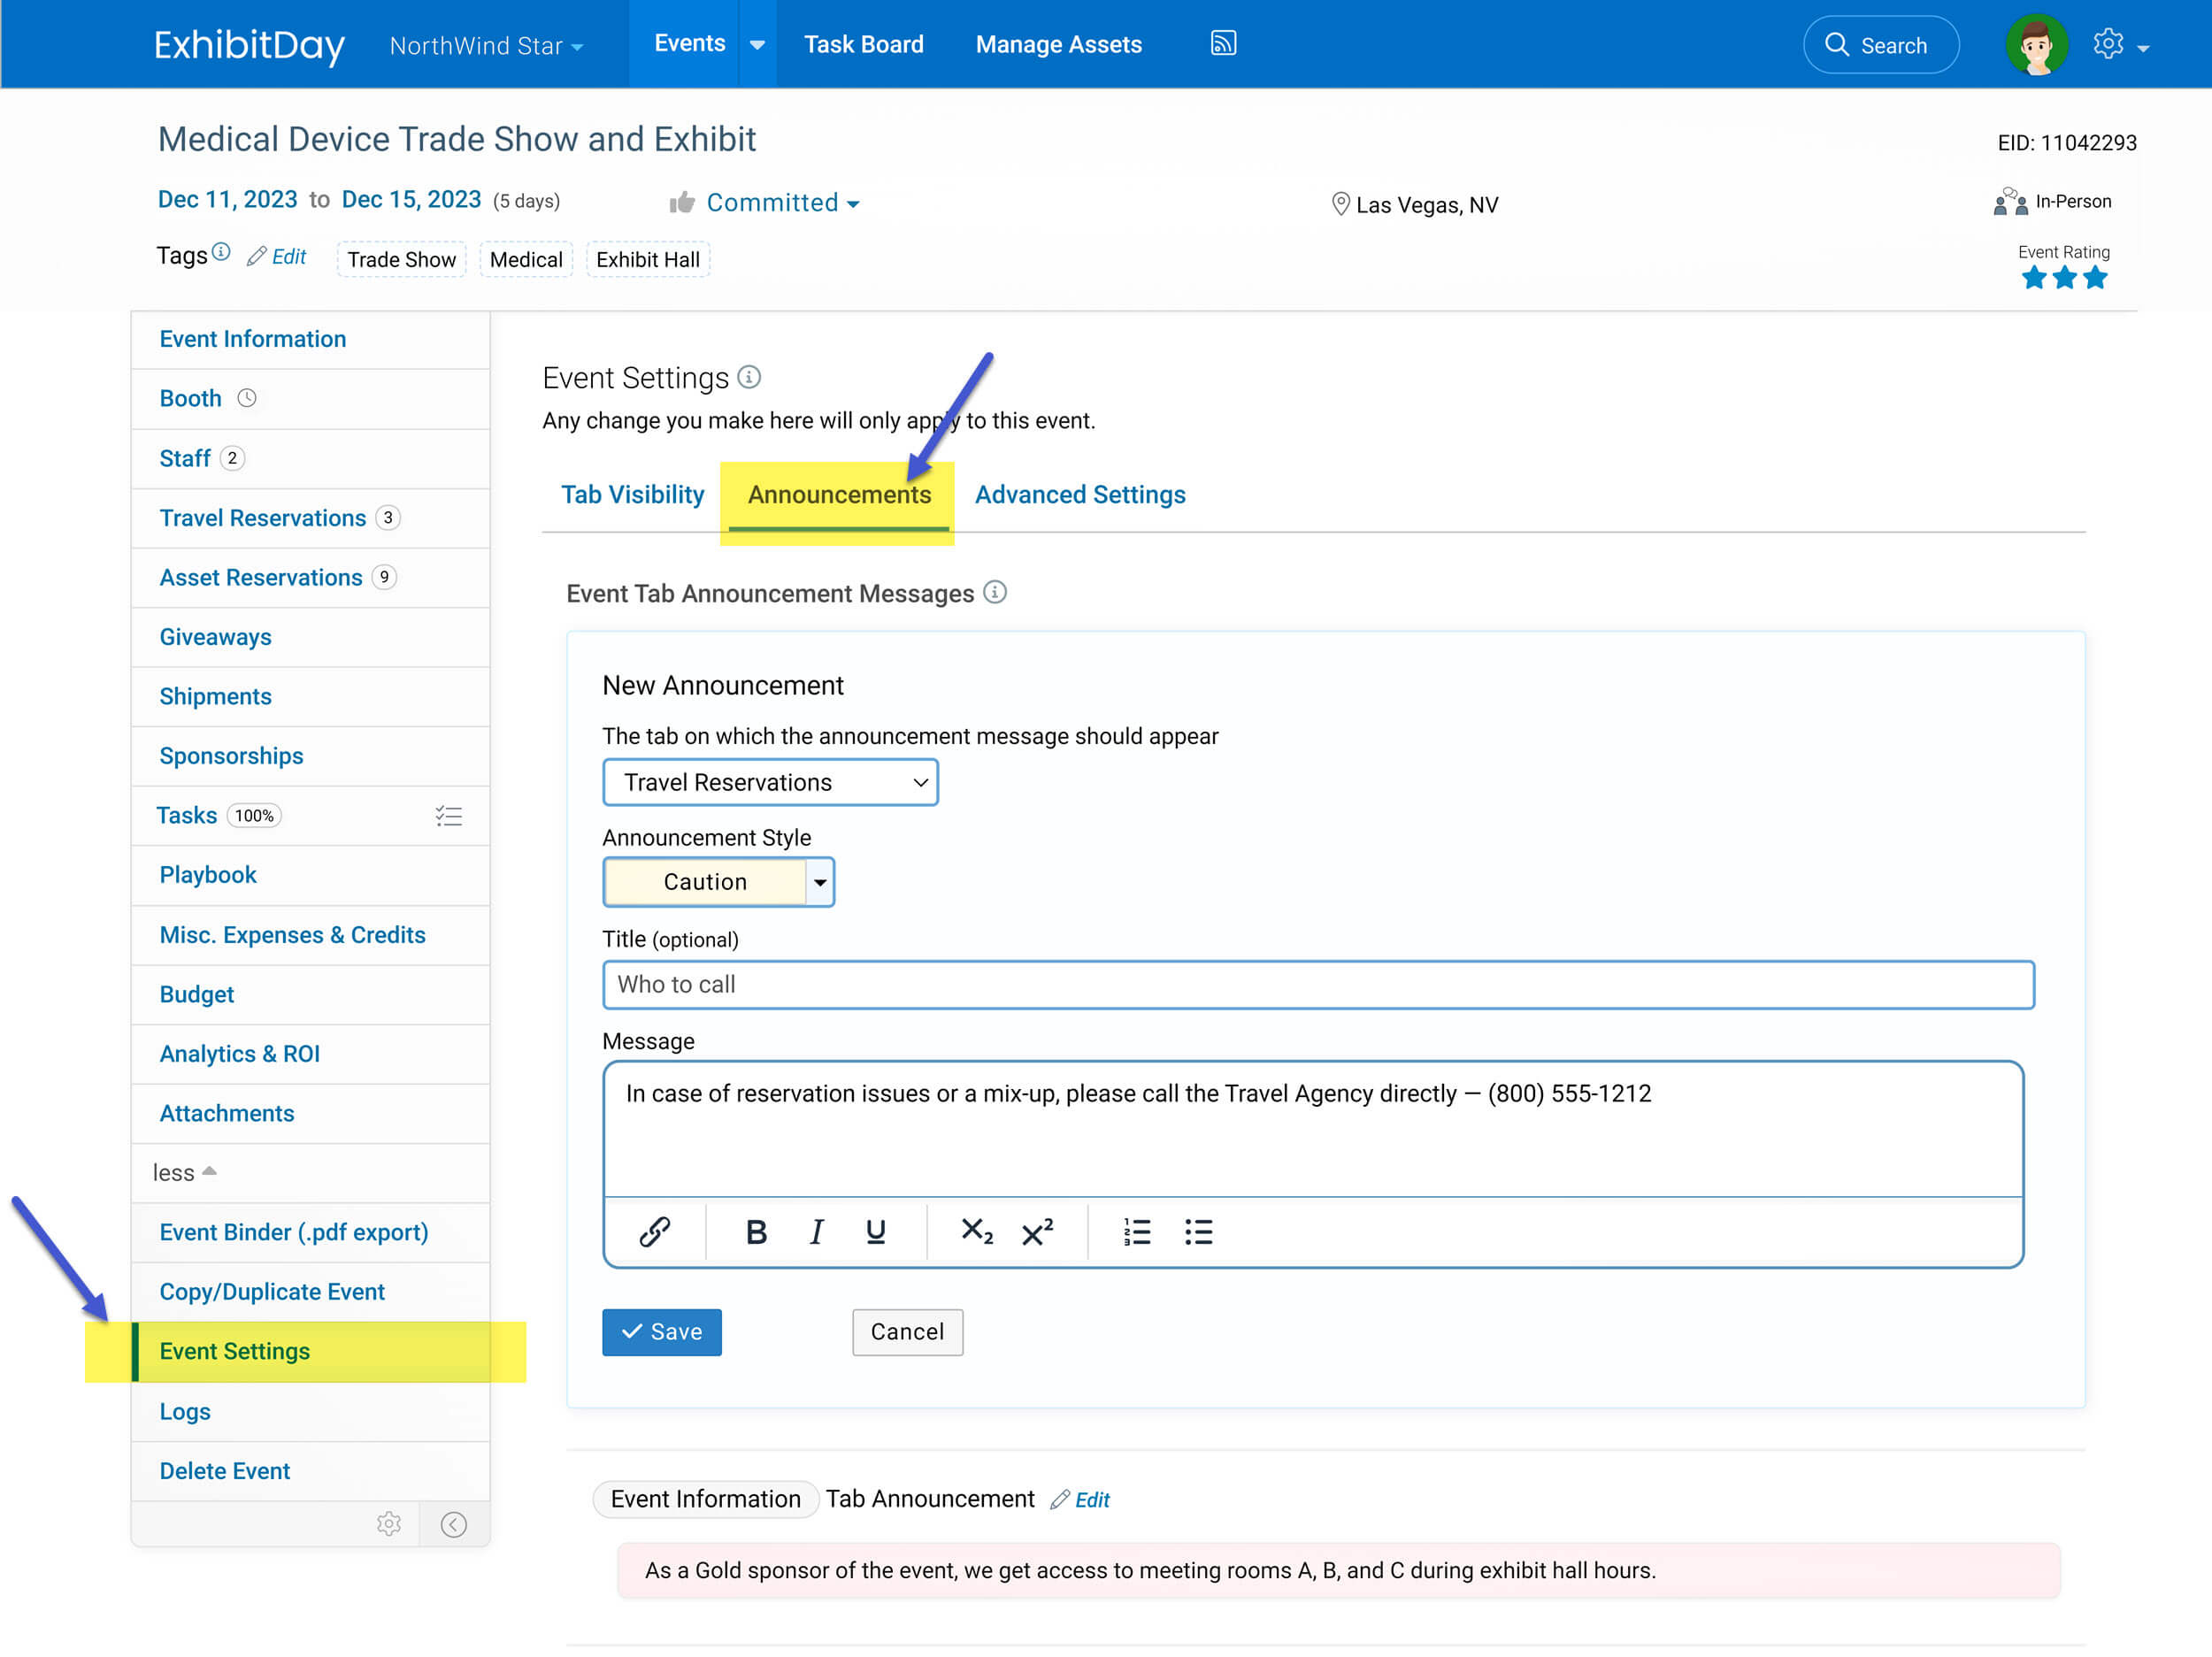
You can add an announcement to the “Travel Reservations” tab with the message: “In case of reservation issues or a mix-up, please call the Travel Agency directly — (800) 555-1212”
Adding An Announcement Message
Announcements messages can be added to event tabs from the “Announcements” section of the “Event Settings” tab of a given event.
Note: Any announcement message that you add to a tab of a particular event appears for that event only; it will not appear for other events in your workspace.
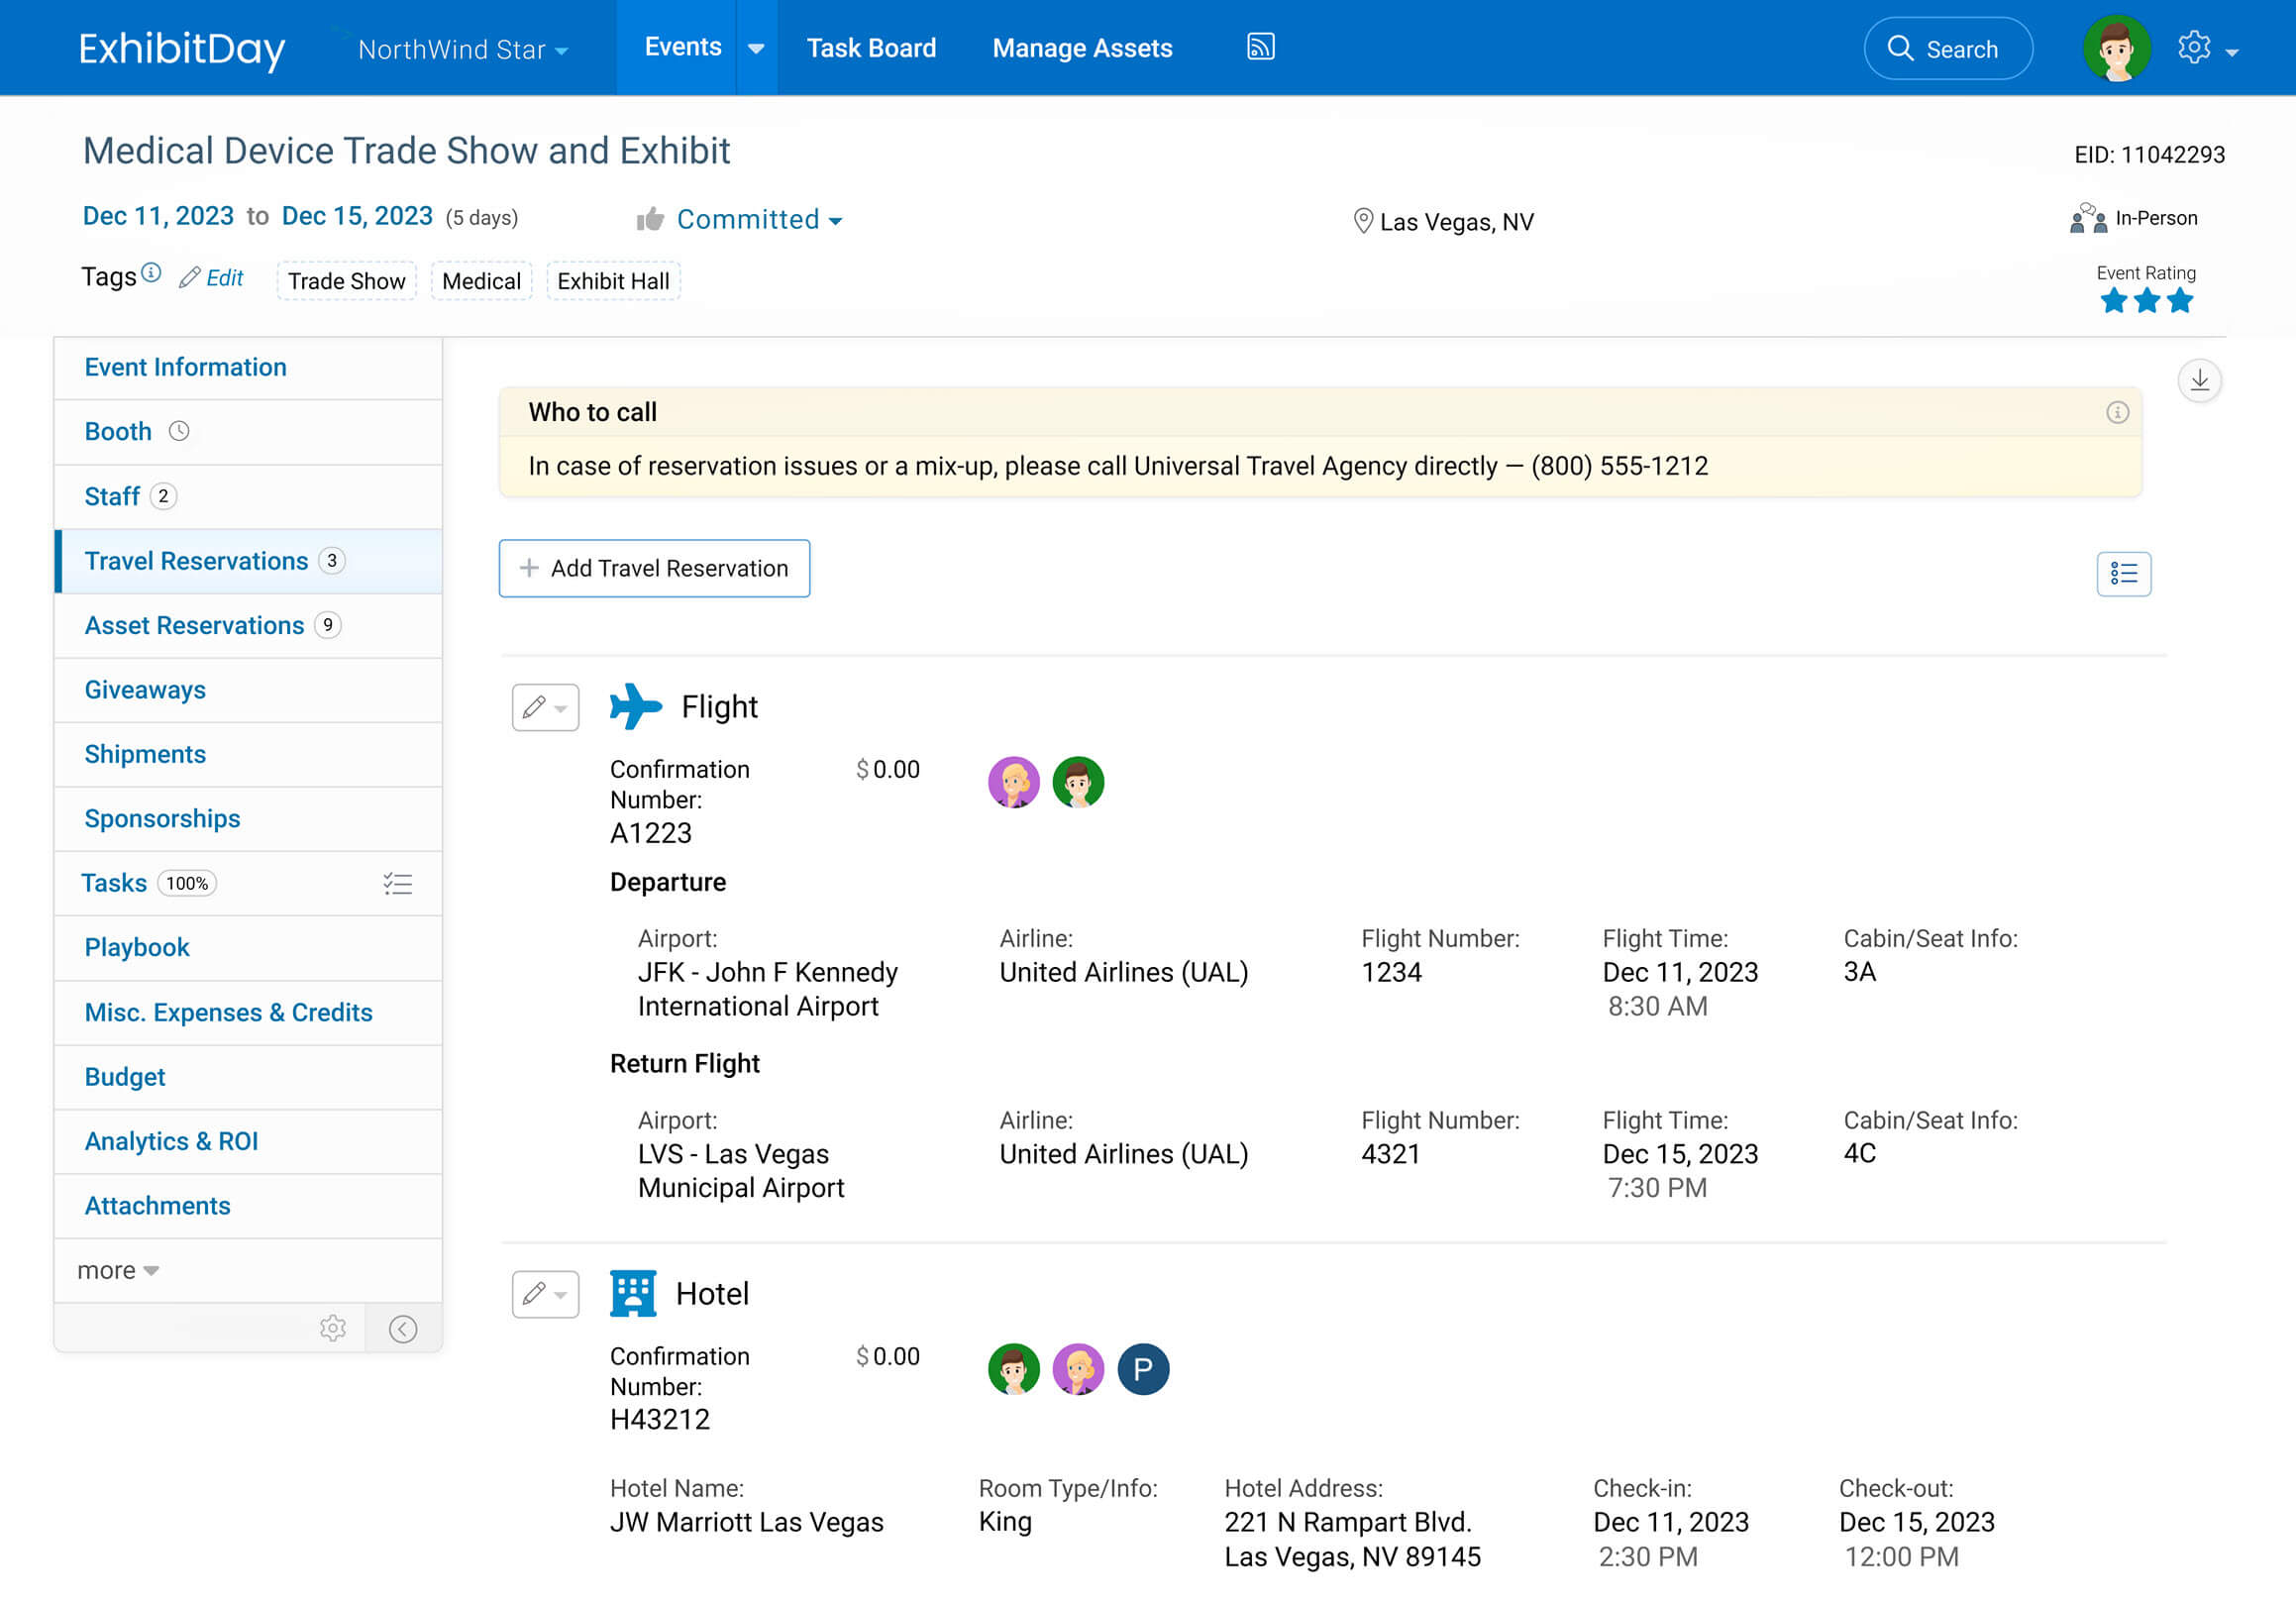
Viewing Announcement Messages on Event Tabs
Once an announcement has been added to an event tab, it will appear at the top of the tab you placed it on. All of the users in your workspace (who have access to that tab) will see the announcement when they visit that particular tab of that particular event.
Pro-tip: When you copy/duplicate an event, all announcement messages for the event will also get copied over to the new event. So, for future events that require the same announcement messages, you can simply make a copy of an event with the desired announcement messages.
Offered under the ExhibitDay Enterprise plan, the Special event tab is a custom tab that you can enable for your events. Once enabled, you’ll get one extra tab in all your events (in addition to the standard event tabs that ExhibitDay provides).
Under the Special tab, you can create a set of custom fields (textboxes, dropdowns, date/time fields, attachments, etc.). For example, you can enable the Special tab and name it “Important Deadlines” (in order to keep track of a set of meaningful and significant dates for your events). Or, you can name it “Links & Resources” and use it to track information about your suppliers and third-party providers for each event.
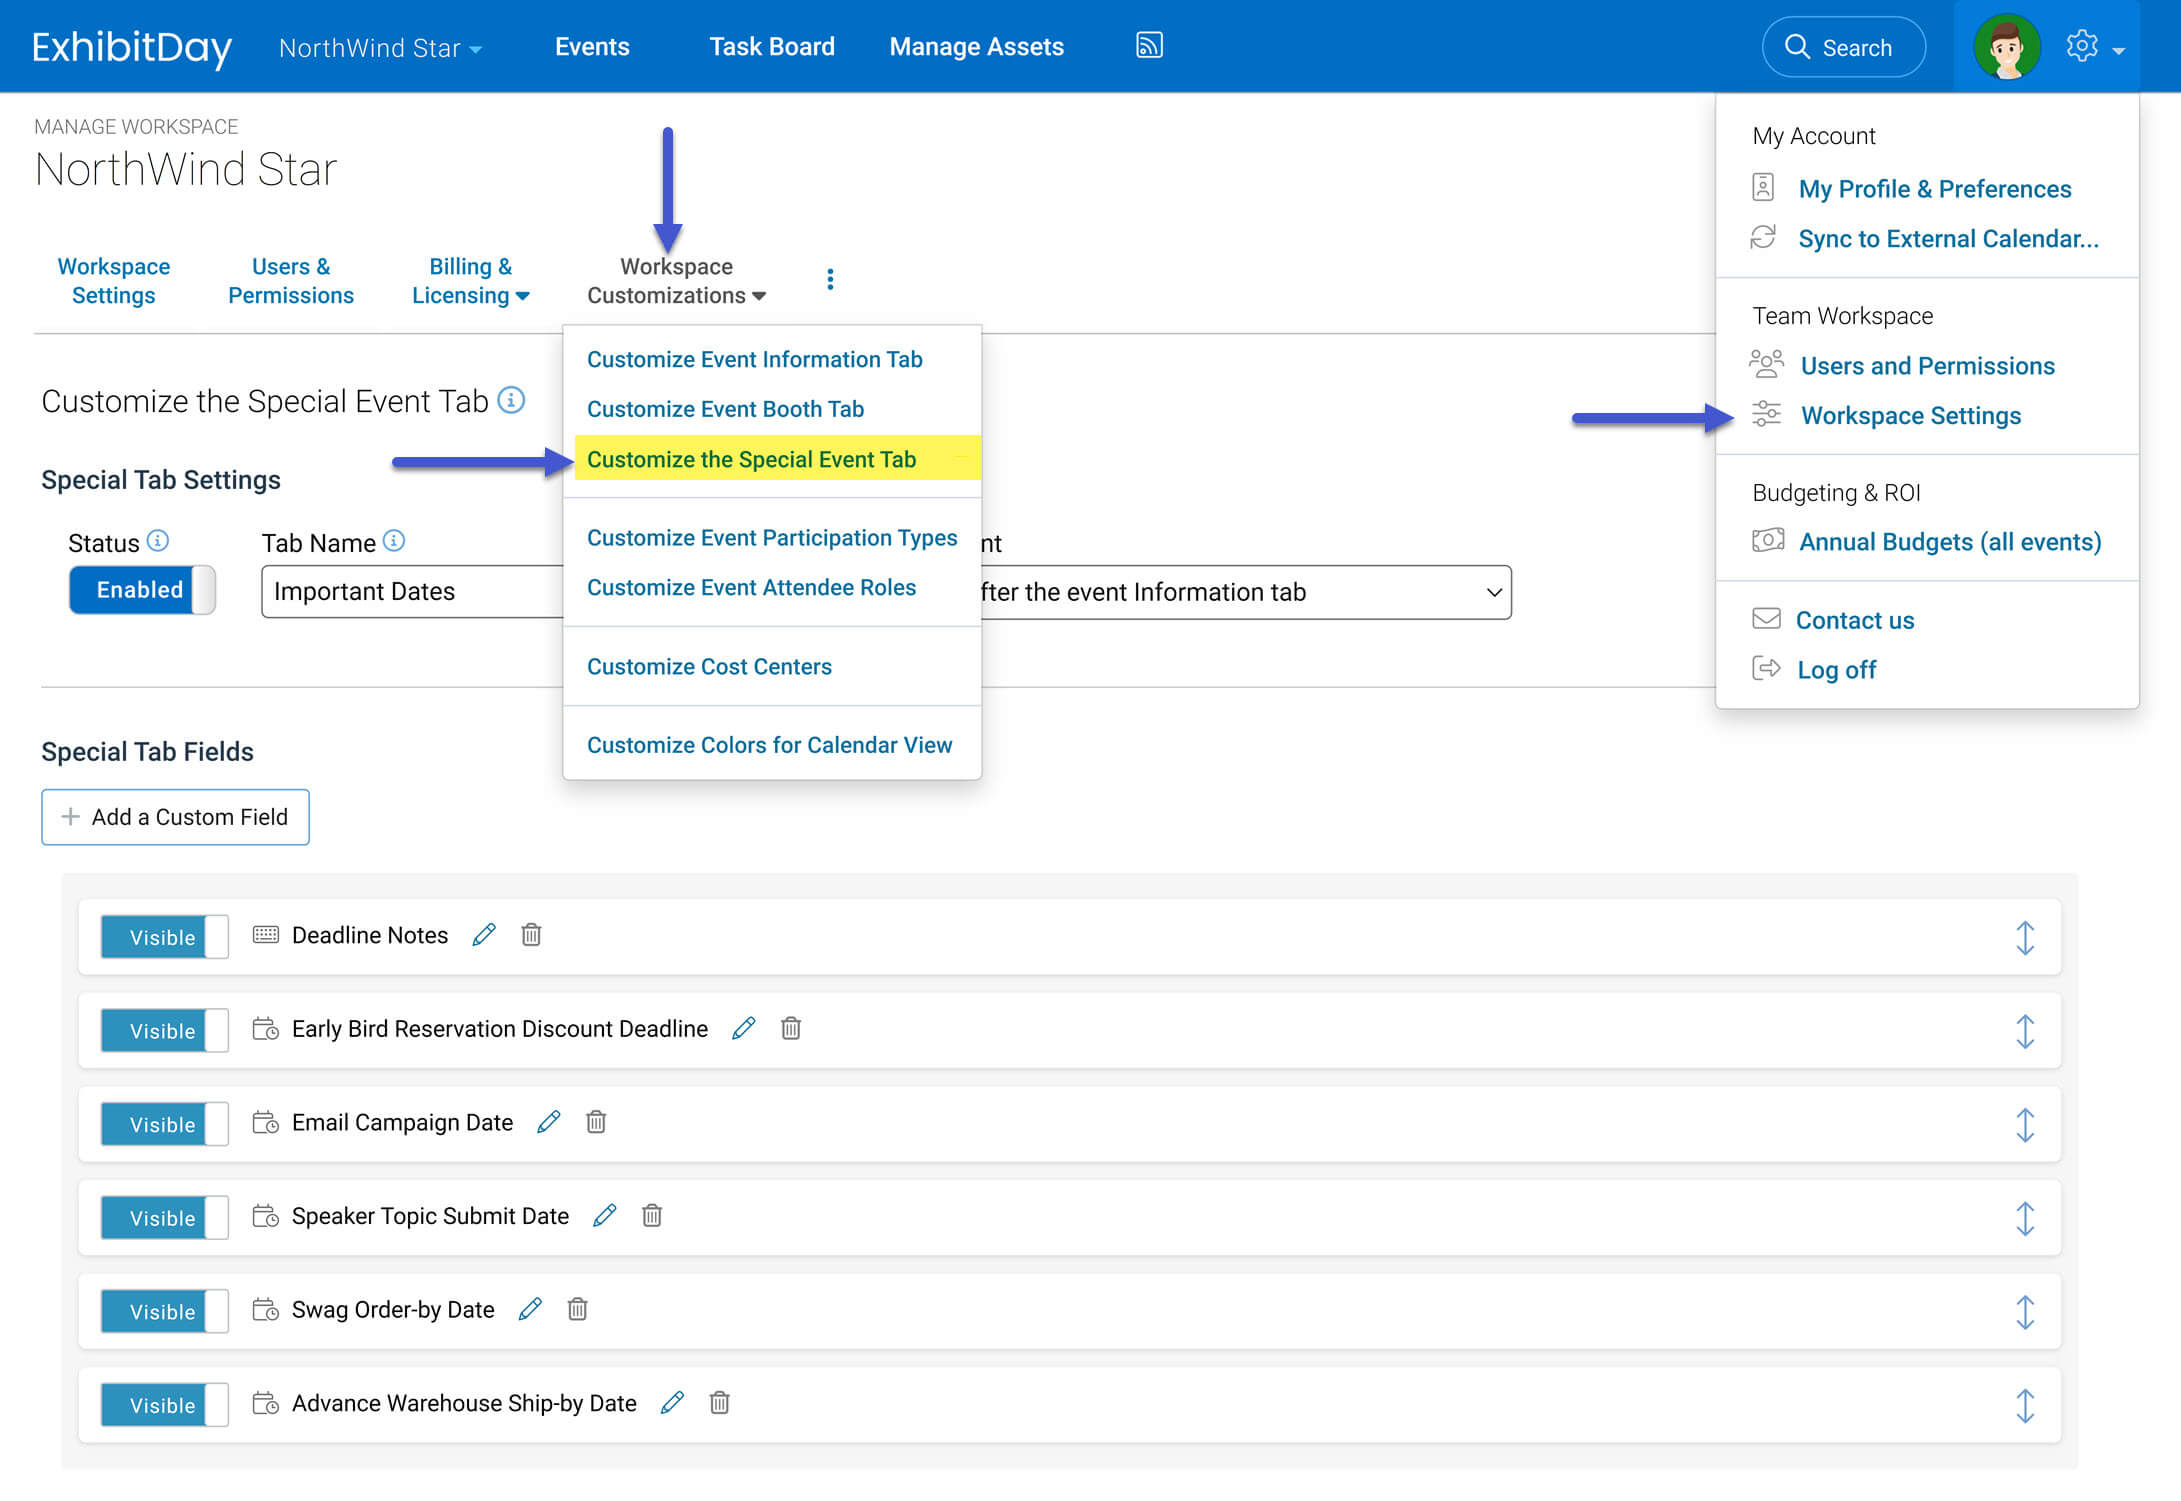
You can get to the Special Event Tab settings by going to Workspace Settings > Workspace Customizations > Customize the Special Event Tab.
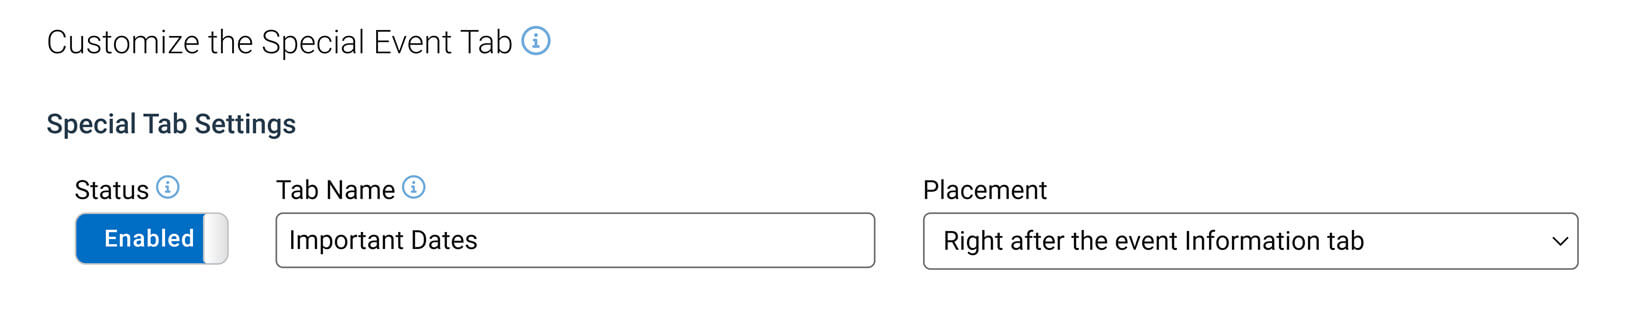
Special Tab Settings
You can configure the settings for your Special event tab under the “Special Tab Settings” section. There, you have the option to enable or disable the Special event tab. You can also set the name of the tab and specify where (on the event page tab strip) the Special tab should appear.
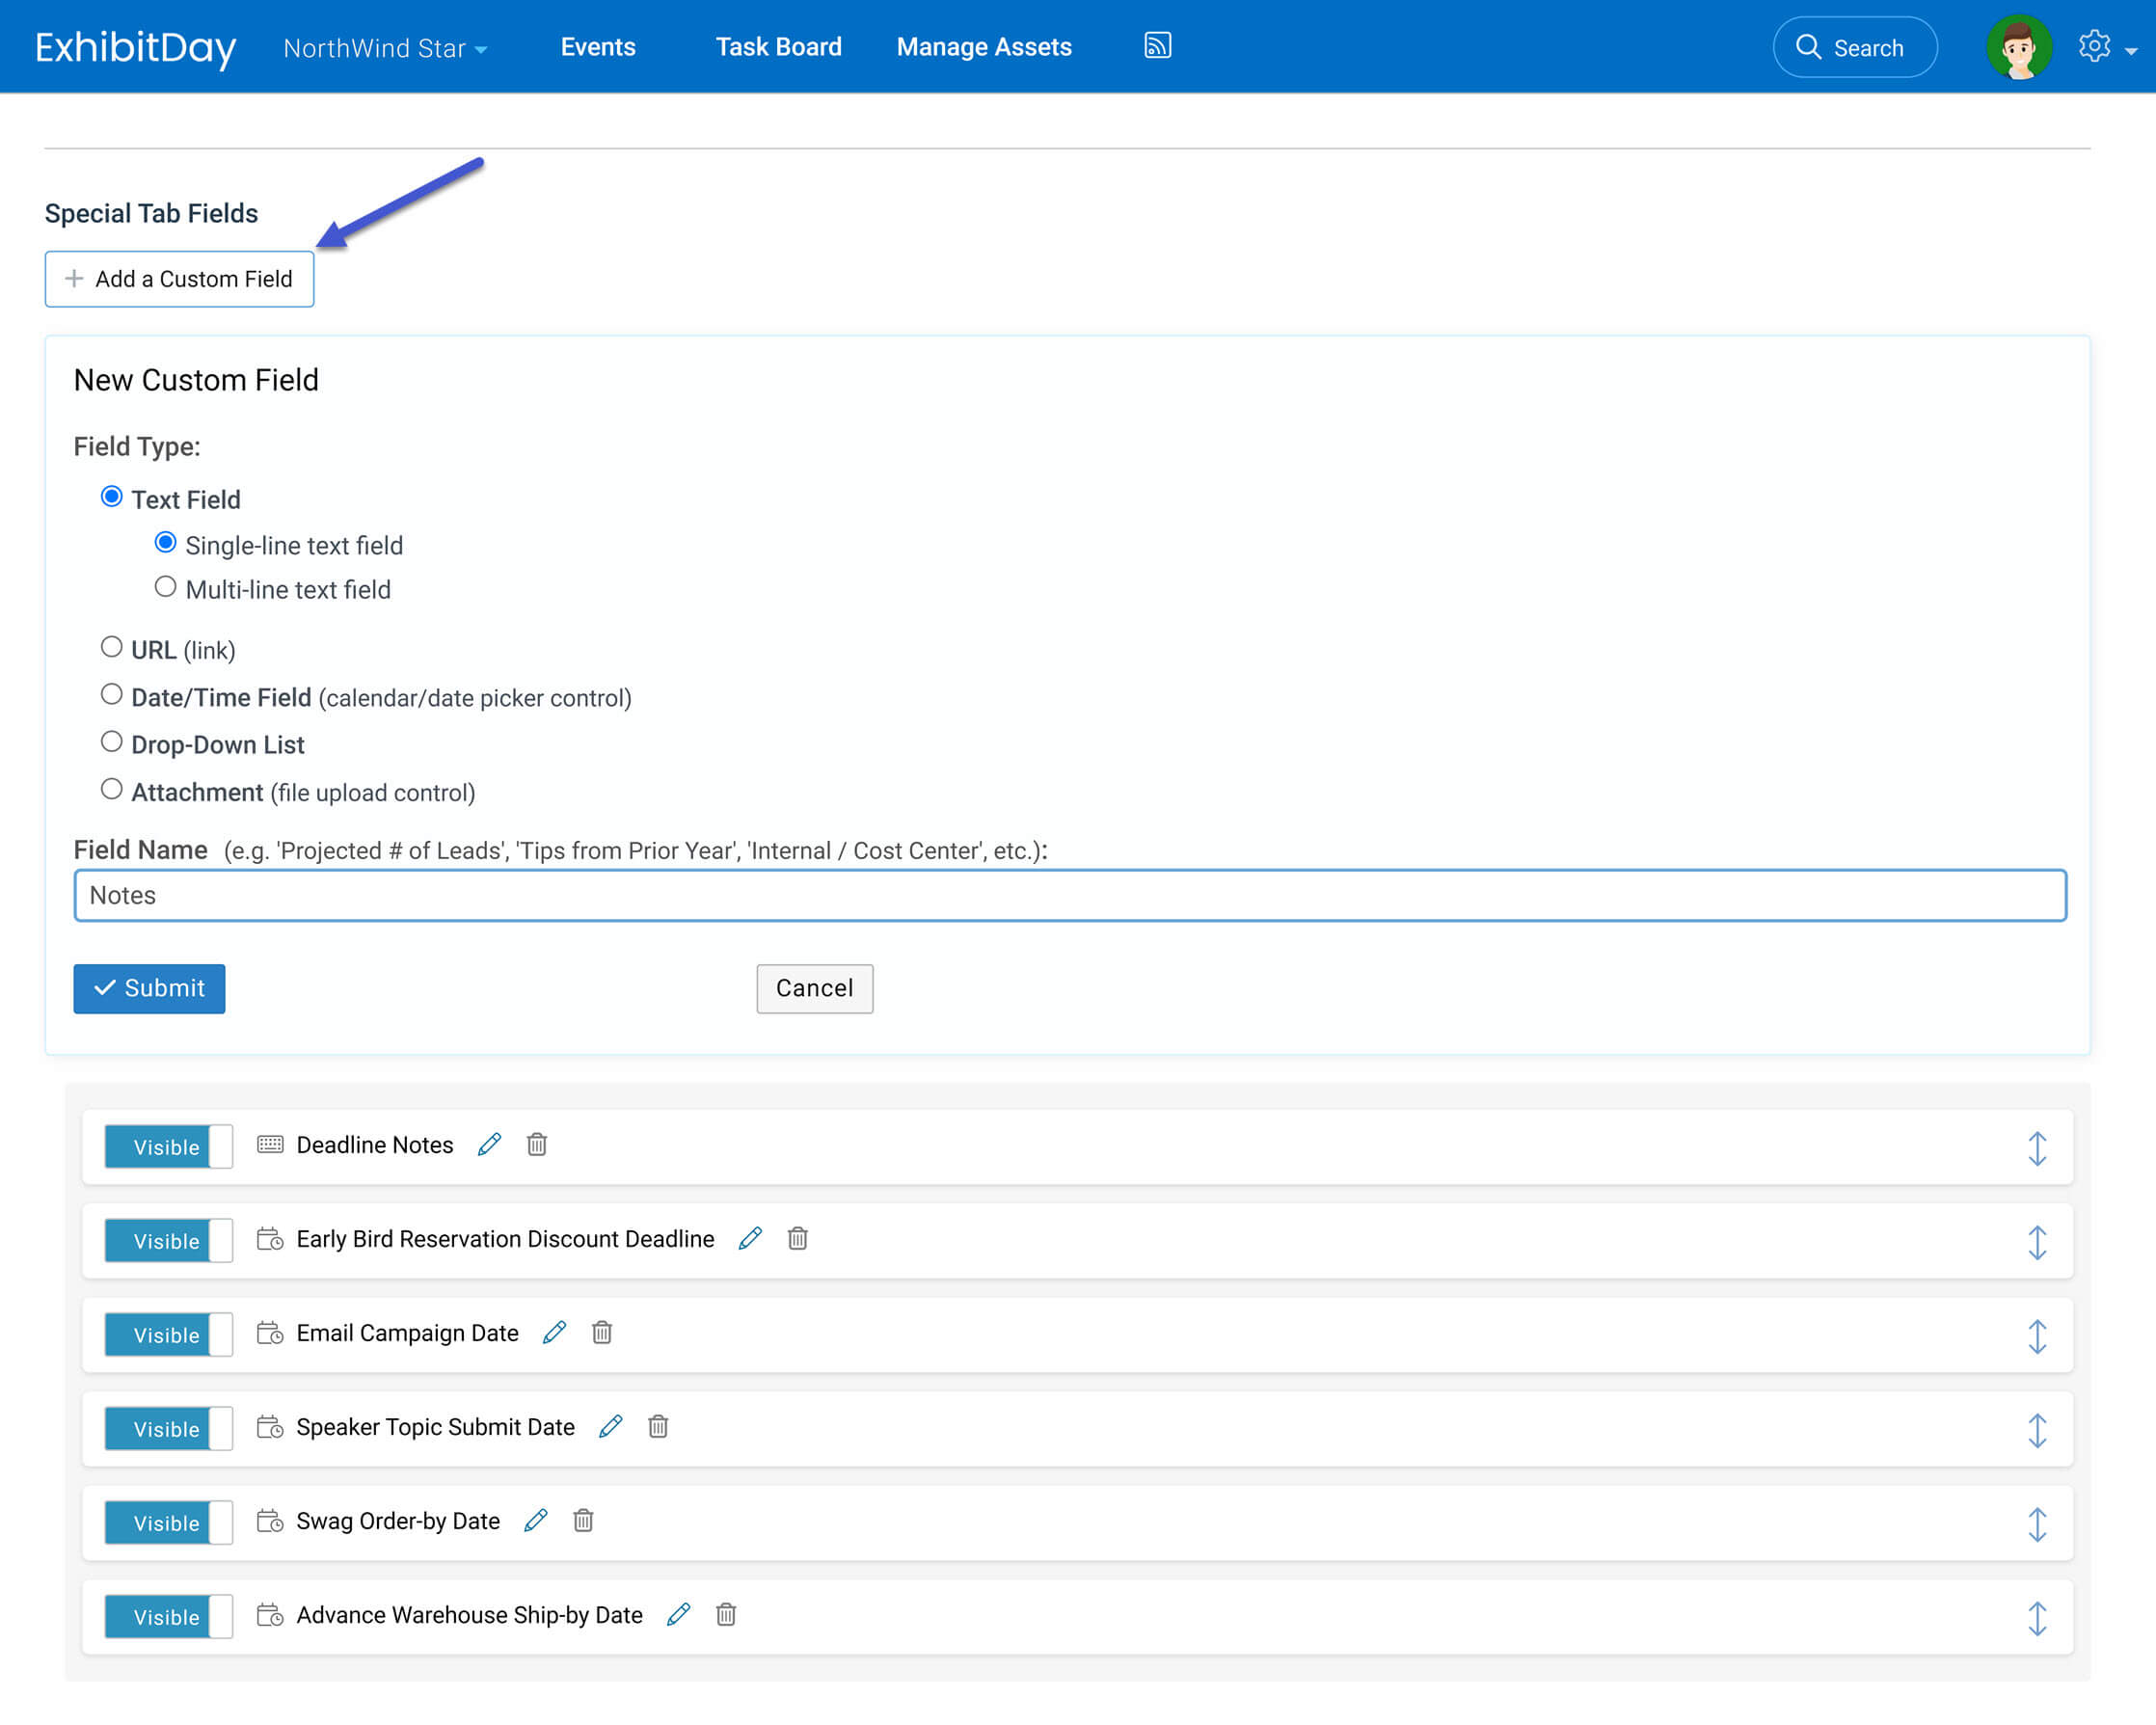
Adding Fields to the Special Tab
Under the “Special Tab Fields” section, you can specify the fields you’d like to have included in your Special event tab. You can choose from any of the standard custom fields available in ExhibitDay (Text, URL, Date/Time, Dropdown control, and File Attachment).
The order in which custom fields appear here is the same order in which they will appear on your Special tab when viewing the tab on your event pages. If you’d like to change the order any field (i.e., move it up/down on the list), grab-and-drag its handle (on the right side of the screen) up or down the list.
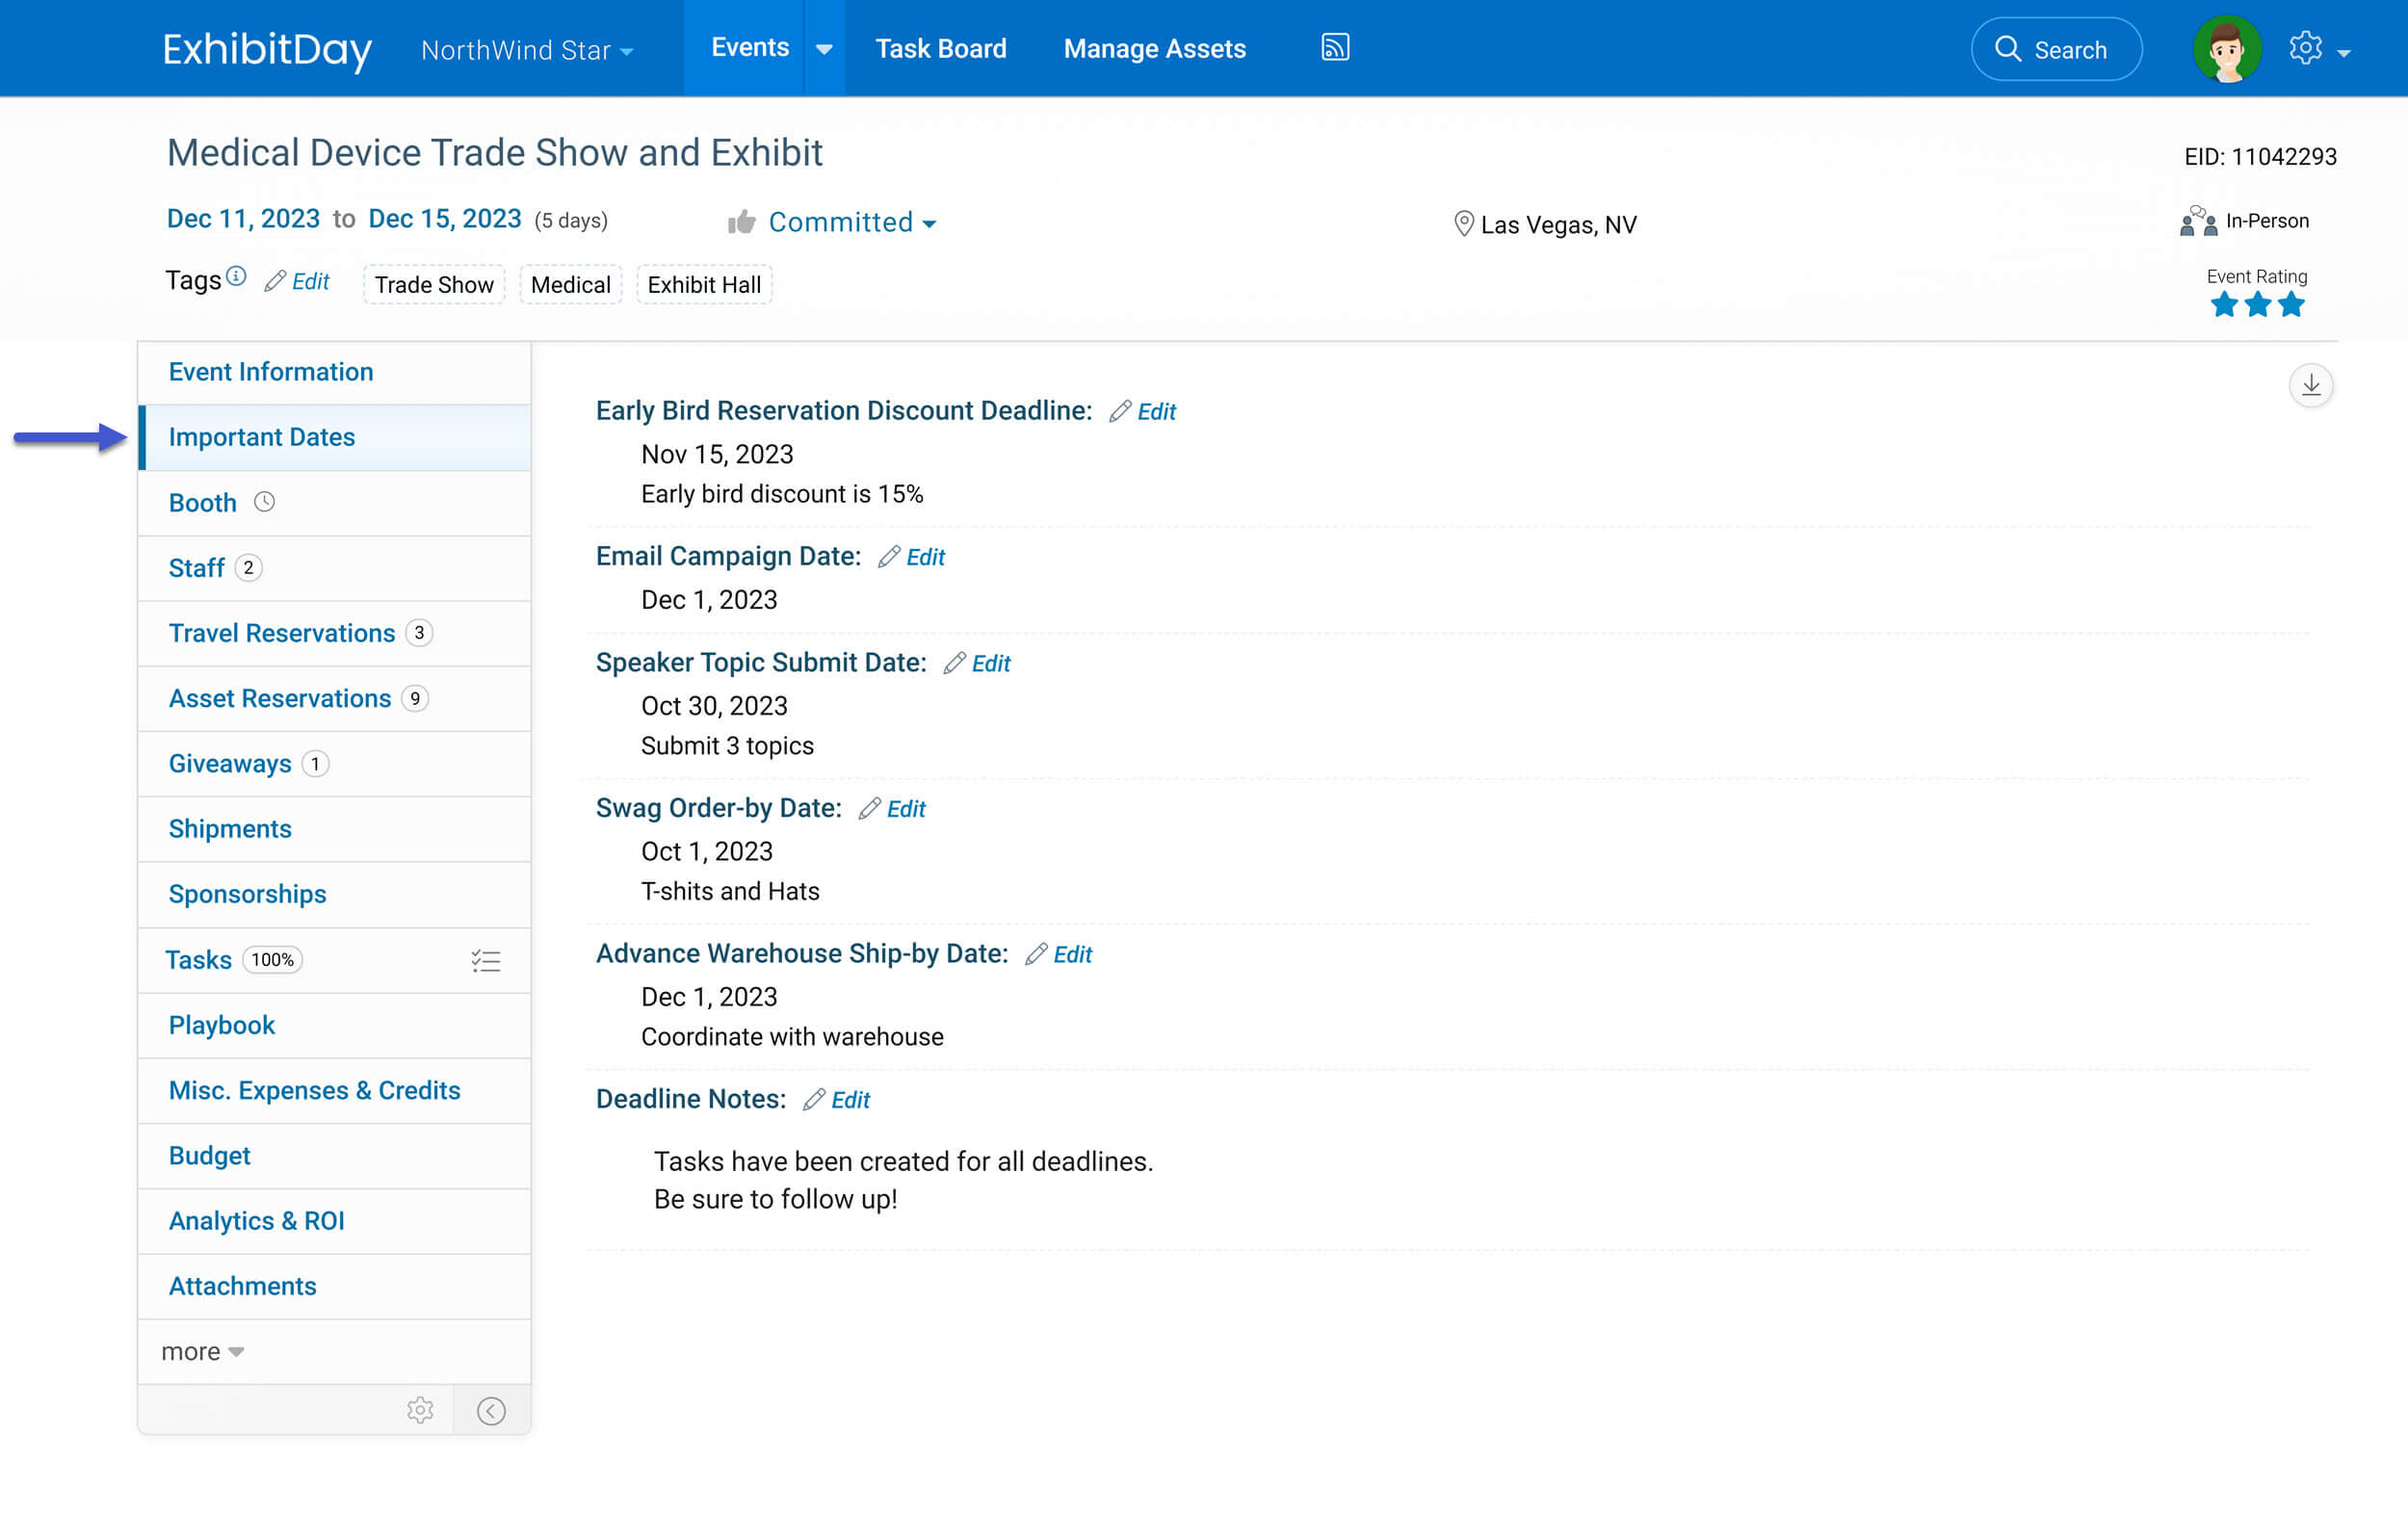
The Special Tab on the Event Page
If your Special event tab is marked as Enabled, you’ll see the tab show up on your Event pages. The Special tab will be placed on the Event page tab strip based on the Placement setting that you specify in the “Special Tab Settings” section.
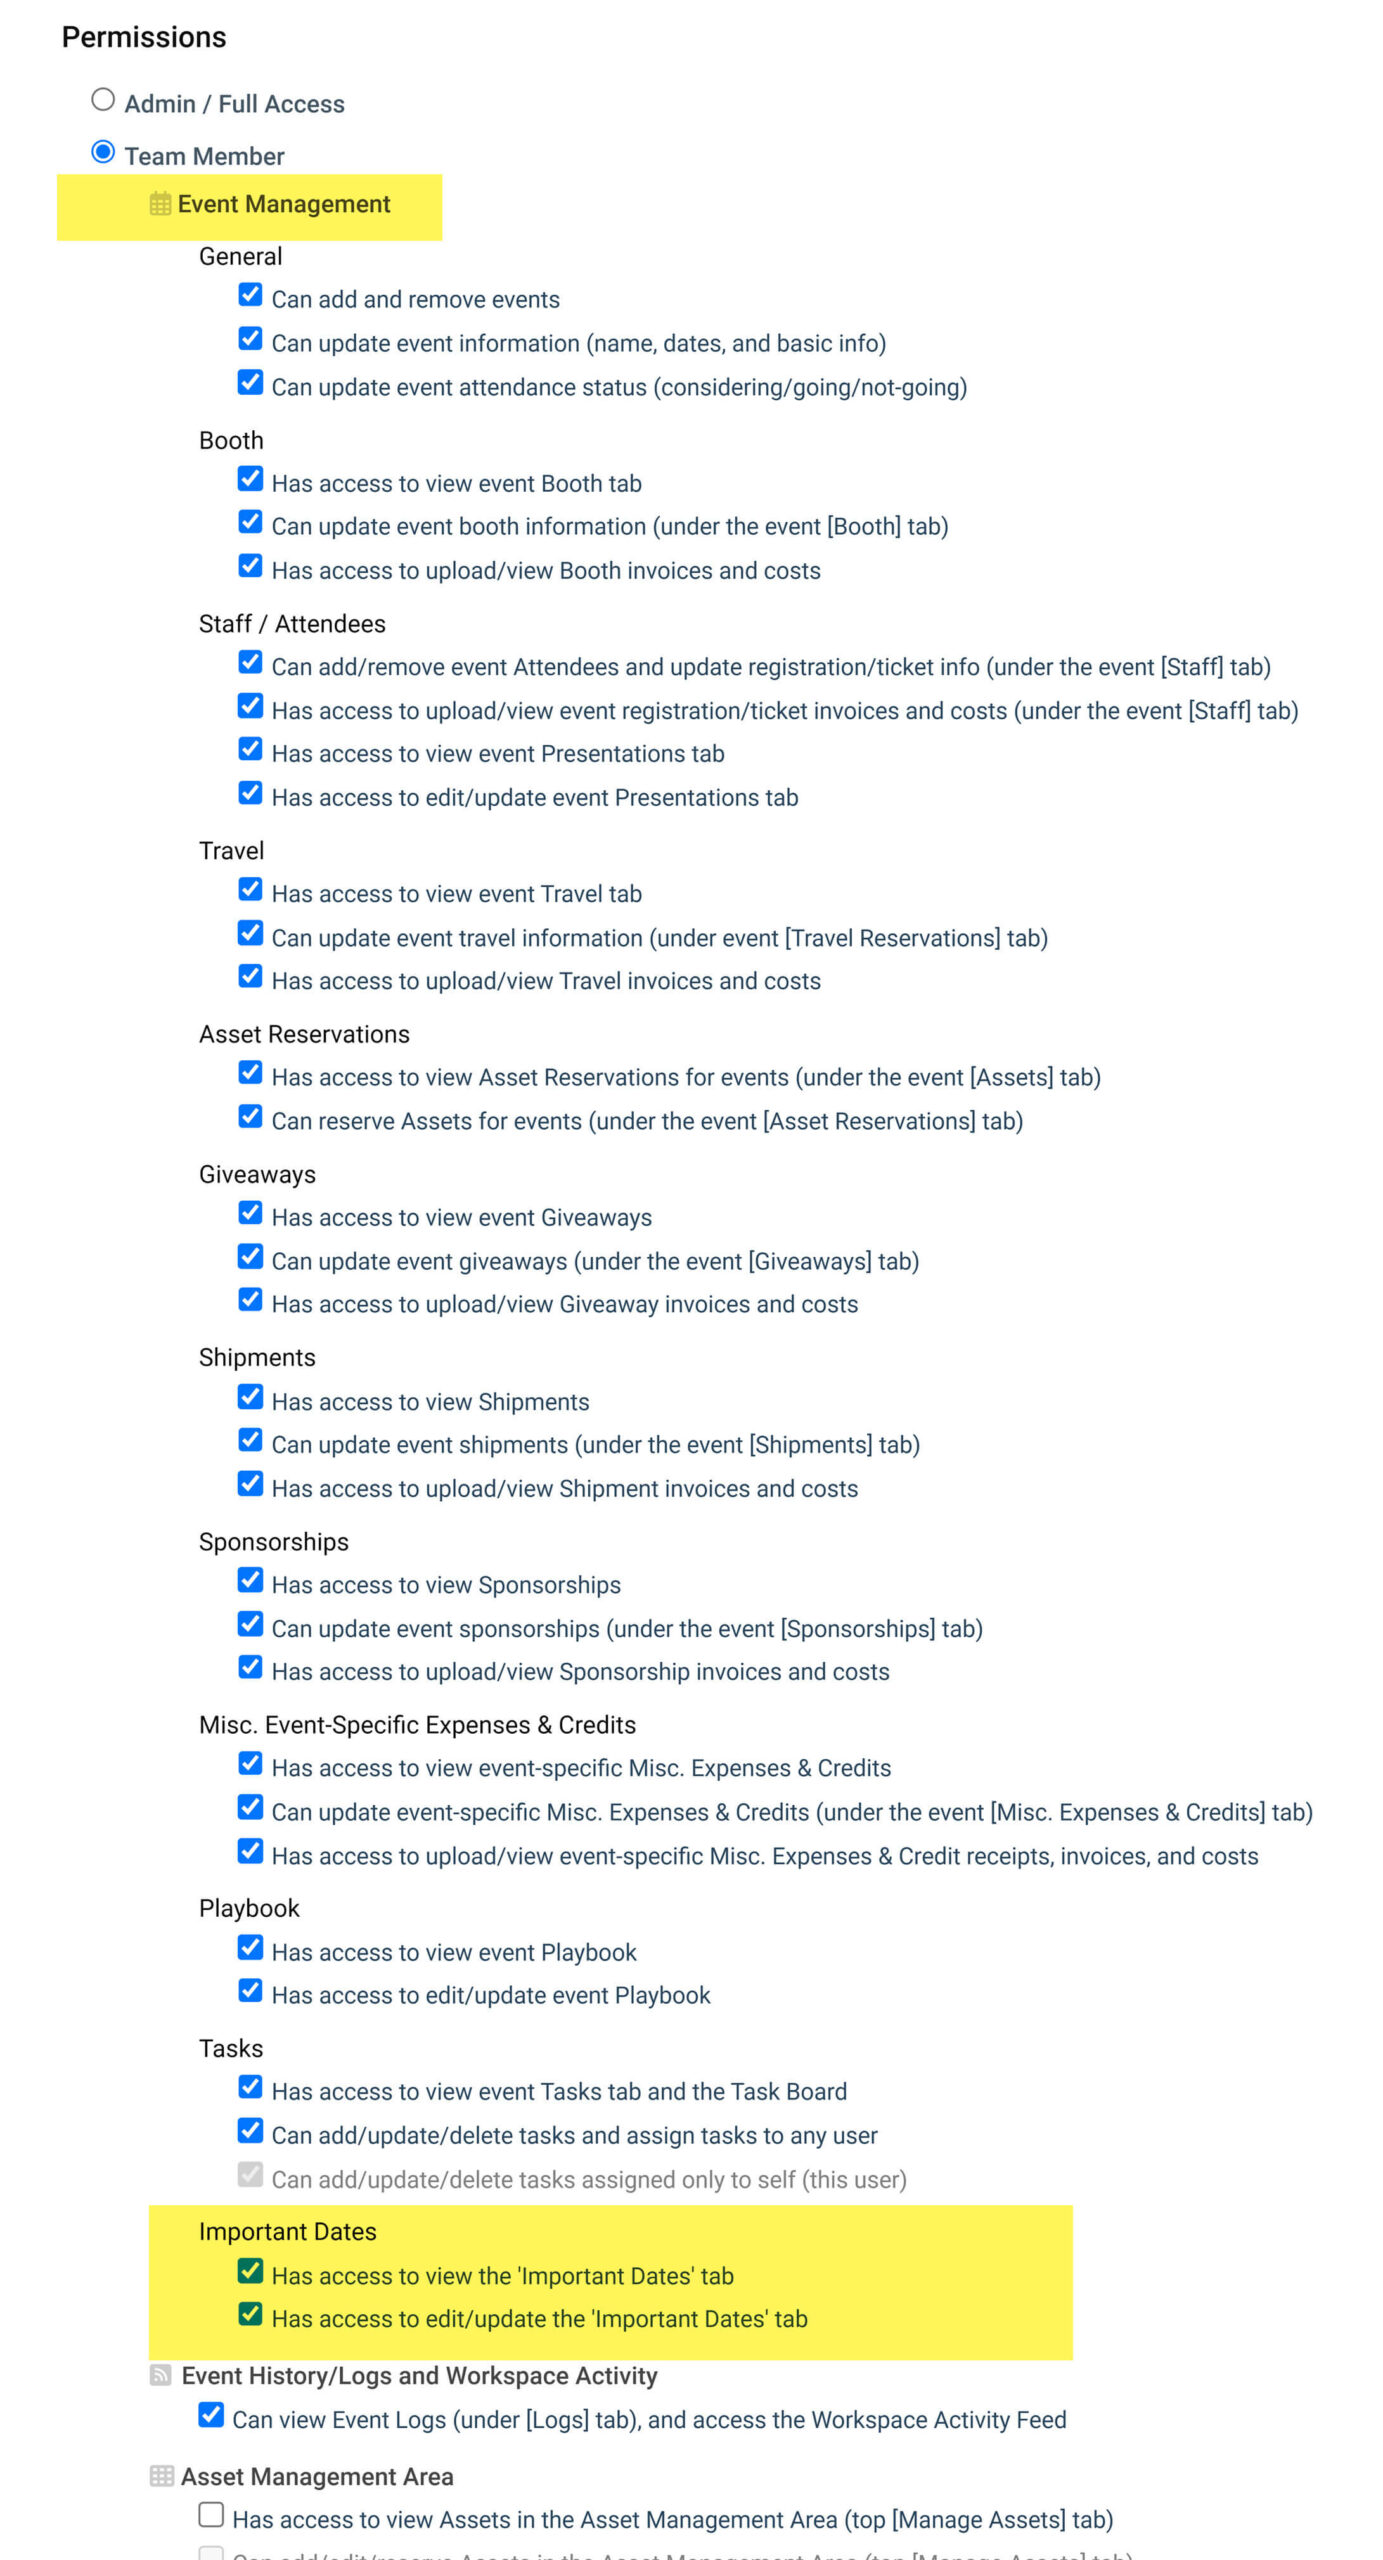
User Permissions for the Special Tab
If your Special event tab is marked as Enabled, when you edit any of the users in your workspace (under Workspace Settings > Users & Permissions), you’ll have the option to specify if they should have access to the Special event tab. The Special tab permissions for Team Members appears as the last item under the “Event Management” section of the list of permissions. The Special tab permission for Guests appears toward the bottom of the list of permissions (3rd from the bottom).
Note: by default, when you enable the Special tab, all users in your workspace will have access to the tab — users marked as Admins or Team Members will have view and update access, and users marked as Guest will have view access.
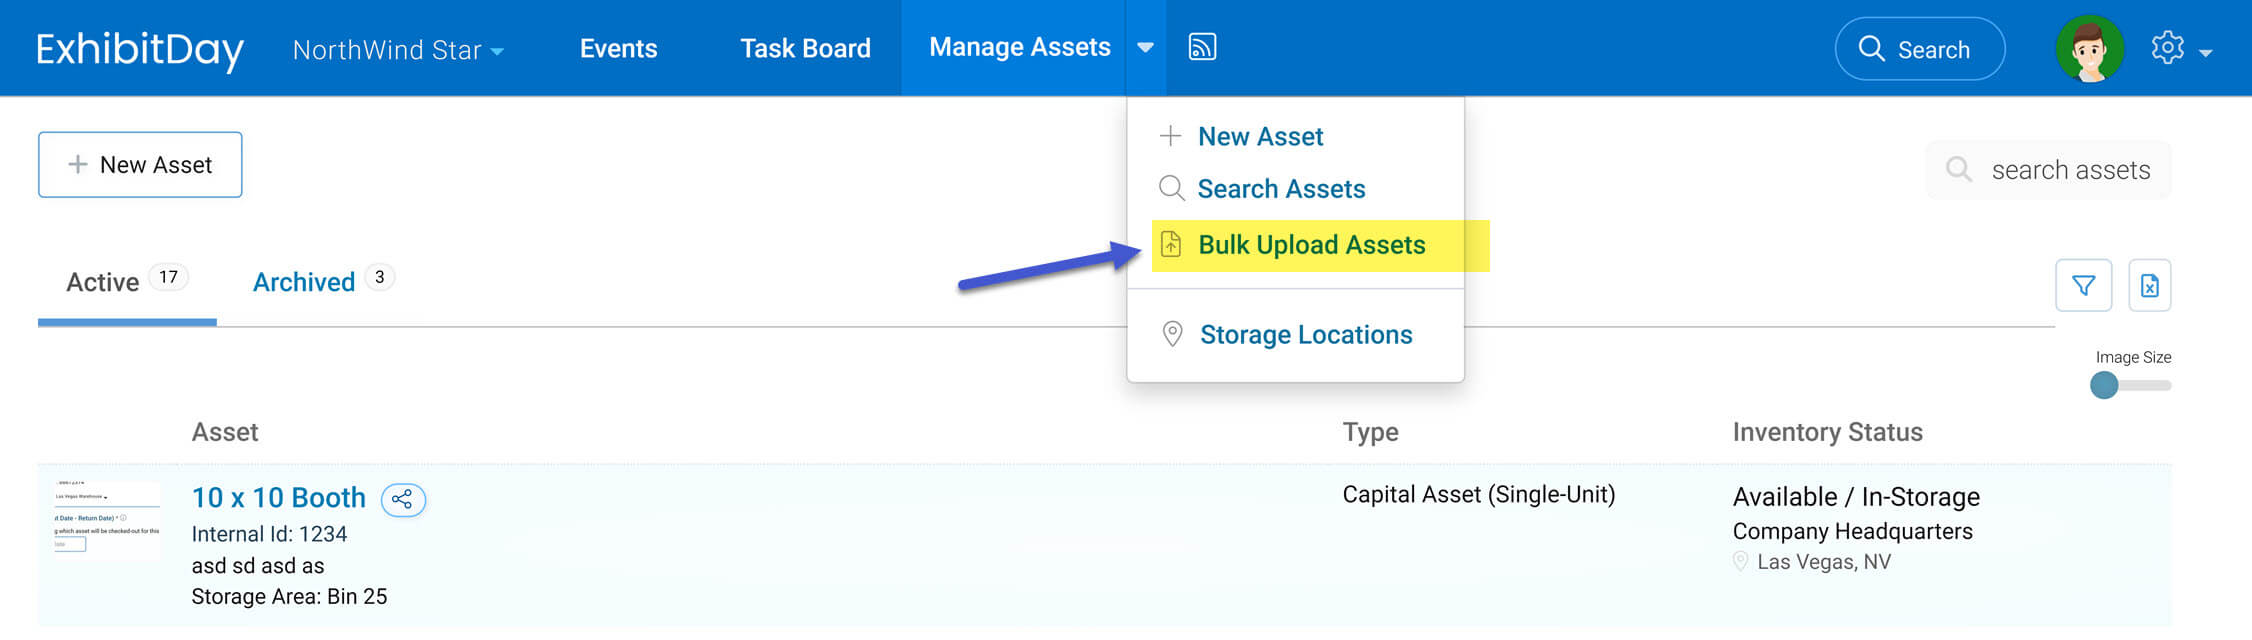
You can import your Assets from a spreadsheet into ExhibitDay. The Asset Import tool can be accessed via the dropdown menu of the “Manage Assets” tab.
Prerequisite: At Least One Storage Location
As a part of the asset bulk upload process, right after you upload your spreadsheet, you’ll be asked to specify the Storage Location for each Capital Asset that you’re importing.
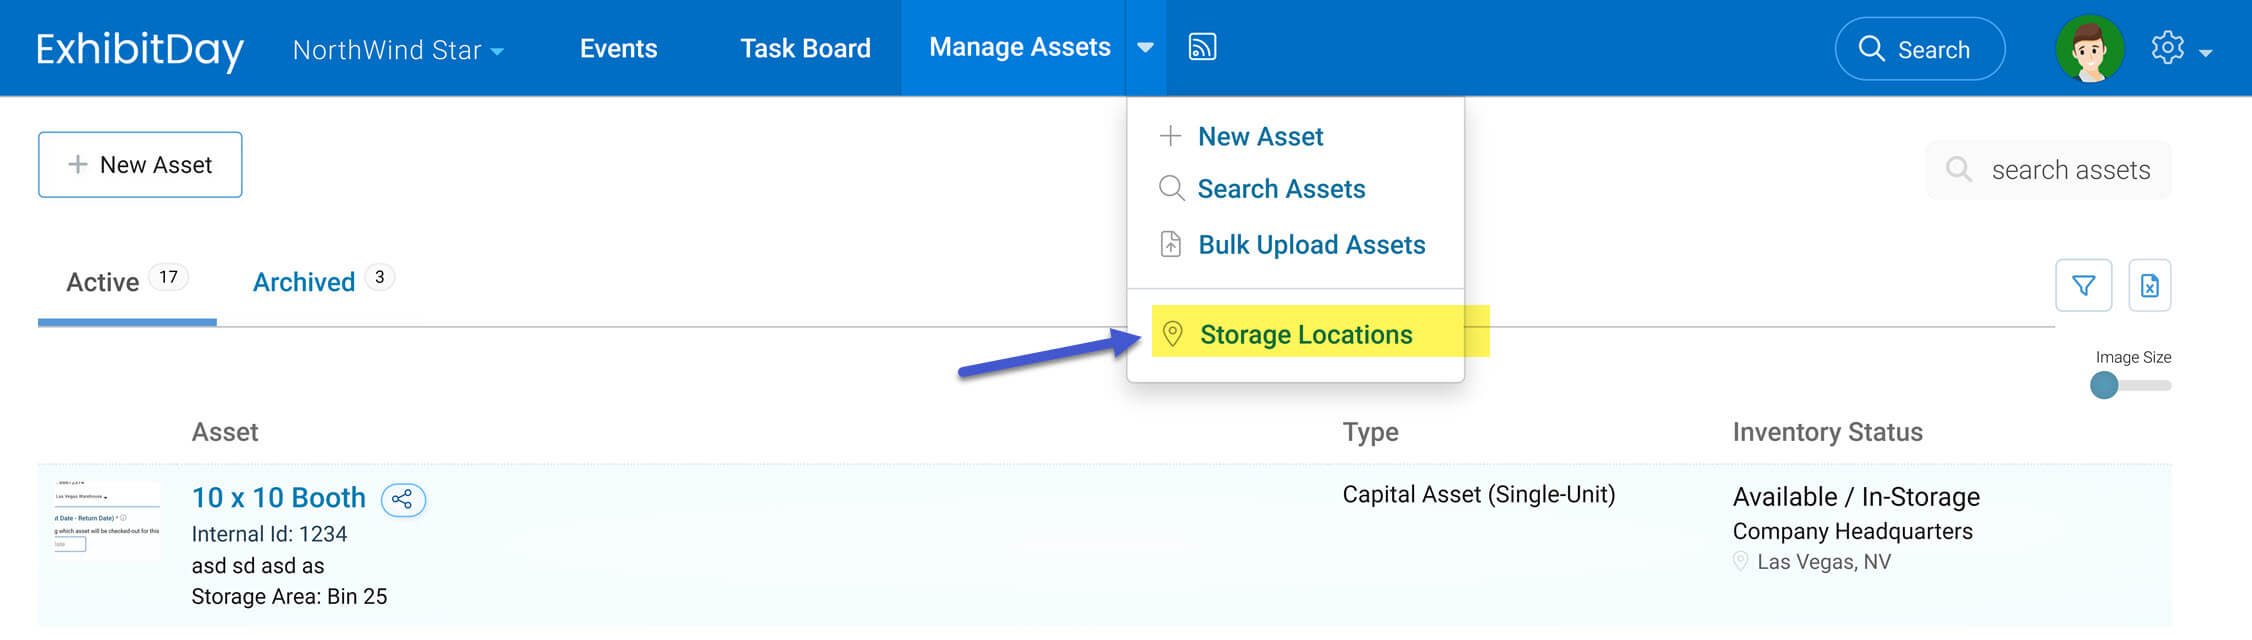
Before you begin, please ensure that the Storage Locations to which you plan to assign the assets you’re importing have already been entered into the system.
Storage Locations can be managed from the dropdown menu of the “Manage Assets” tab.
Note: Storage Locations are different from “Storage Areas.” Storage Locations are places where assets are stored (for example, Warehouse A, Warehouse B). Each Storage Location has a name, address, point of contact, etc. Storage Areas are places within Storage Locations where assets are typically stored (e.g. “Aisle 1, Bin 3”). If you want to specify Storage Areas for assets you’re importing, you can enter the Storage Area for each asset under the “Storage Area” column (Column F of the upload template).
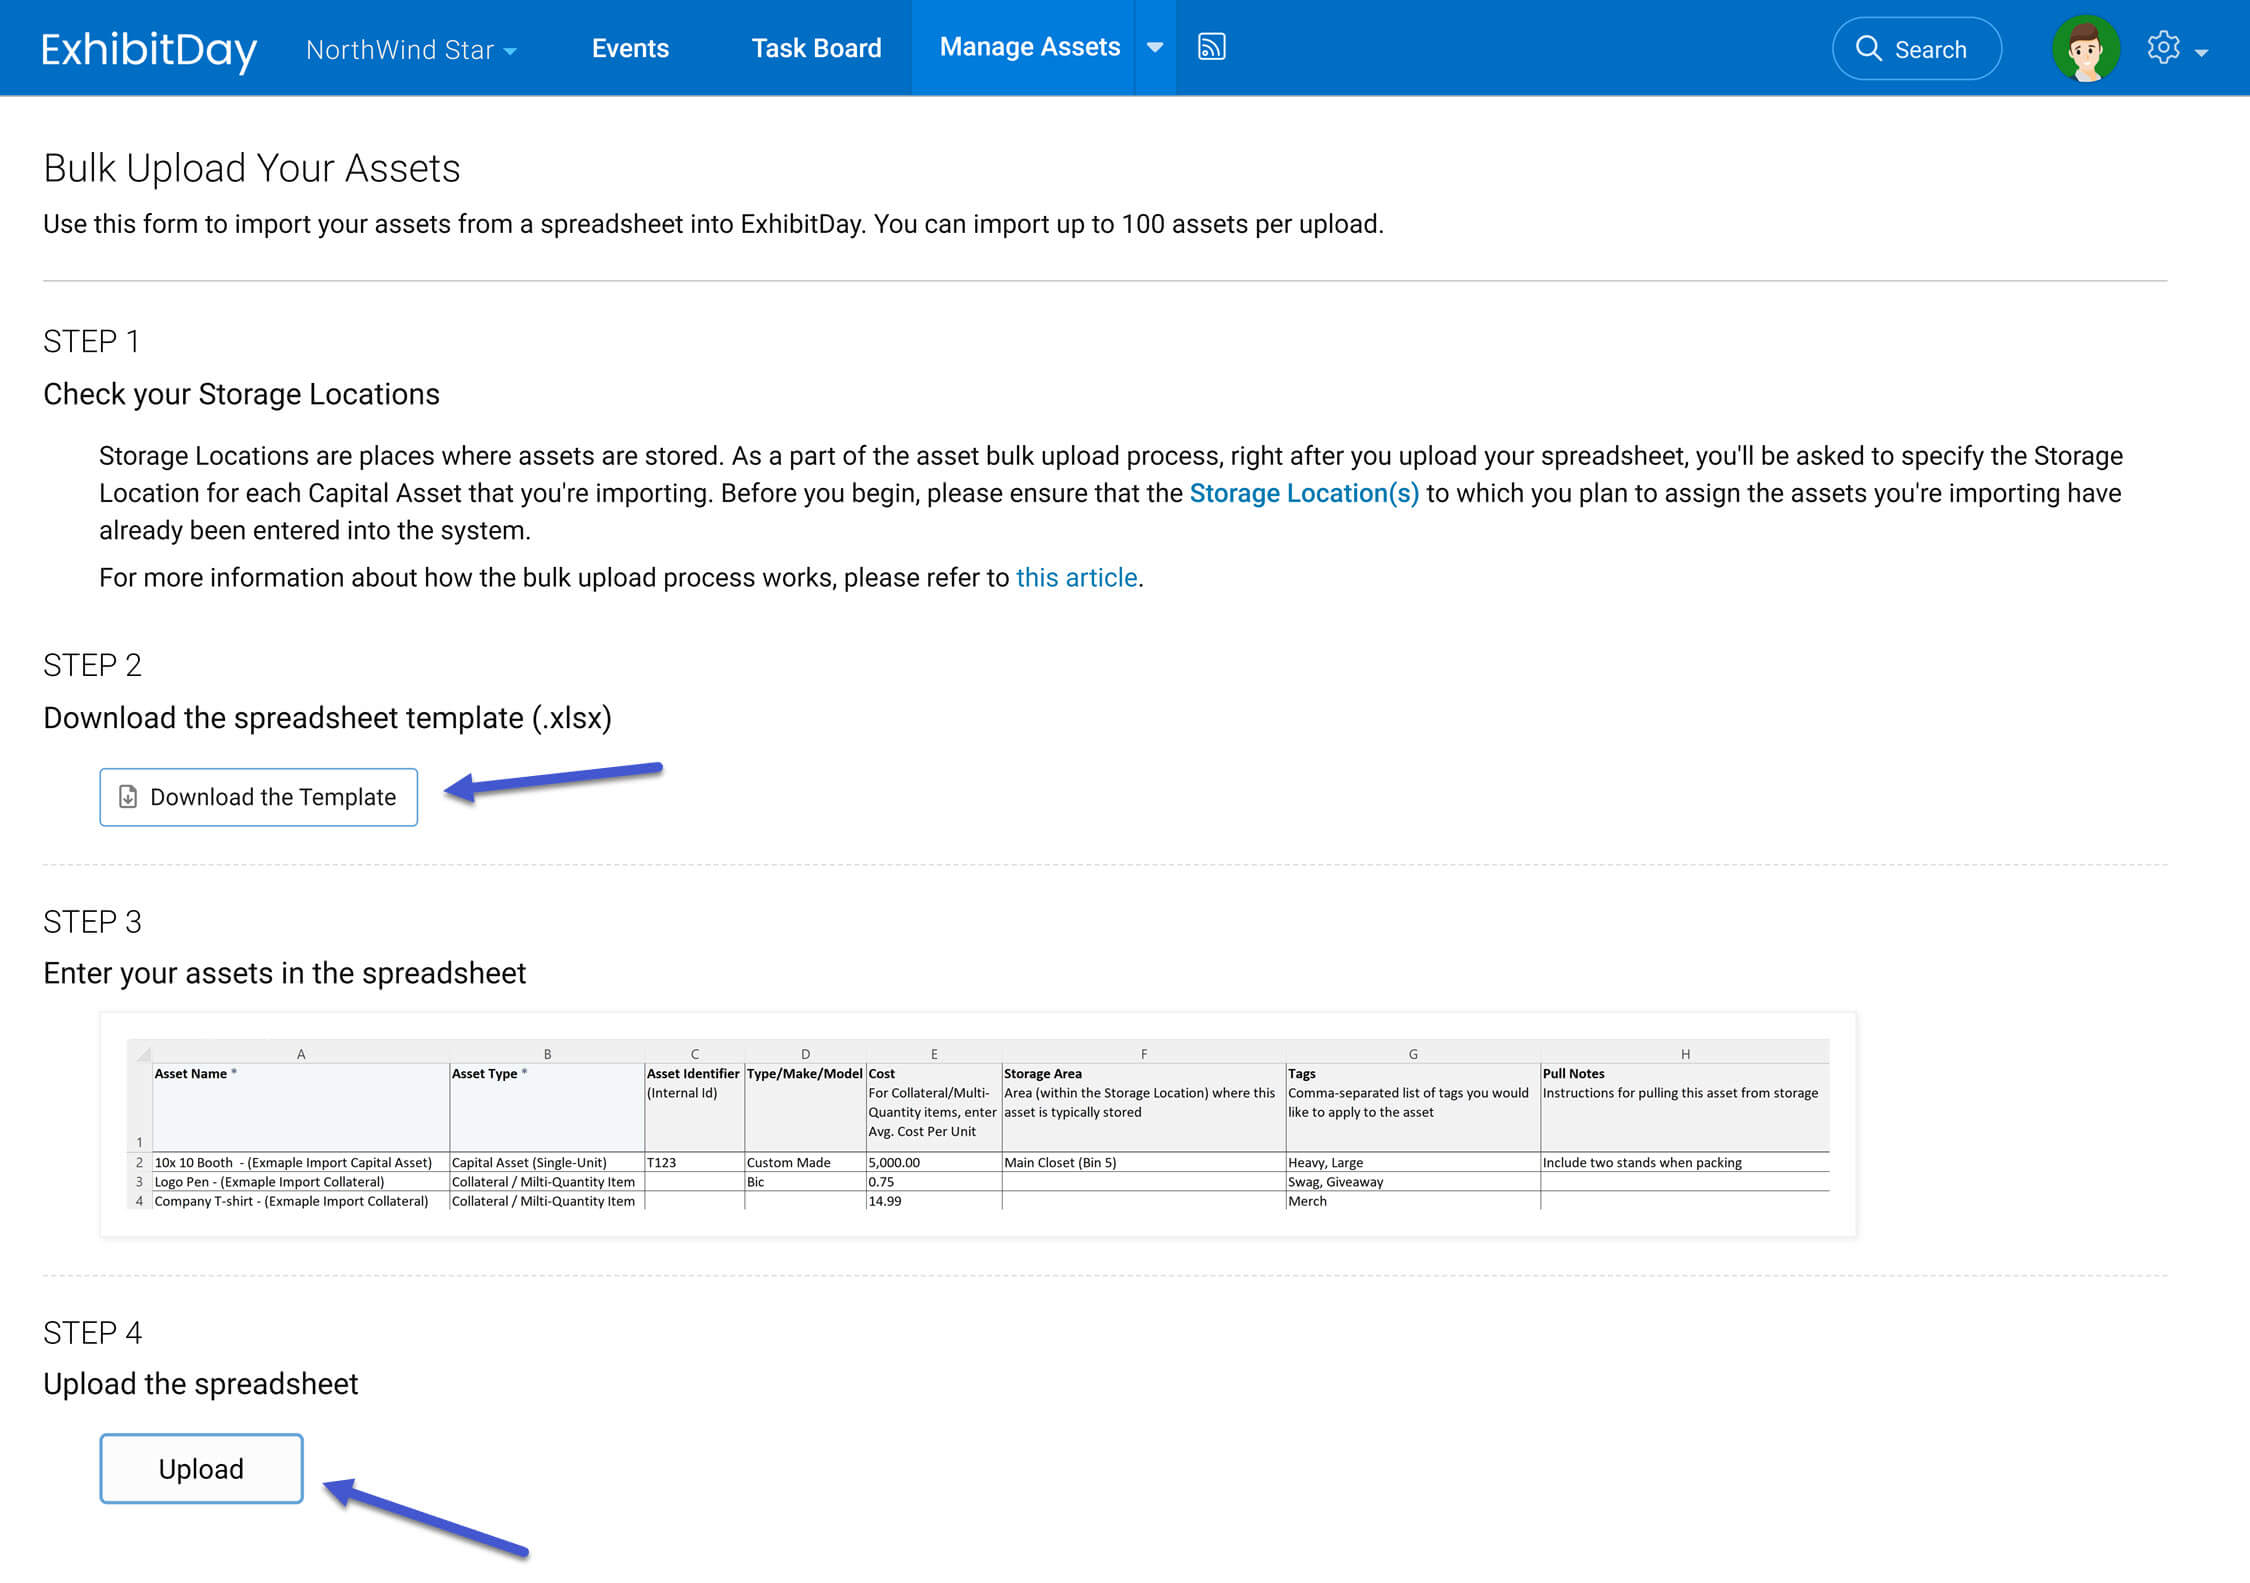
The Import Process
The import process is simple — you download the spreadsheet template (.xlsx), then fill in your assets (1 asset per row), and upload the completed file.
Please note that in the template, “Asset Name” (column A) and “Asset Type” (column B) are the only required columns.
Note: You can import up to 100 assets per upload. If you have more than 100 assets that you would like to import, you can break them down into multiple spreadsheets and upload each spreadsheet separately. Also, the import tool is limited to the properties of assets listed in the spreadsheet template (Asset Name, Type, Internal ID, Make/Model, Cost, Storage Area, Tags, and Pull Notes). Other properties of assets (like asset images, and quantities for collateral, etc.) cannot be imported using the import tool — they would have to be entered into the system manually after the import is complete.
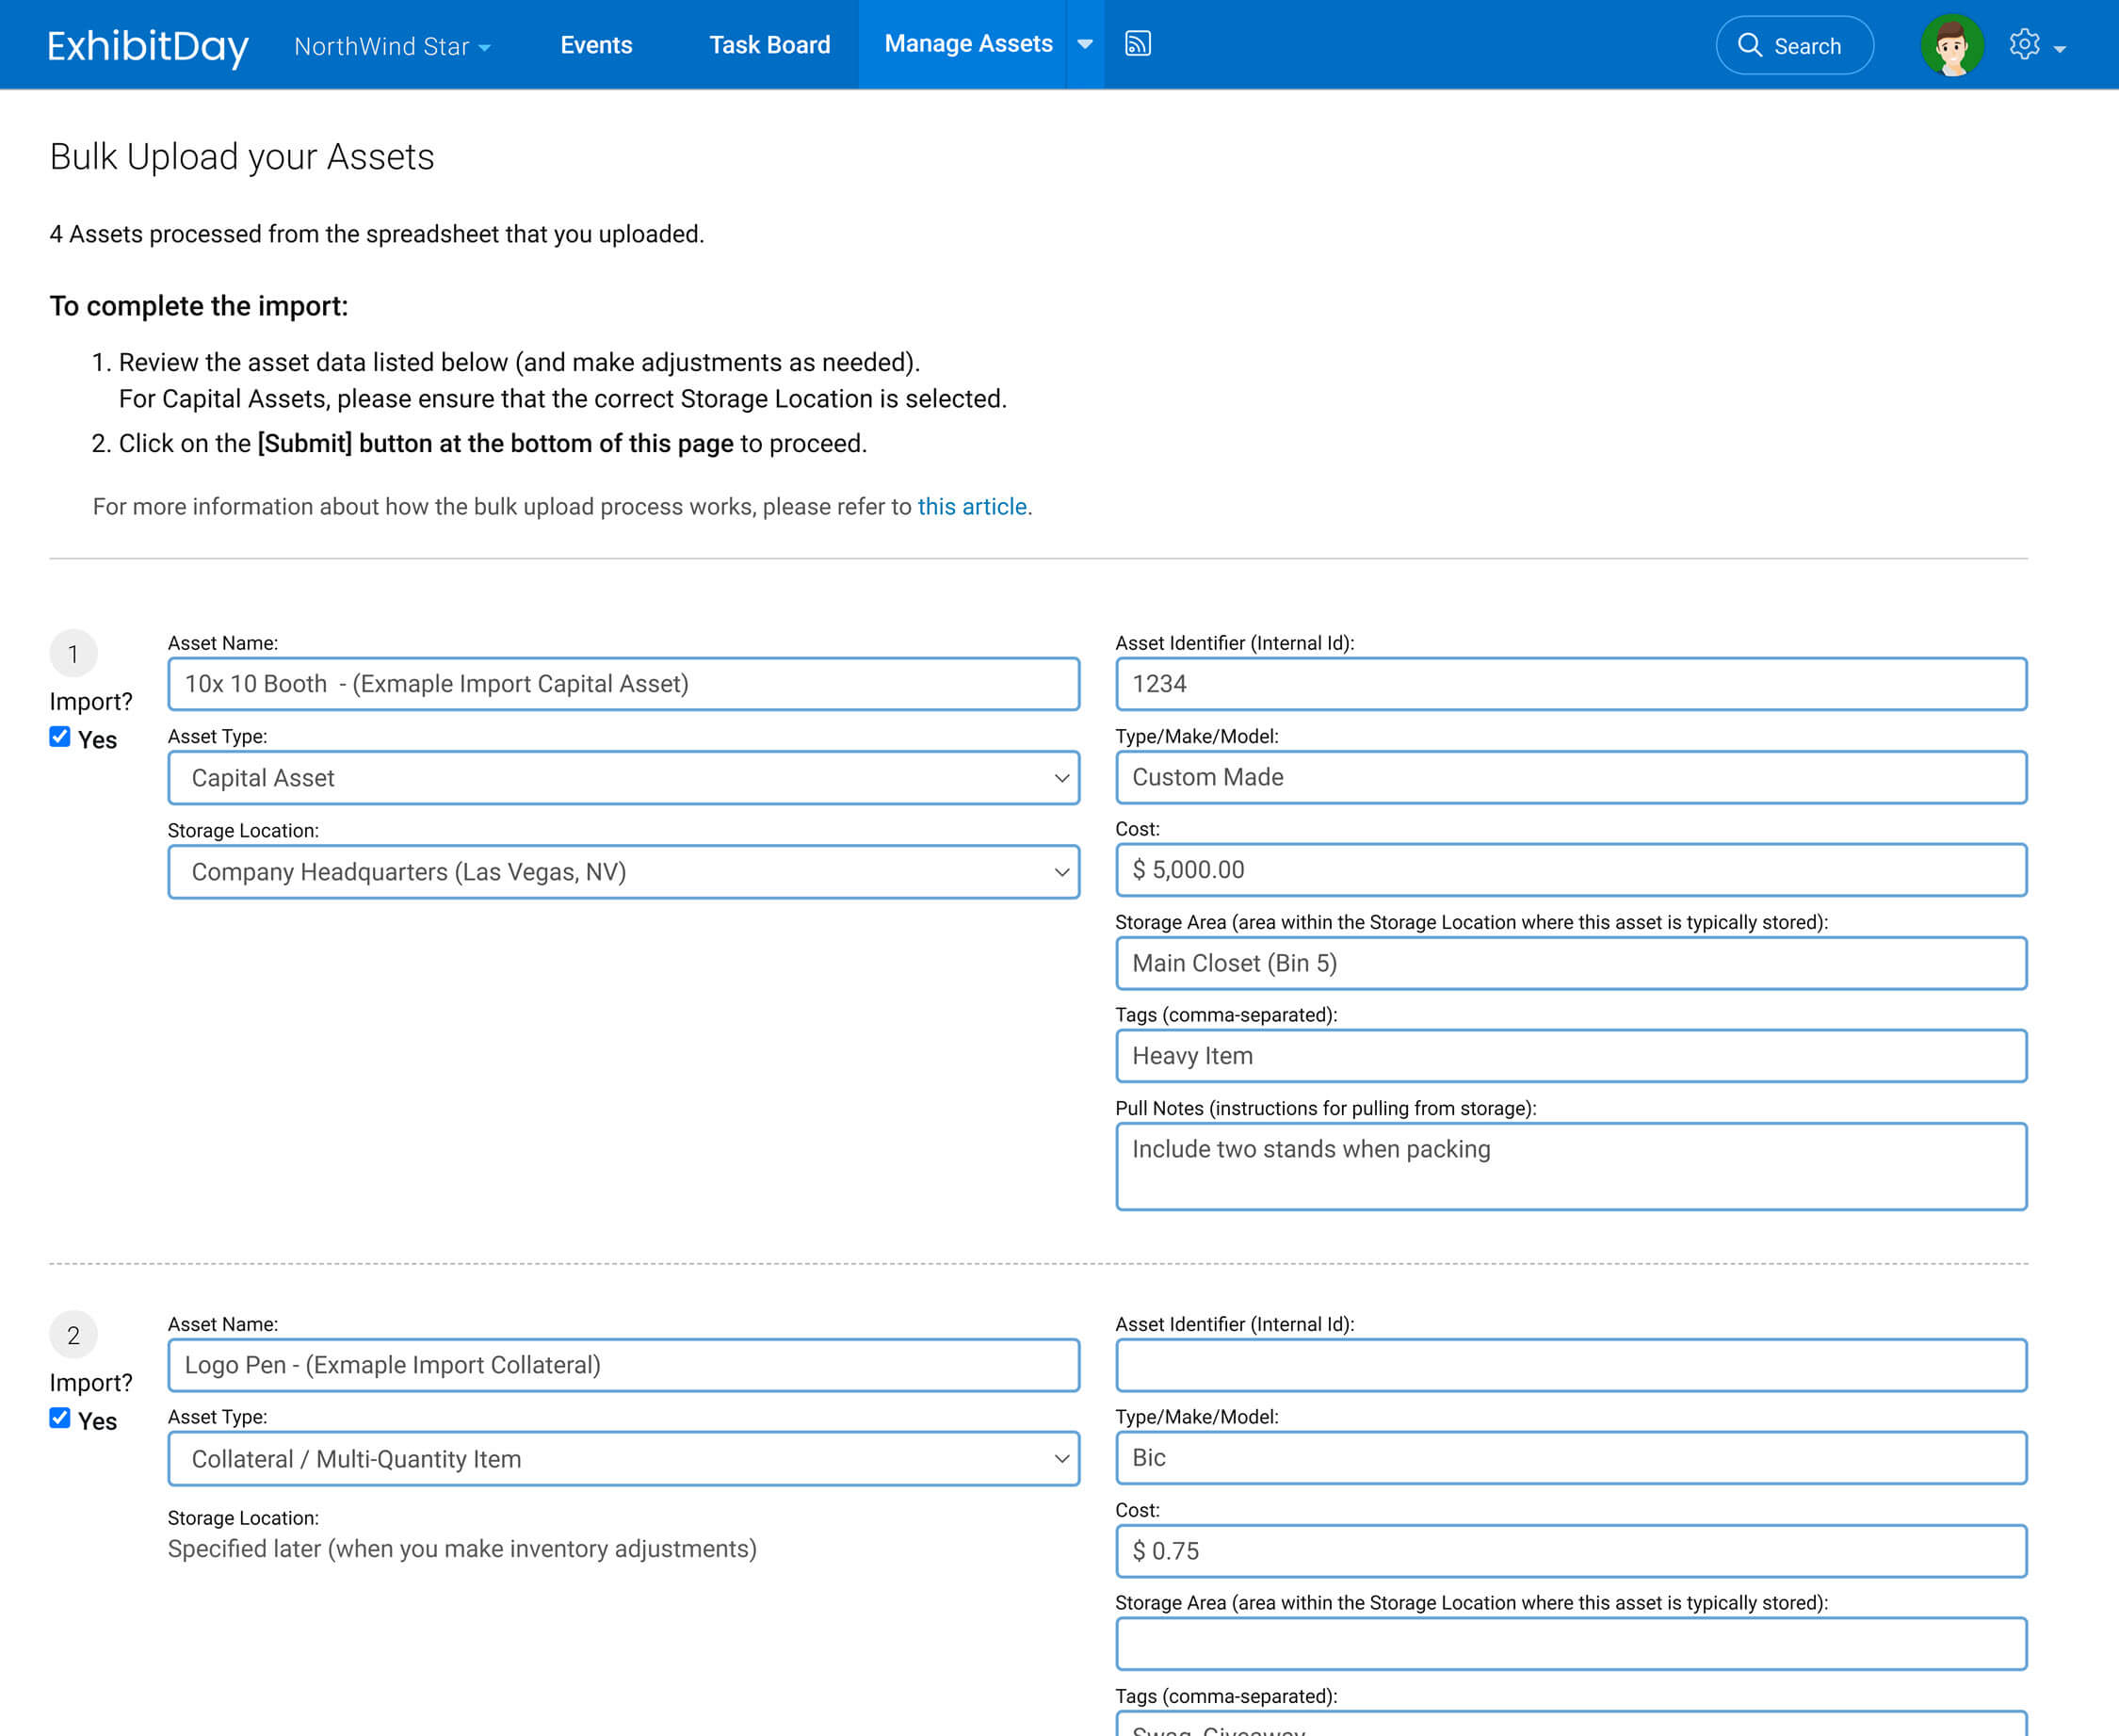
Final Step: Review Screen
After you upload the spreadsheet, the system will parse your data and present you with a screen where you can review the data you’re about to import for accuracy. Review each asset that is being imported and make changes as needed.
If you are importing any Capital Assets, please ensure that you select the appropriate Storage Location for each Capital Asset on the review screen.
Once you’re done reviewing the data, click the “Submit” button at the bottom of the page to complete the import process.
Note: In ExhibitDay, each Capital Asset must be assigned to a Storage Location. That is why you are given the option to choose the Storage Location for each Capital Asset you’re importing on the review screen. On the other hand, Collateral / Multi-quantity Items do not need to have a storage location defined; the storage locations for Collateral / Multi-quantity Items can be selected whenever you make inventory adjustments for them (after the import is done).
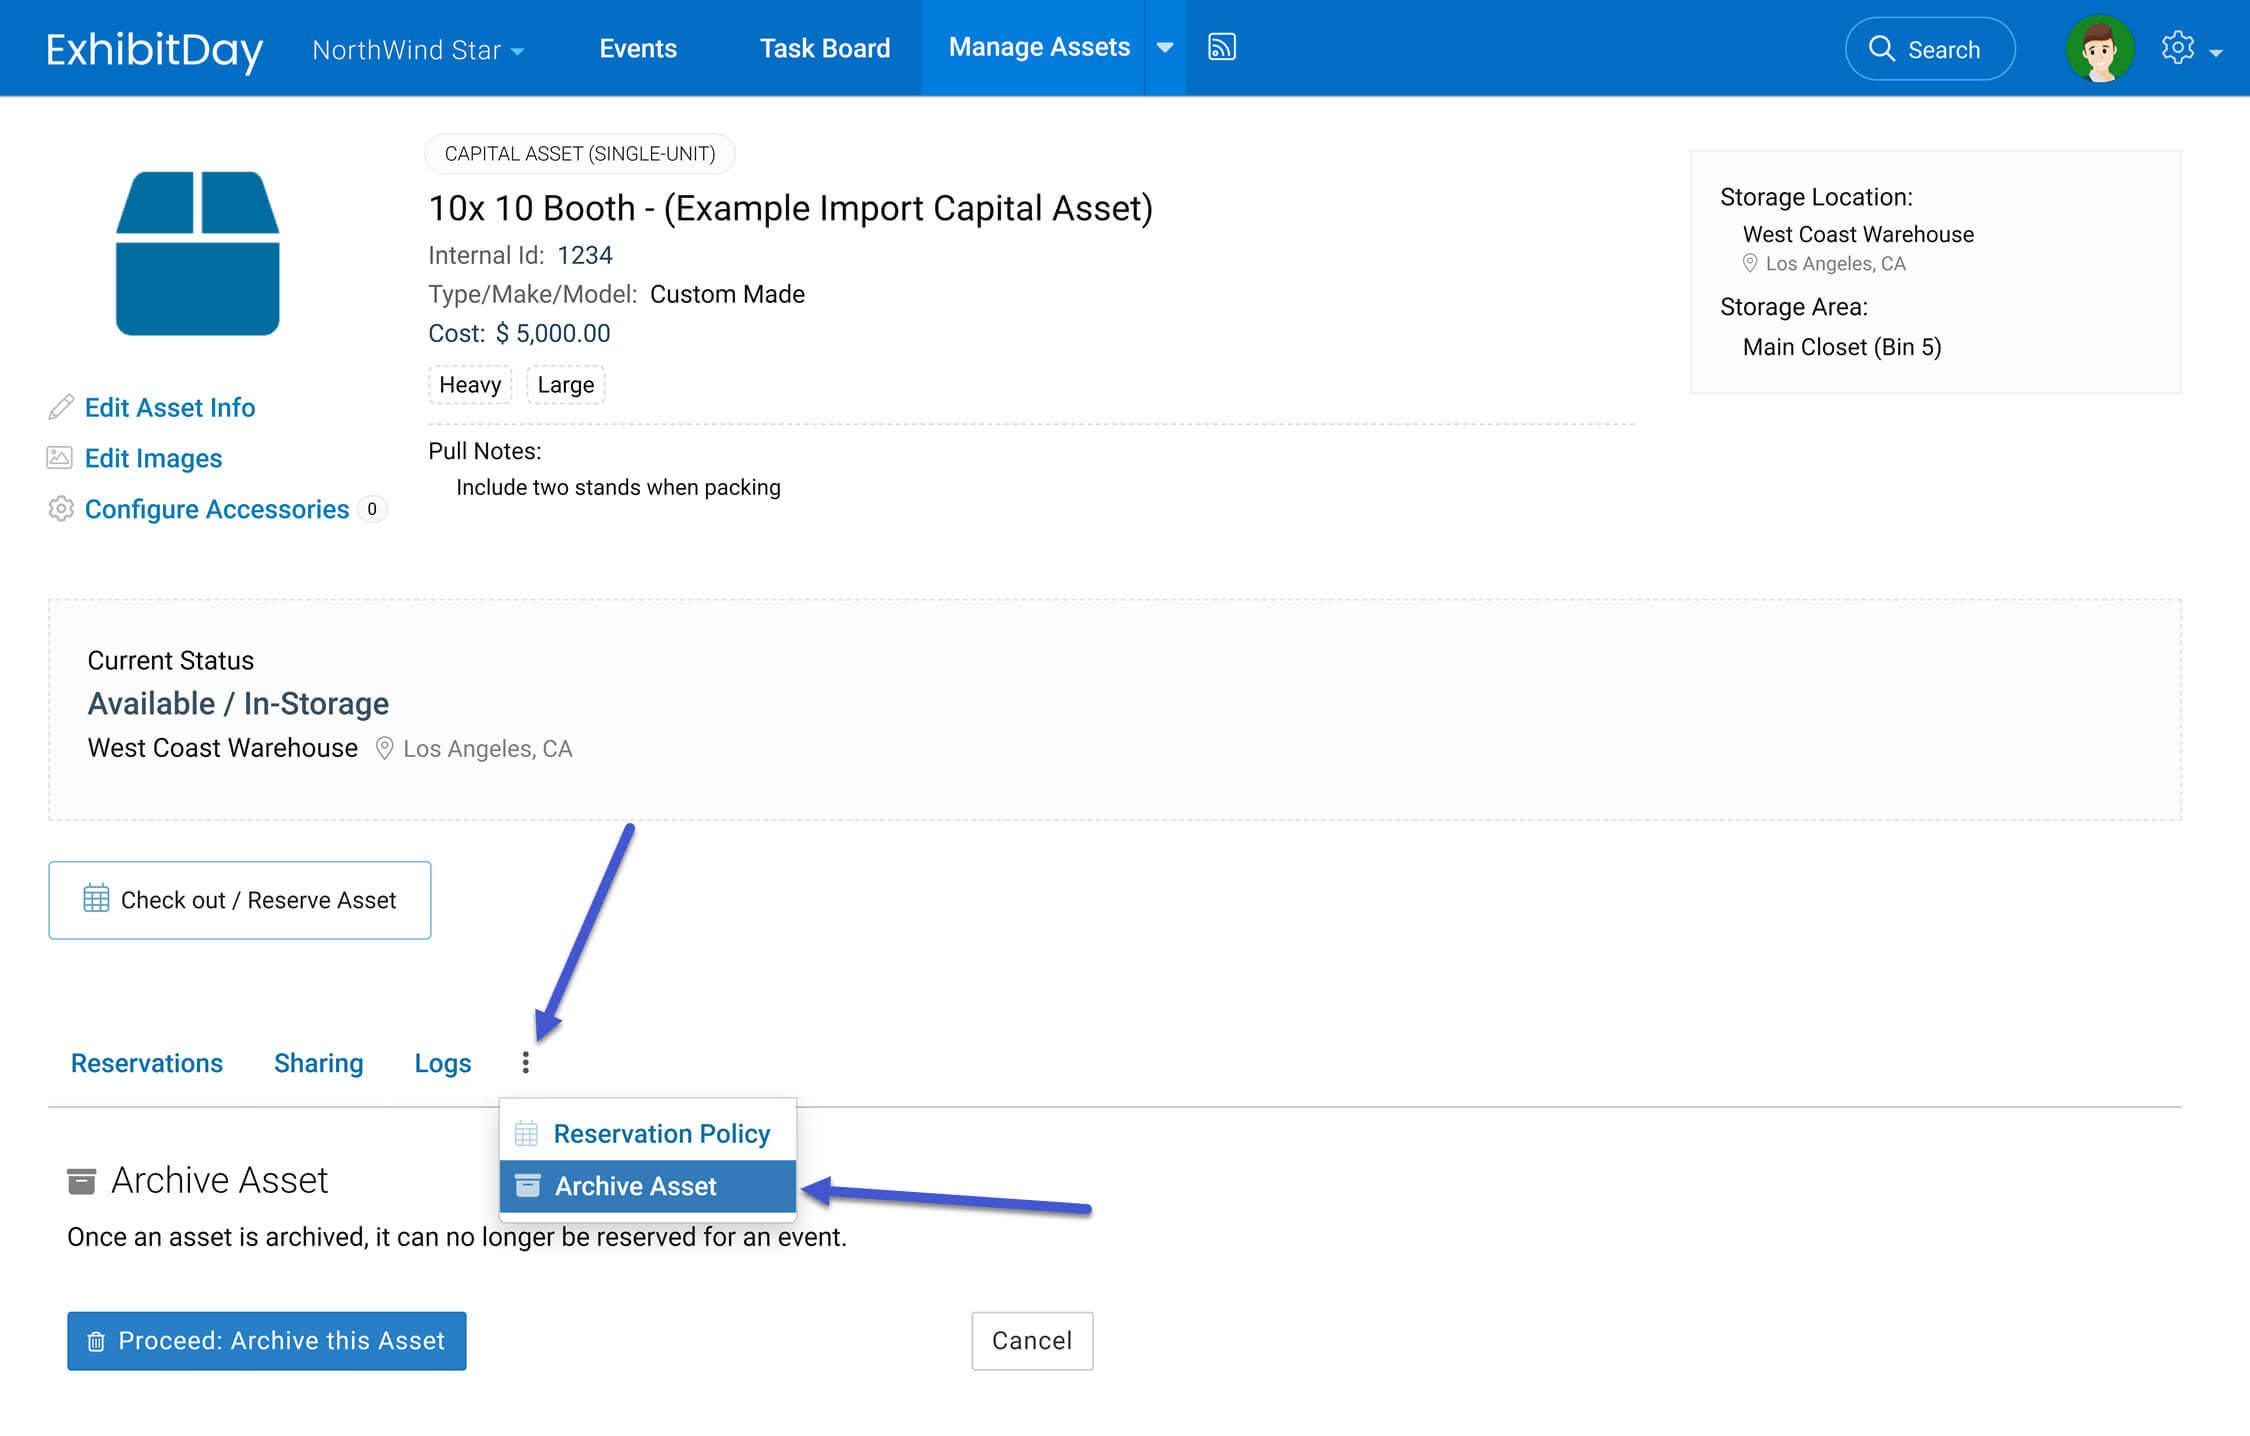
Deleting Assets
If you accidentally import a duplicate asset, you can delete it by going to the Asset page itself. Please note that prior to deleting an asset, the asset must be marked as ‘Archived’. You can archive an asset from the extended menu of the tab strip on the Asset page. Once an asset is marked as ‘Archived’, the option to delete it appears in the extended menu of the tab strip.
You can easily create a copy of an existing travel reservation (under the event travel tab).
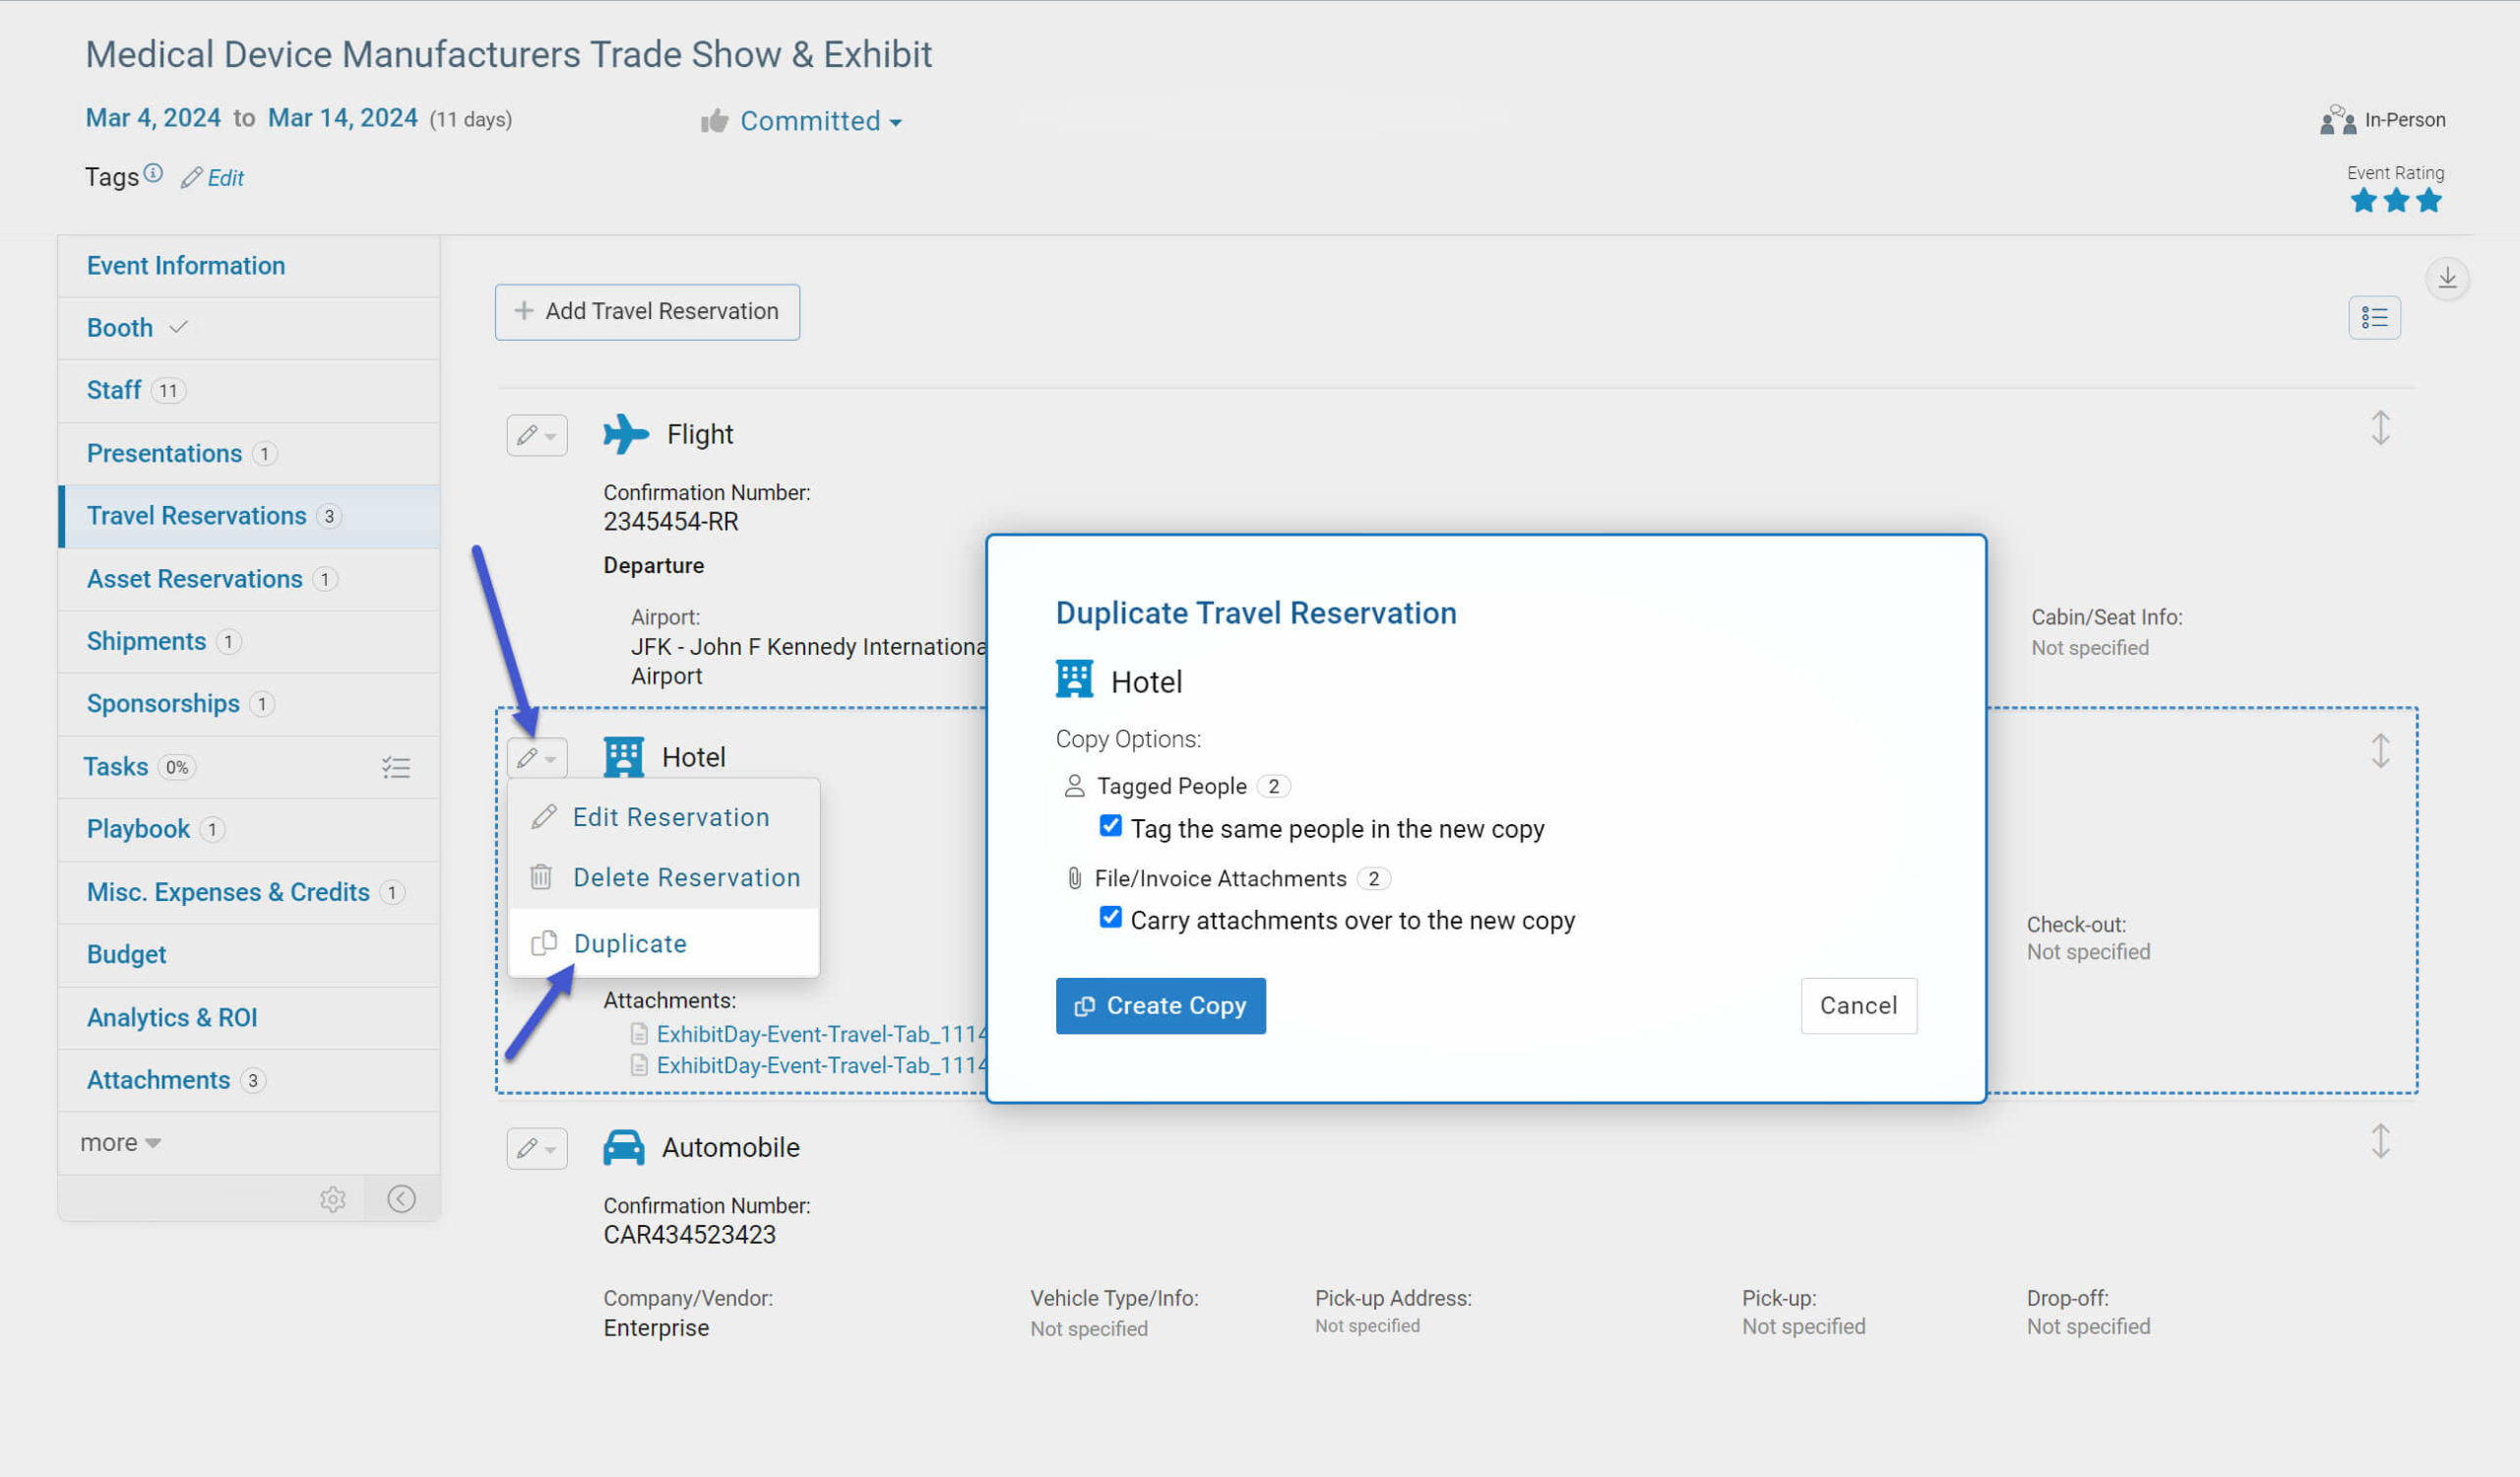
To create a duplicate copy of an existing travel reservation, click on the “Duplicate” option in the “Edit” menu of the reservation you’d like to copy.
Once the “Duplicate Travel Reservation” dialog appears, you can choose to copy the same tagged people and file attachments (if any) over to the new copy.
Finally, click the “Create Copy” button to complete the process.
Note: The ability to copy/duplicate travel reservations is only offered with ExhibitDay’s paid plans.
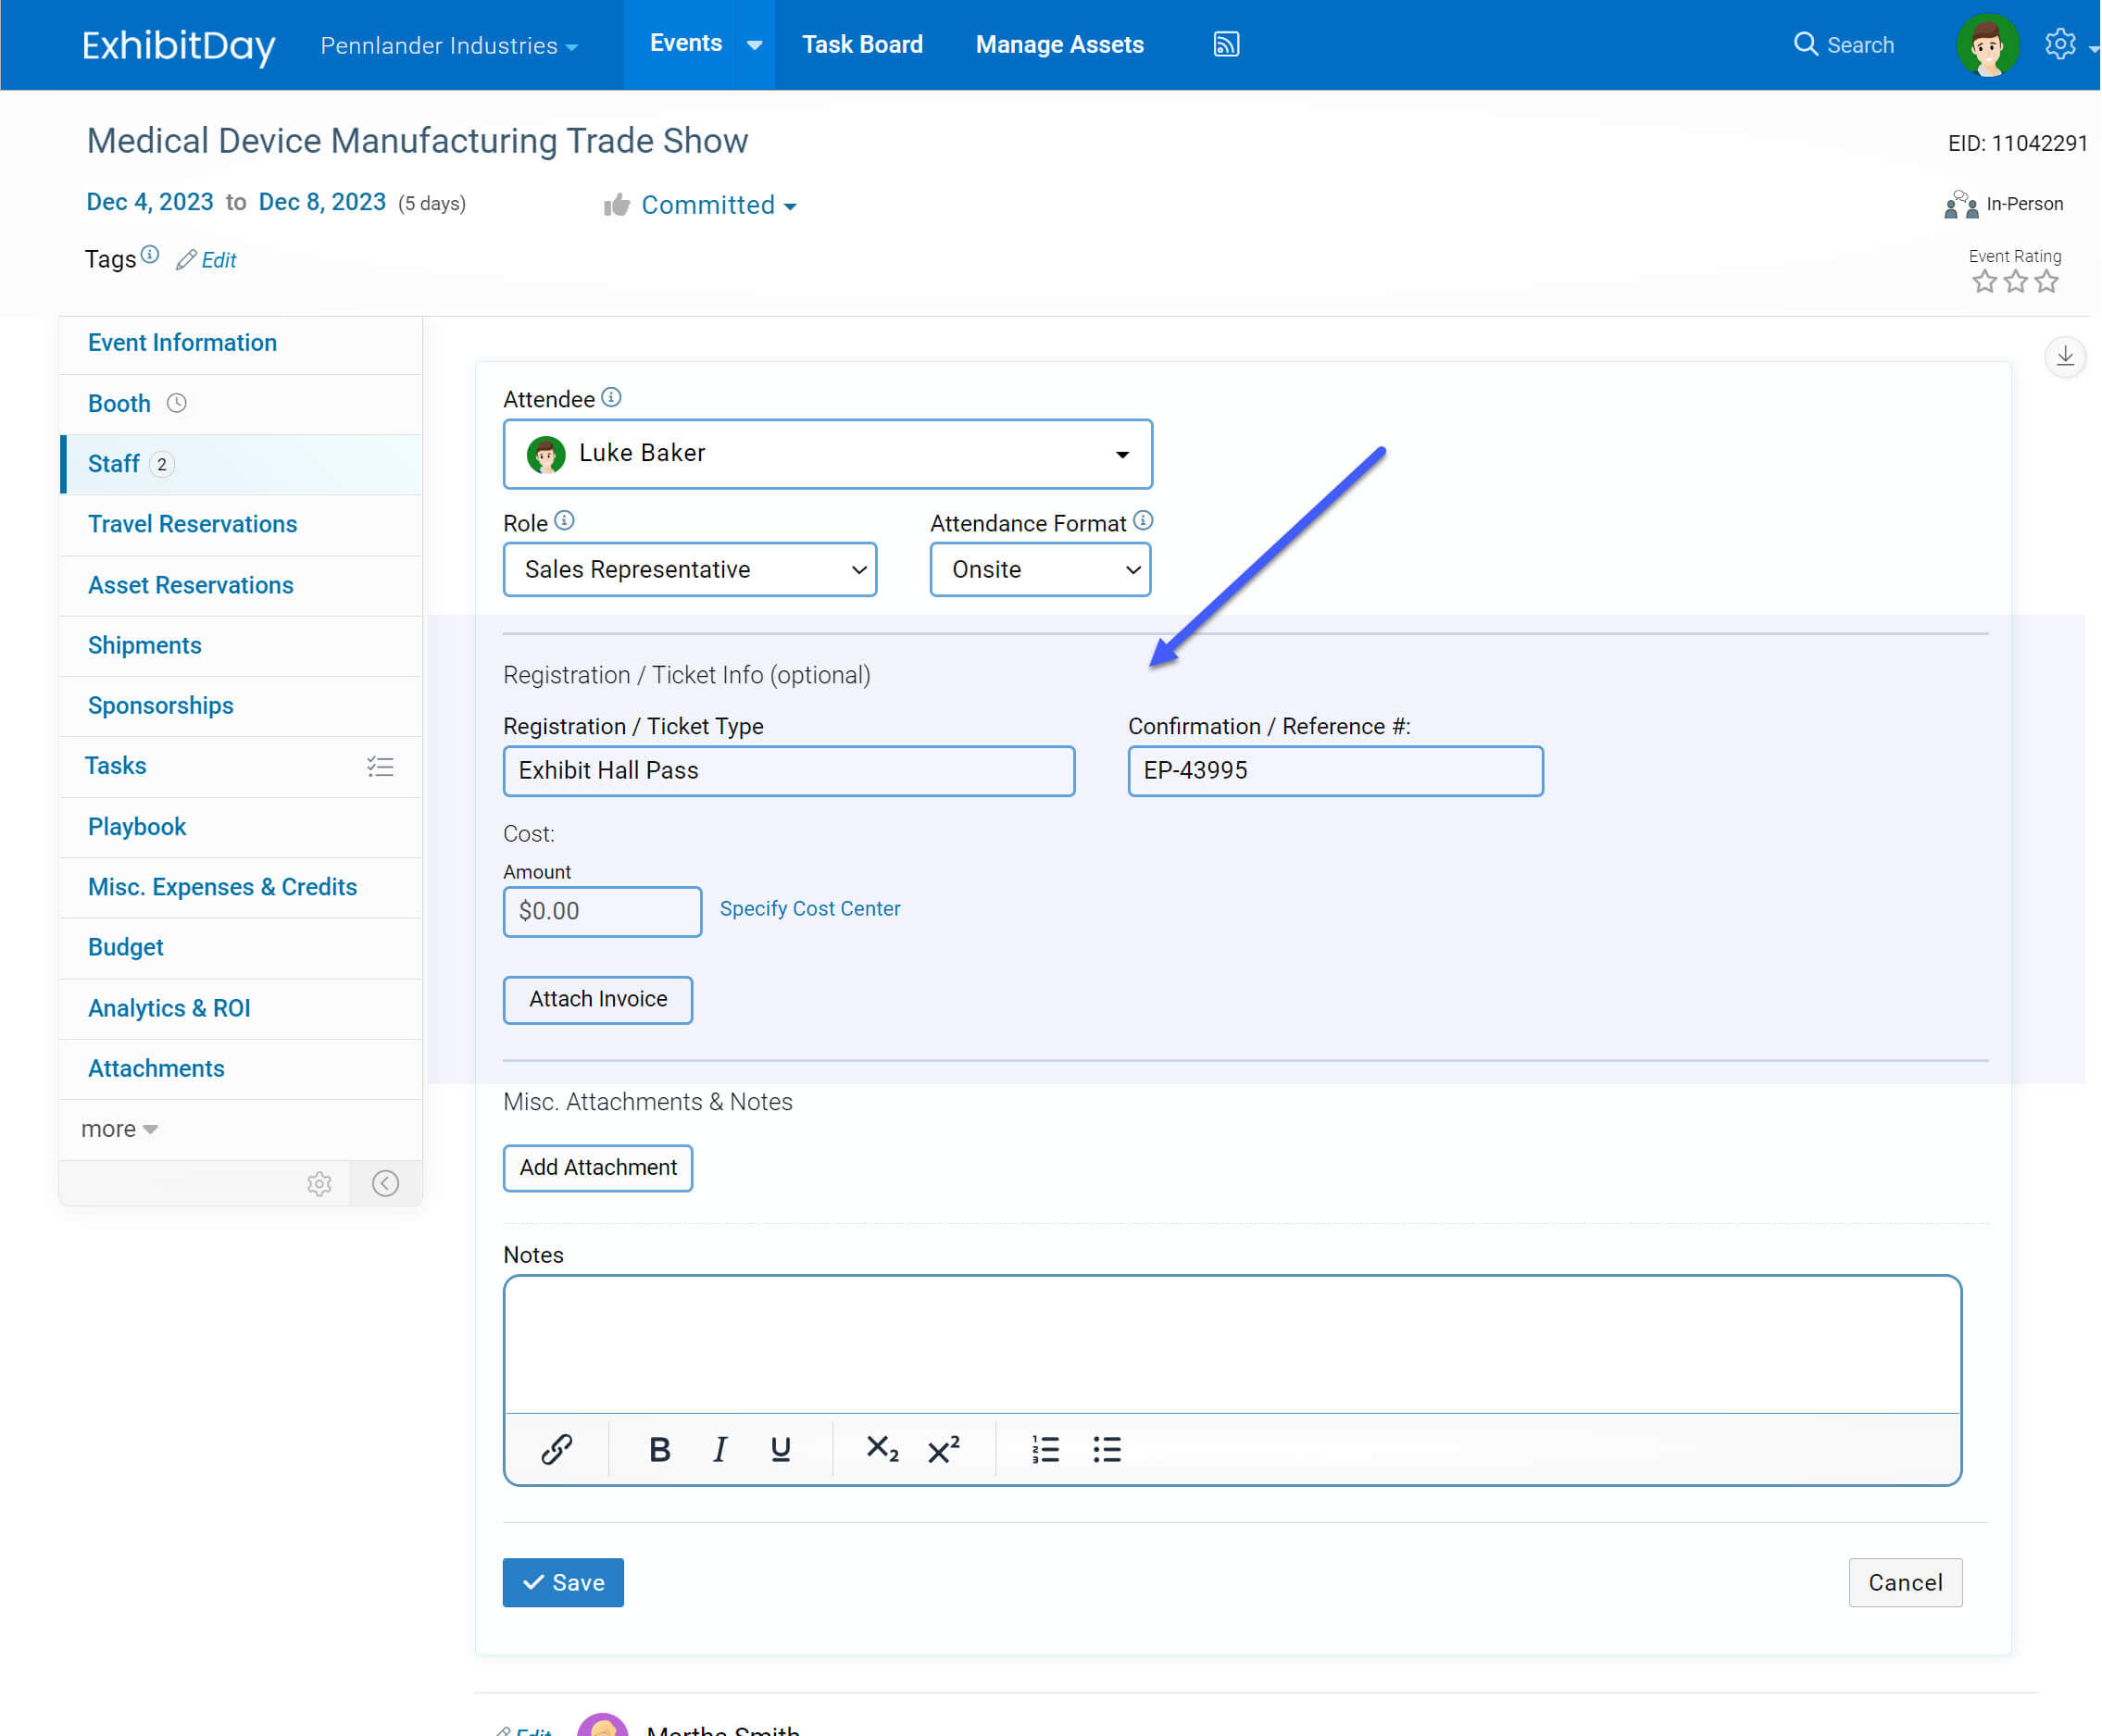
You can track event registration information for your staff who attend your events (under the “Registration / Ticket info” section when adding an attendee via the event “Staff” tab).
Pro-tip
If you have already committed to an event (i.e. purchased tickets, etc.), but you don’t know who’s going to attend yet, you can still create an “untagged attendance record” (by simply adding an attendee record without actually choosing a particular person in the Attendee dropdown). Once you determine who’ll be attending, you can come back and edit that record to tag the actual attendee.
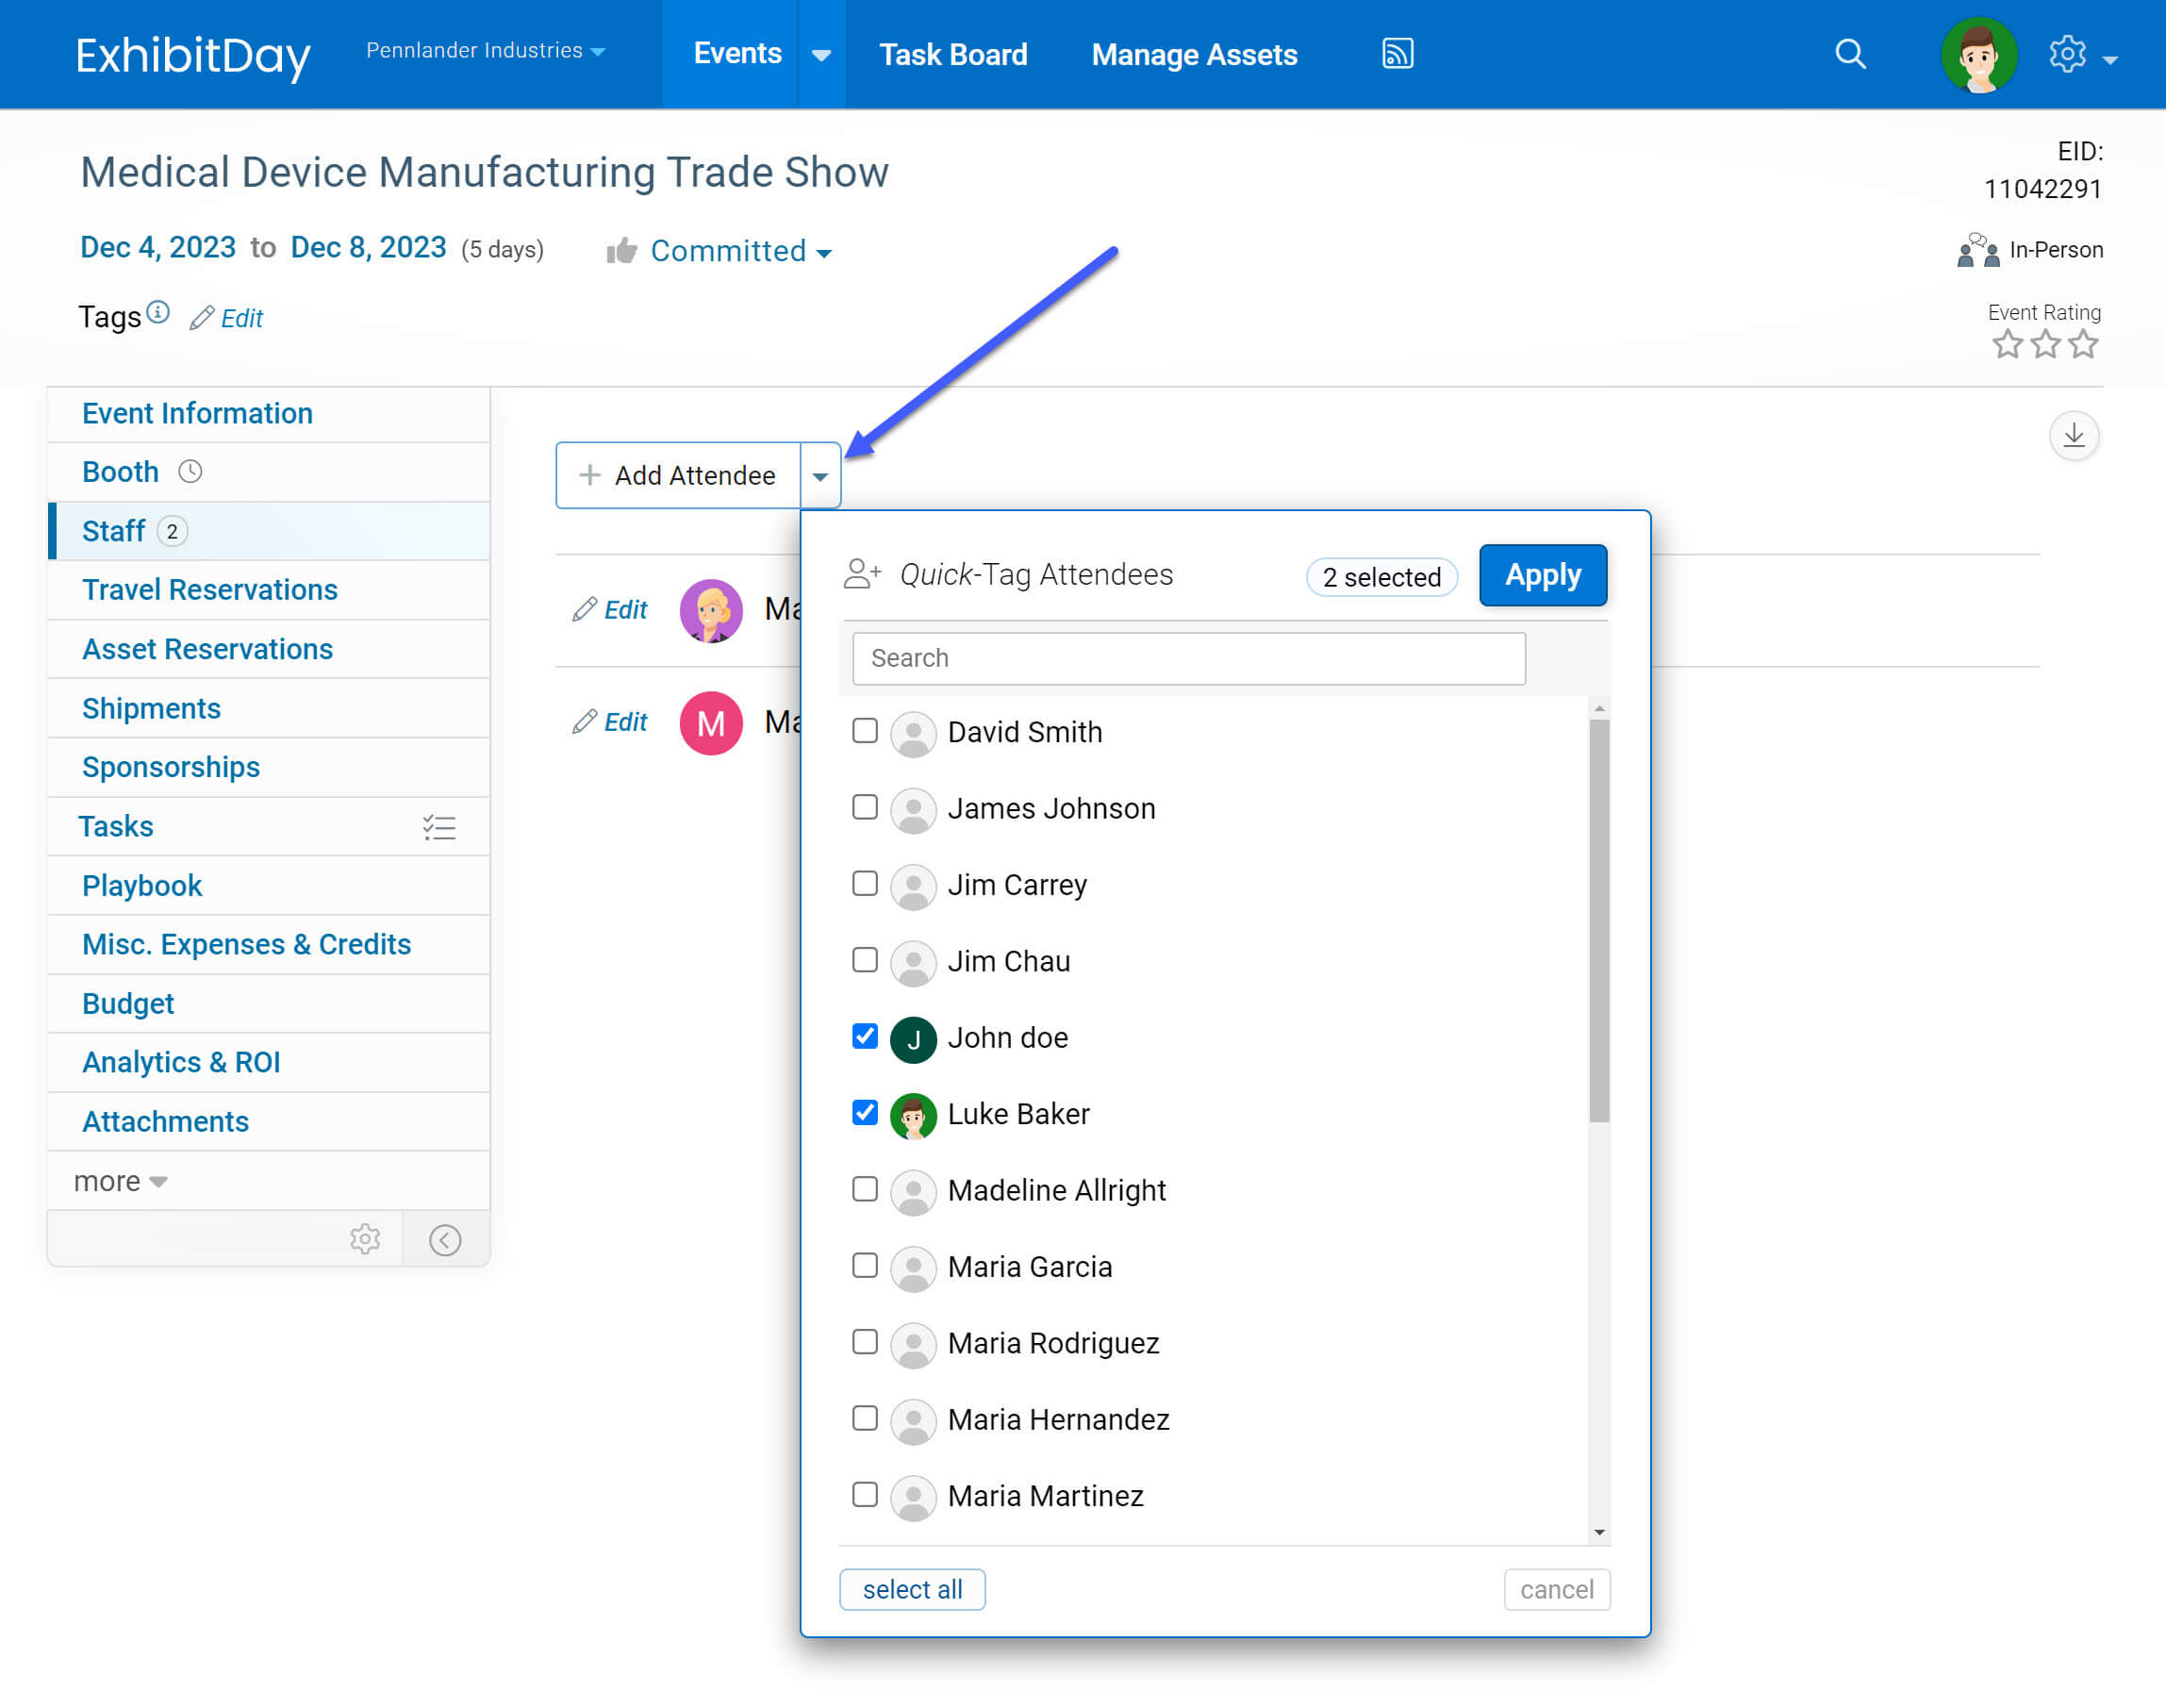
Quick-Tag Attendees
With just a few clicks, you can quickly tag attendees under the Event Staff tab. Use the dropdown menu (to the right of the “Add Attendee” button) to open the Quick-Tag dialog, then select the Attendee(s) you’d like to tag and click “Apply”.
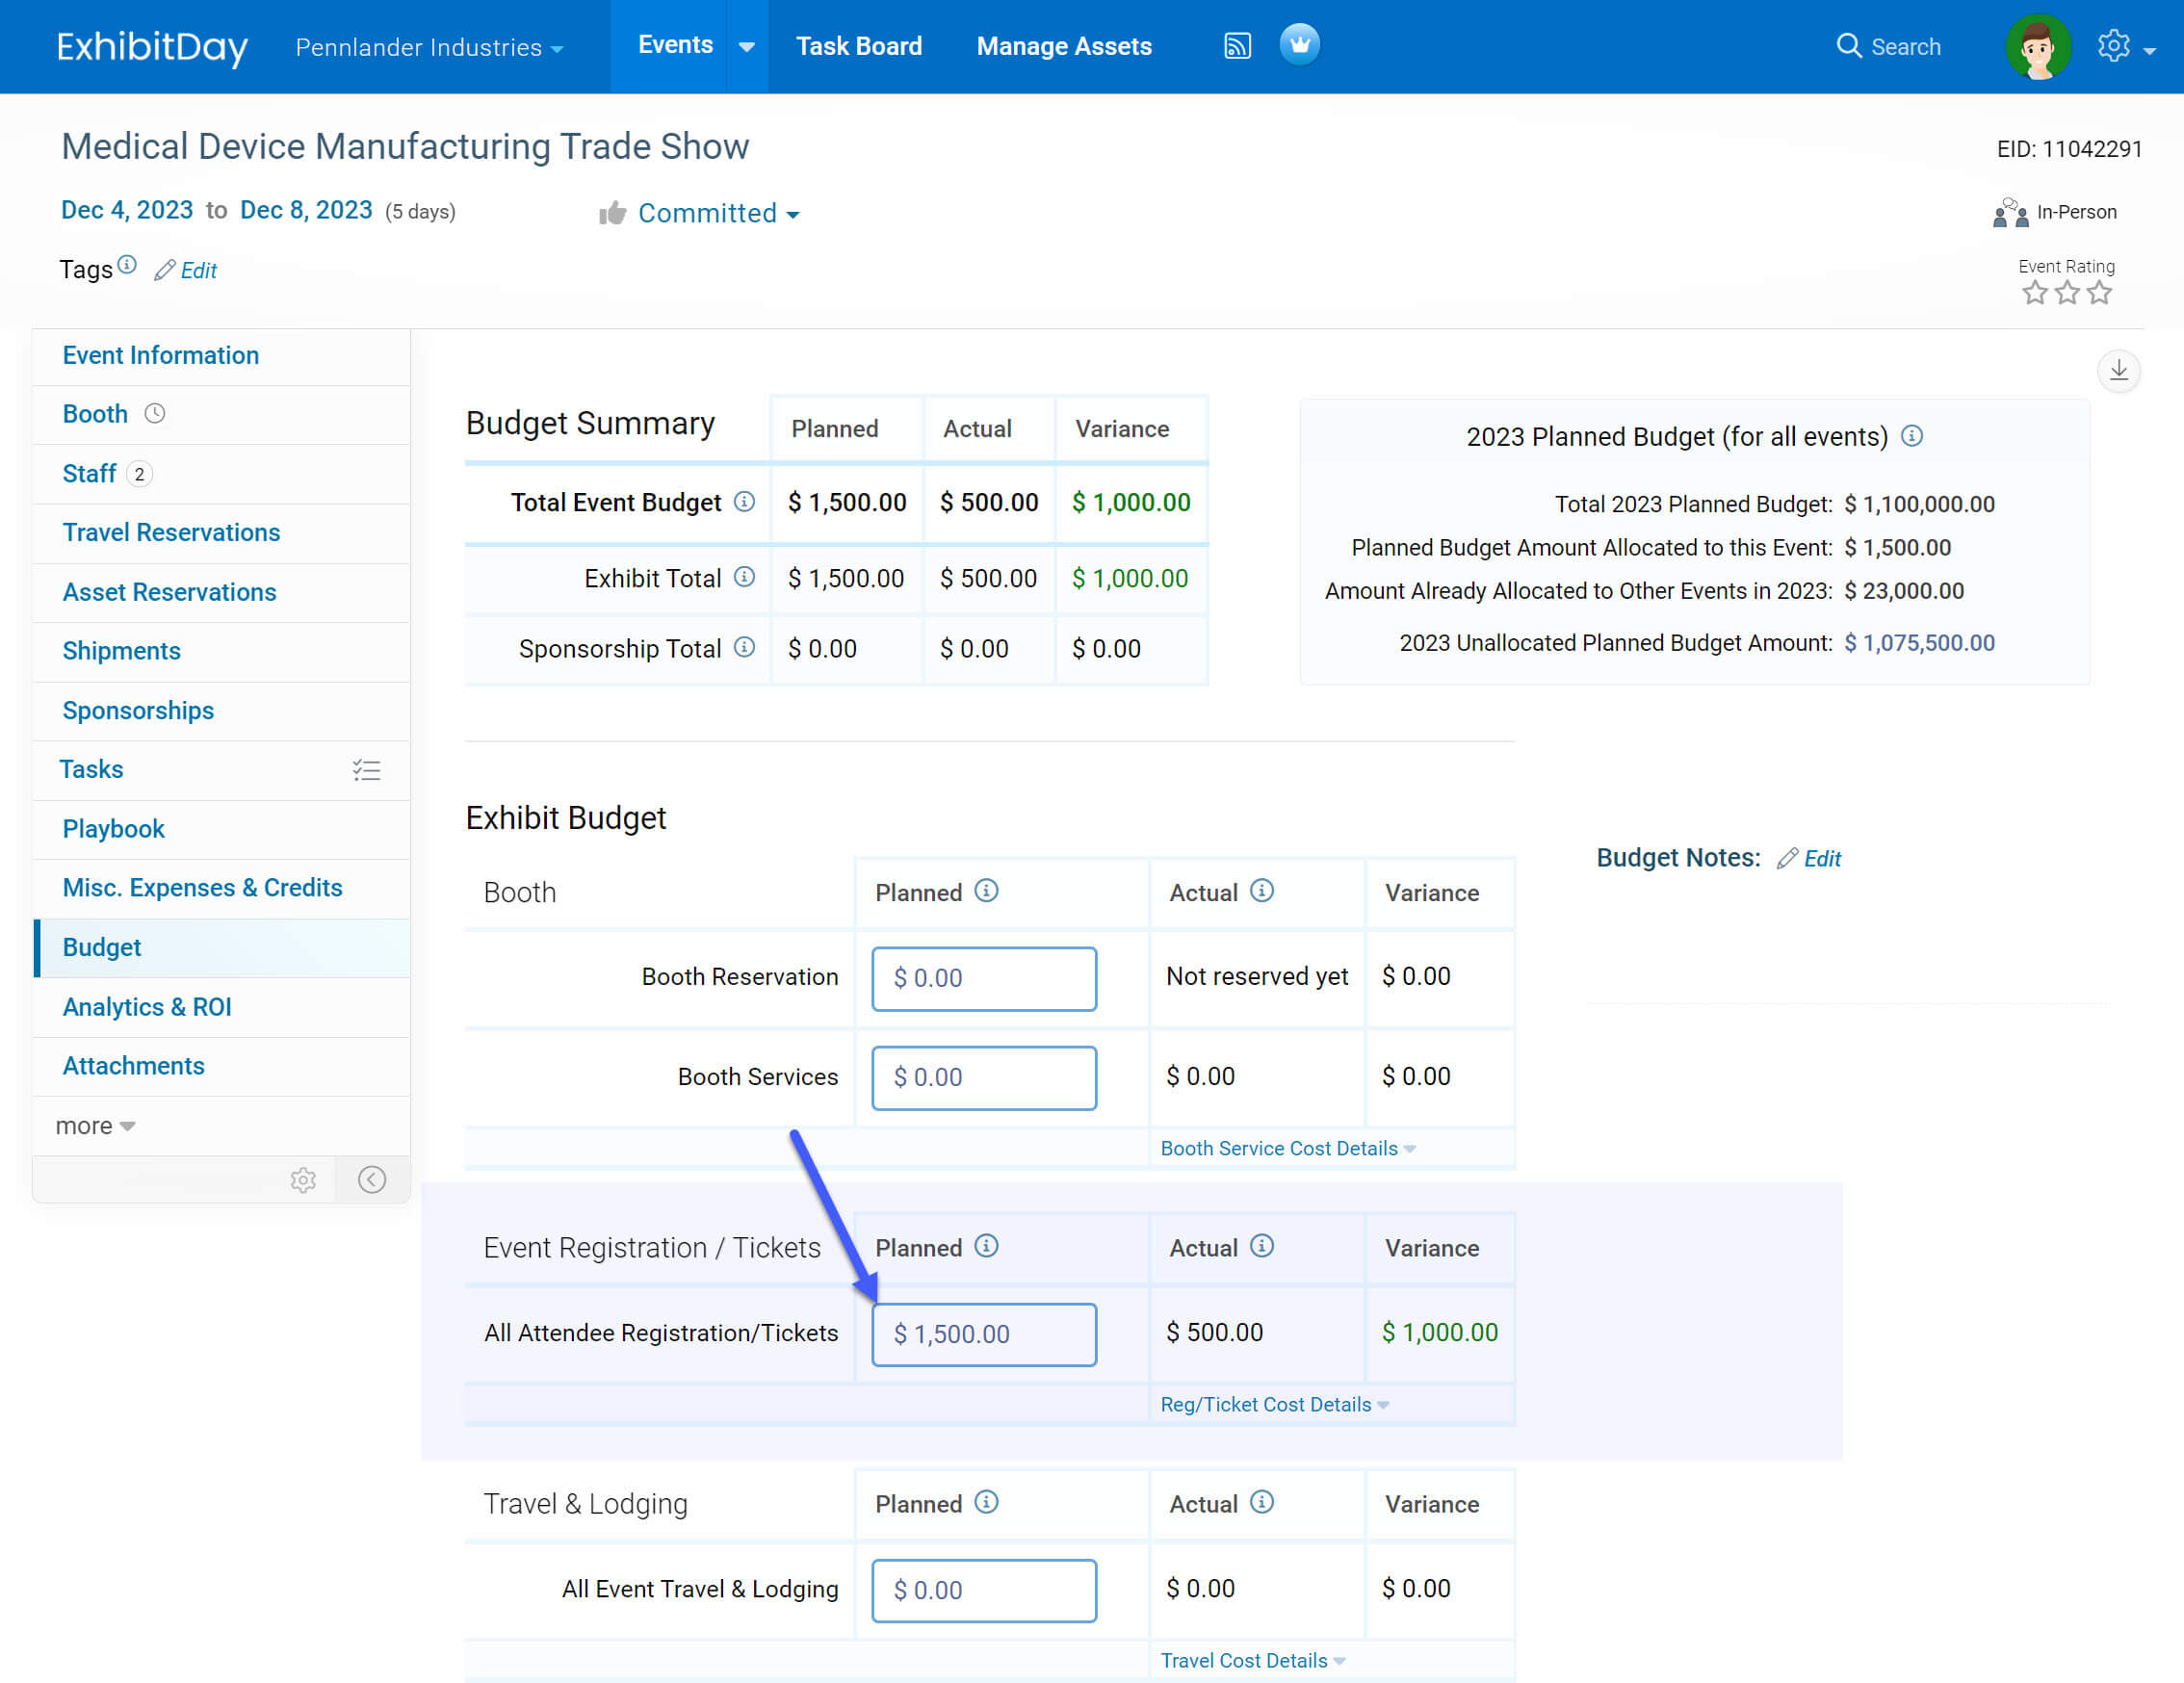
Planned Budget for Attendee Registration / Tickets
You can enter your planned budget for Attendee Registration under the “All Attendee Registration/Tickets” section of the Event Budget tab.