Shareable Event Boards

A Shareable Event Board is an automatically generated page that displays a list of events in your workspace based on the predetermined filter criteria that you select.

Each Event Board has a unique URL (web address) that can be used to view the board without having to log into ExhibitDay. You can share this URL with people interested in the events you’re attending, or publish it on your organization’s website to inform your customers about your upcoming shows.

Configuring Event Boards

You can get to the Event Board Management Area from the dropdown menu of the Events tab.

Manage Event Boards

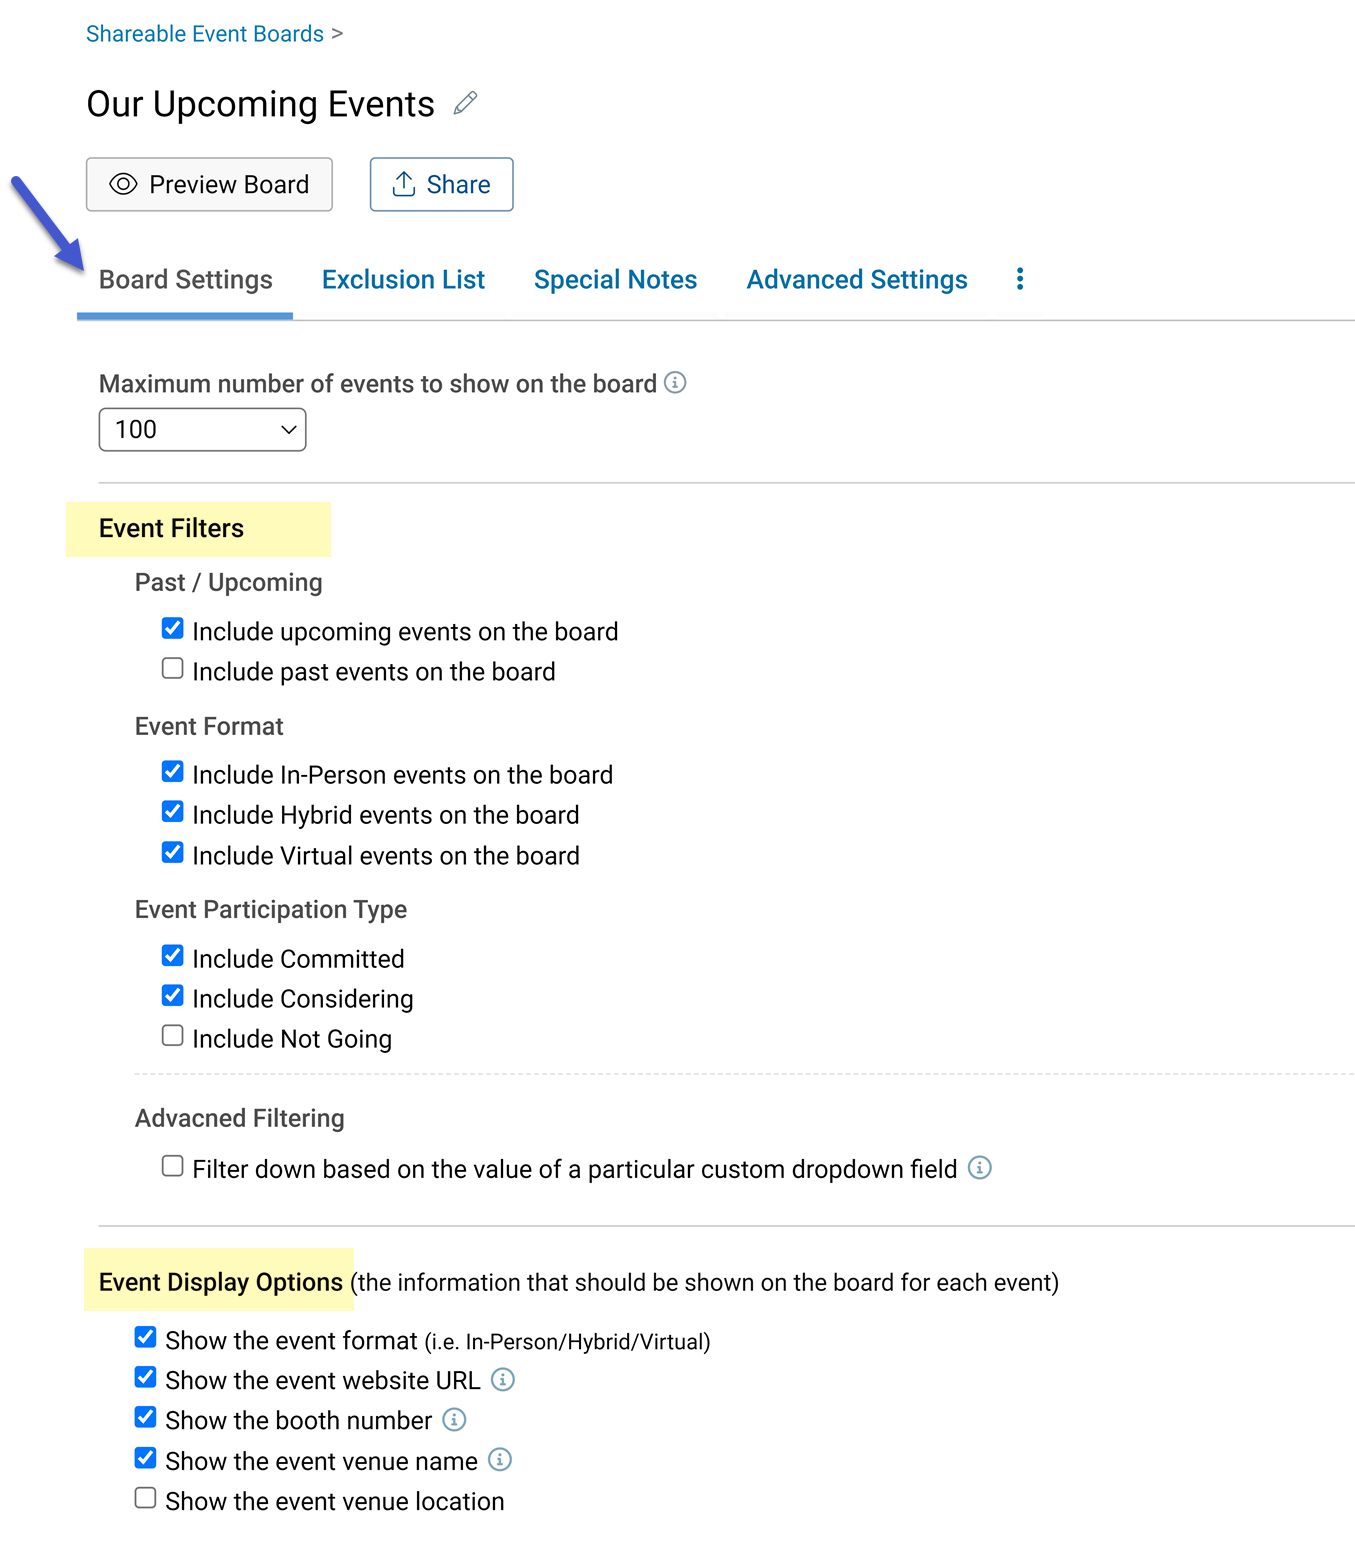
Once you create a board, you can configure it to be filtered down based on various criteria. You can also select the information you would like to have displayed on the board about each event.
Filtering the Board Based on a Value of a Custom Dropdown Field

Under the “Advanced Filtering” section of the “Board Settings” tab, you can configure your event board to be filtered down based on the value of any Custom Dropdown field.

Advanced Filtering

Example:
You can add a custom dropdown field to your events and name it “Publish this event to the Event Board?” (with the available options: ‘Yes’ and ‘No’). Then, you can configure your board to be filtered down to events that have the value ‘Yes’ selected for that dropdown.

Previewing the Board

Once you’re done making configuration changes to your event board, you can click the “Preview Board” button to see what your event board looks like when you share its URL with someone or embed it in a web page.
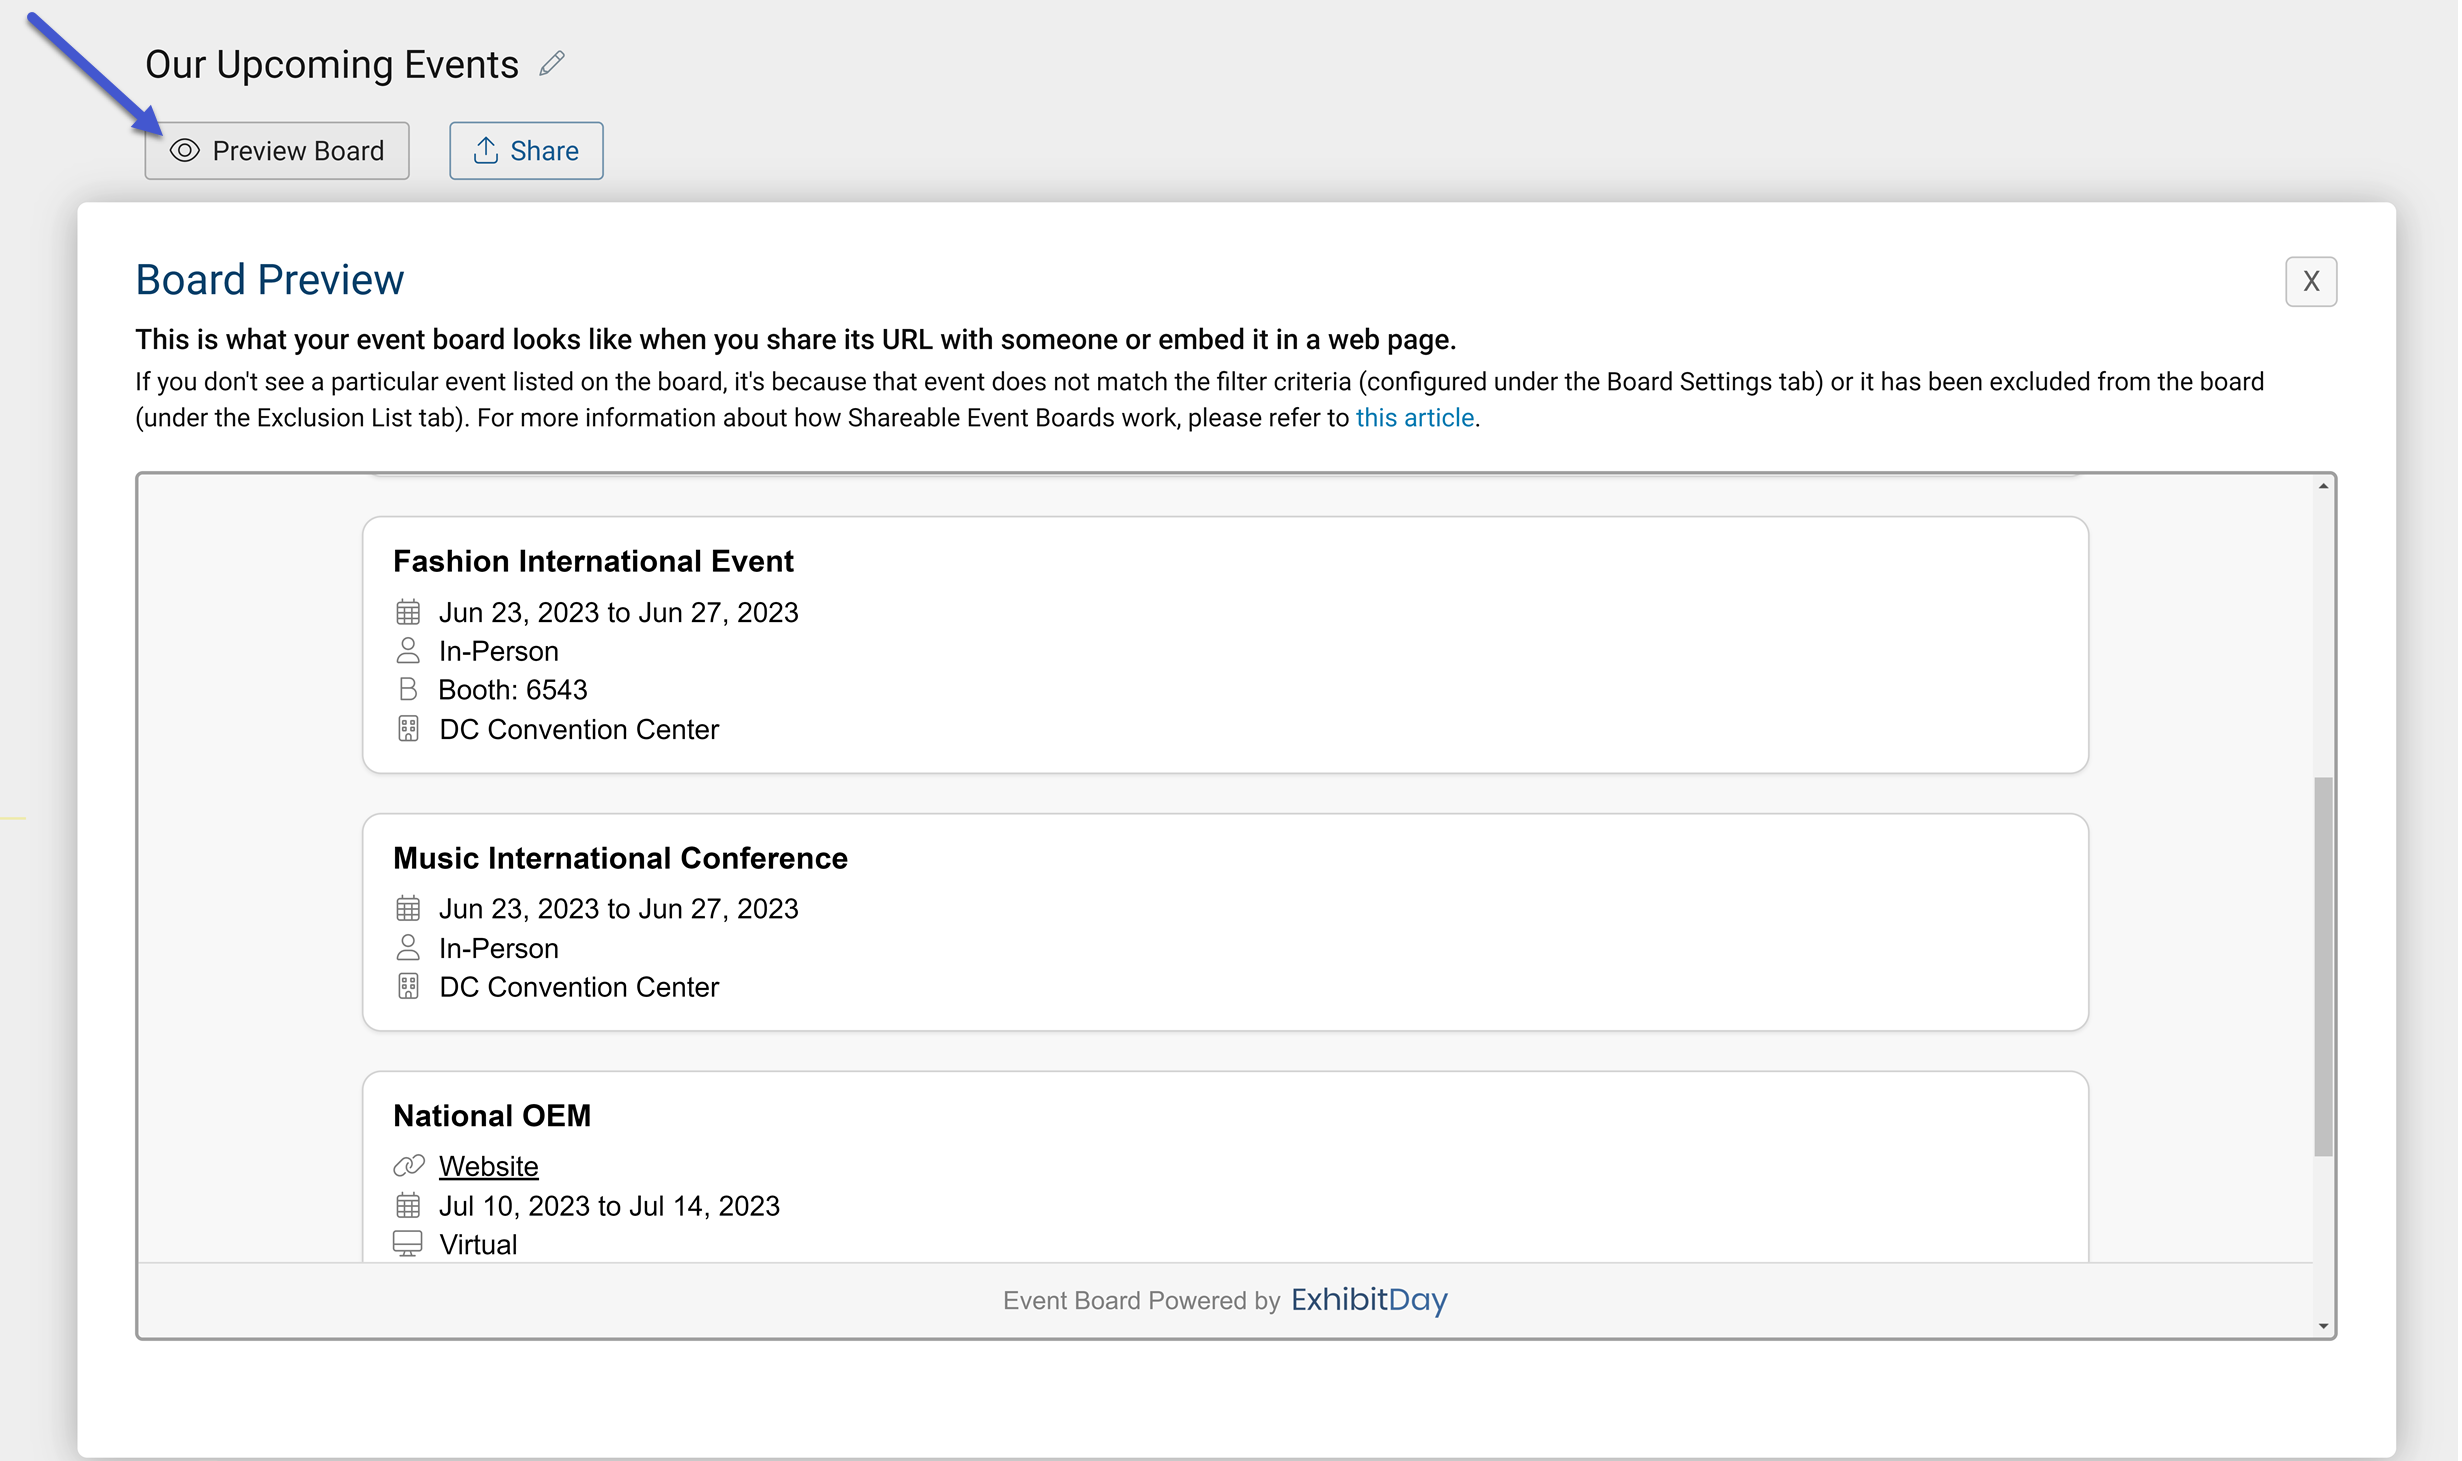
Preview Event Board

Note: If you don’t see a particular event listed on the board, it’s because that event does not match the filter criteria (configured under the Board Settings tab) or it has been excluded from the board (under the Exclusion List tab).

Sharing the Board (outside of ExhibitDay)

You can obtain the board’s shareable URL (unique web address) by clicking the “Share” button.
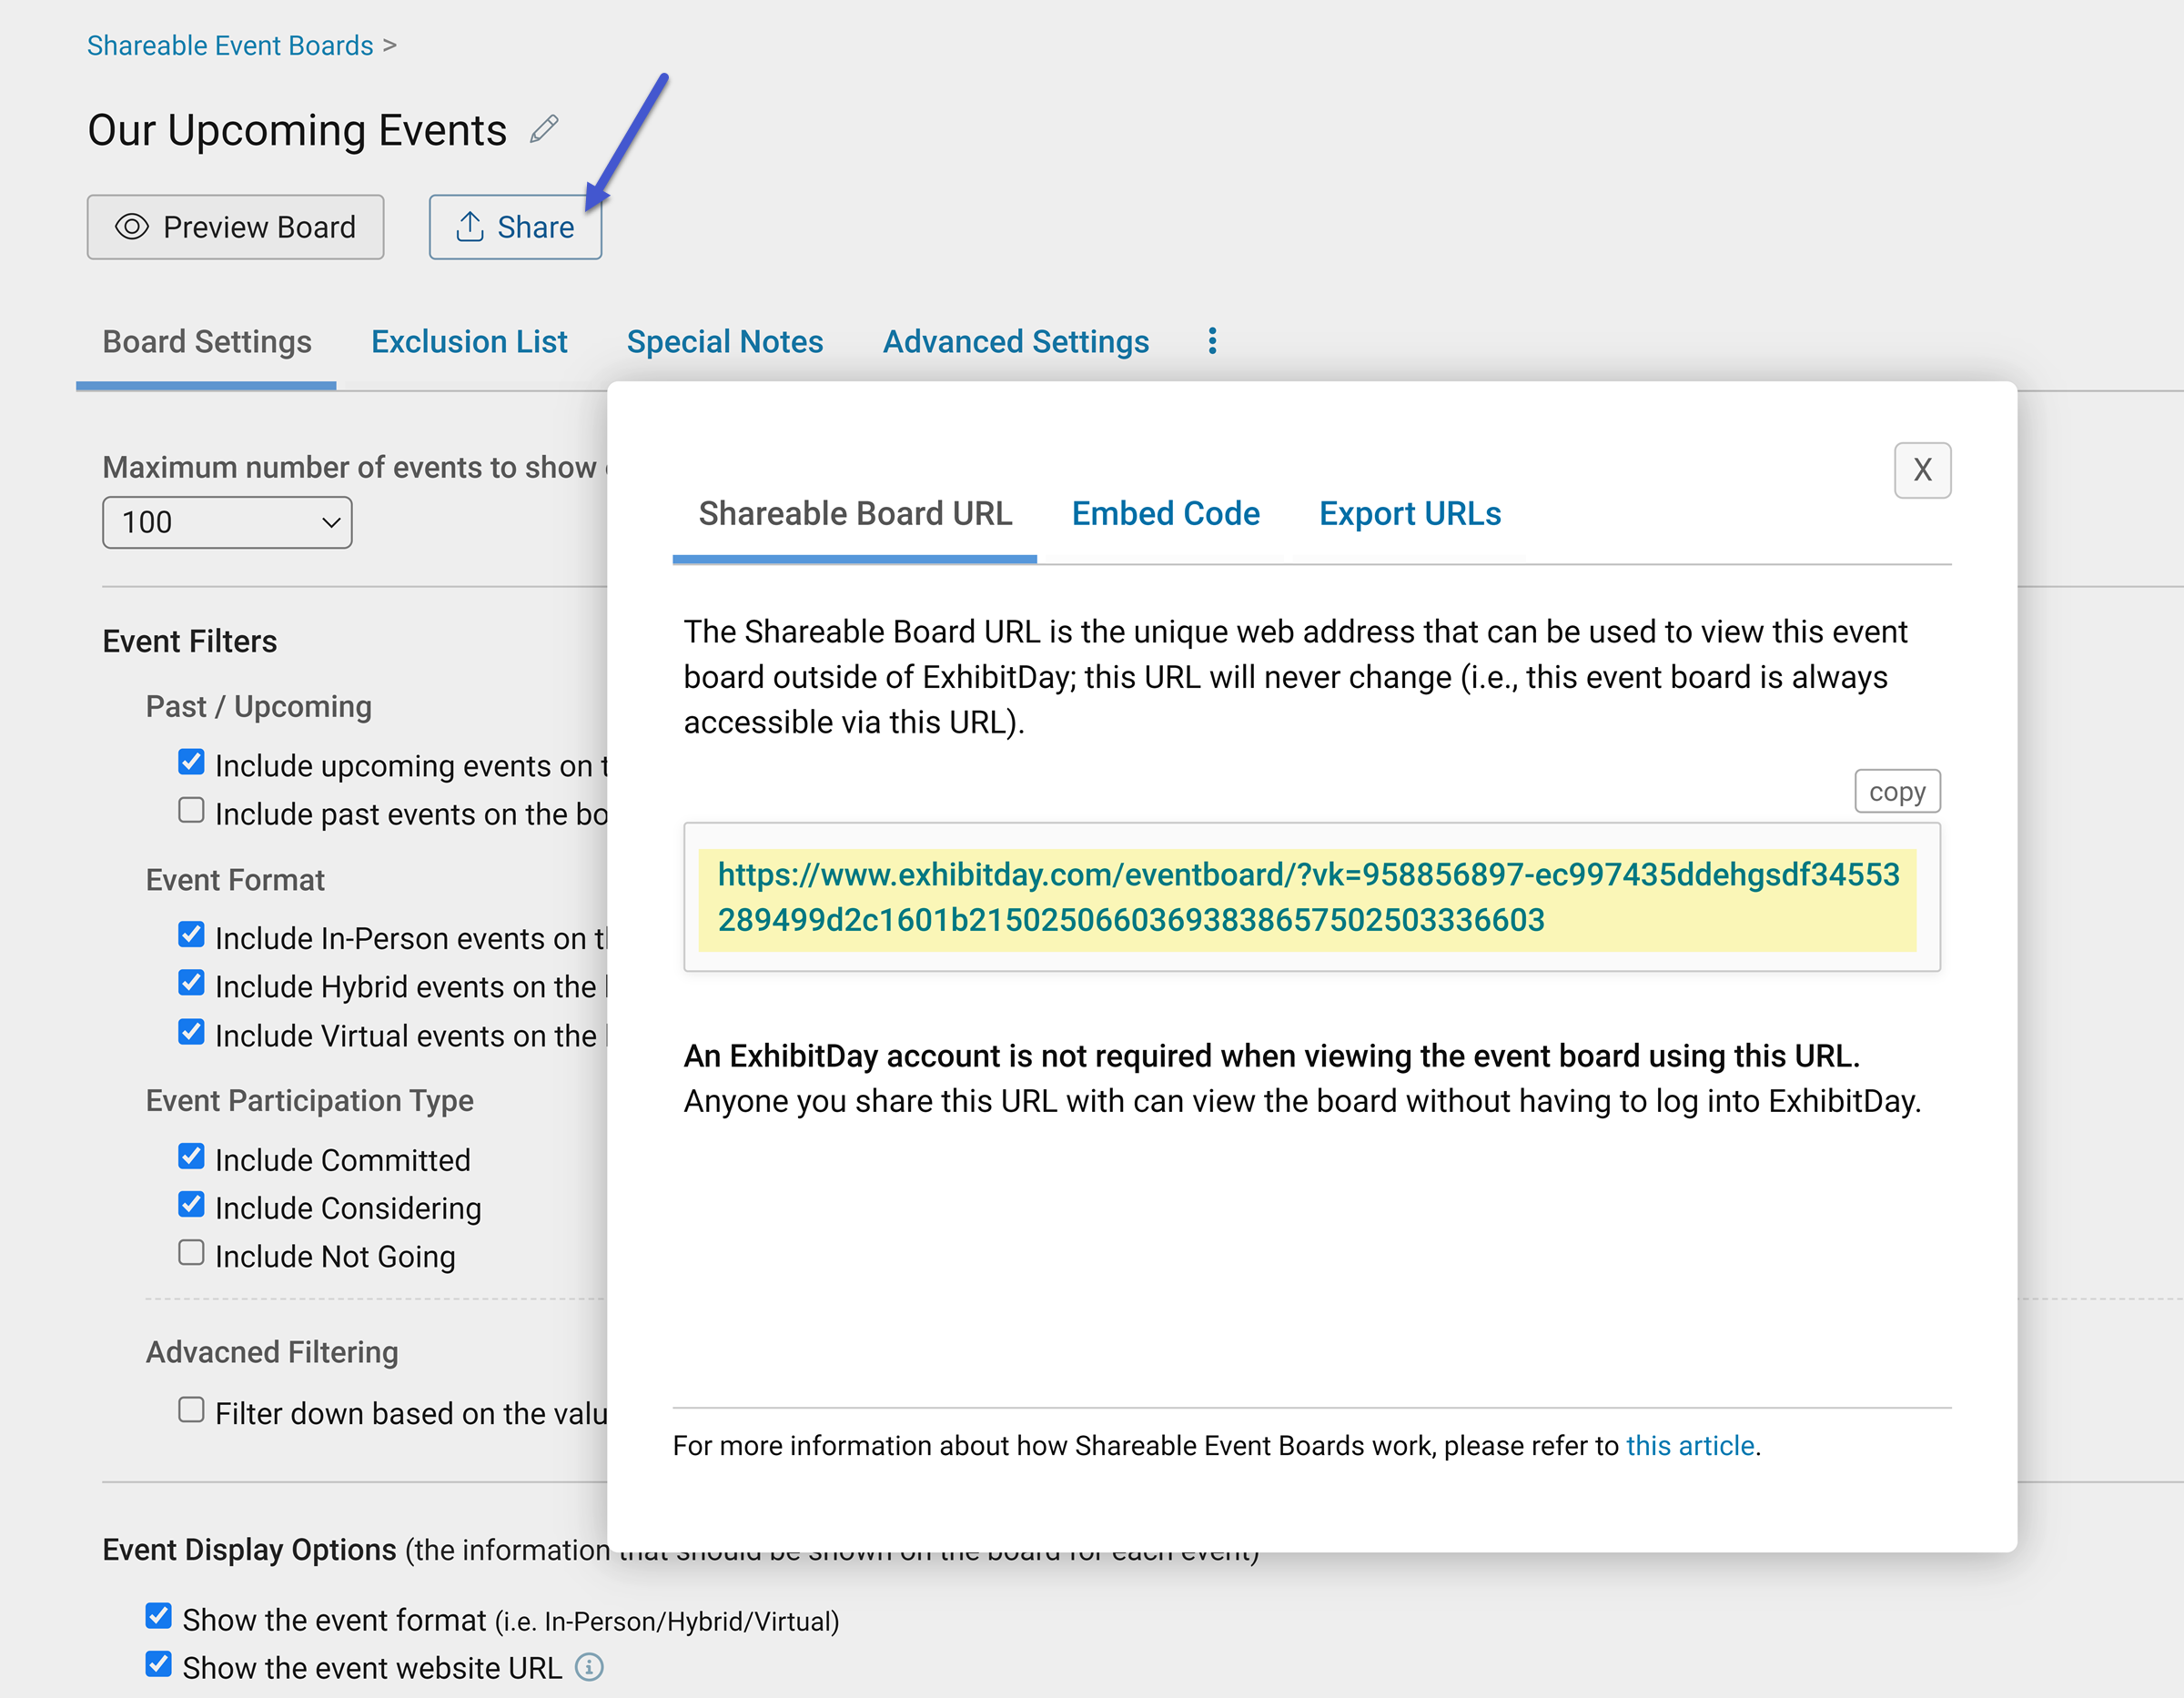
Share, Embed, Export Event Board

Note: The board’s shareable URL will never change (i.e., the event board is always accessible via this URL). Also, an ExhibitDay account is not required when viewing the event board using this URL. Anyone you share this URL with can view the board without having to log into ExhibitDay.

Embedding the Board on Your Organization’s Website, Blog, or Intranet

You can obtain the HTML markup for embedding the event board on a website from the “Embed Code” tab.
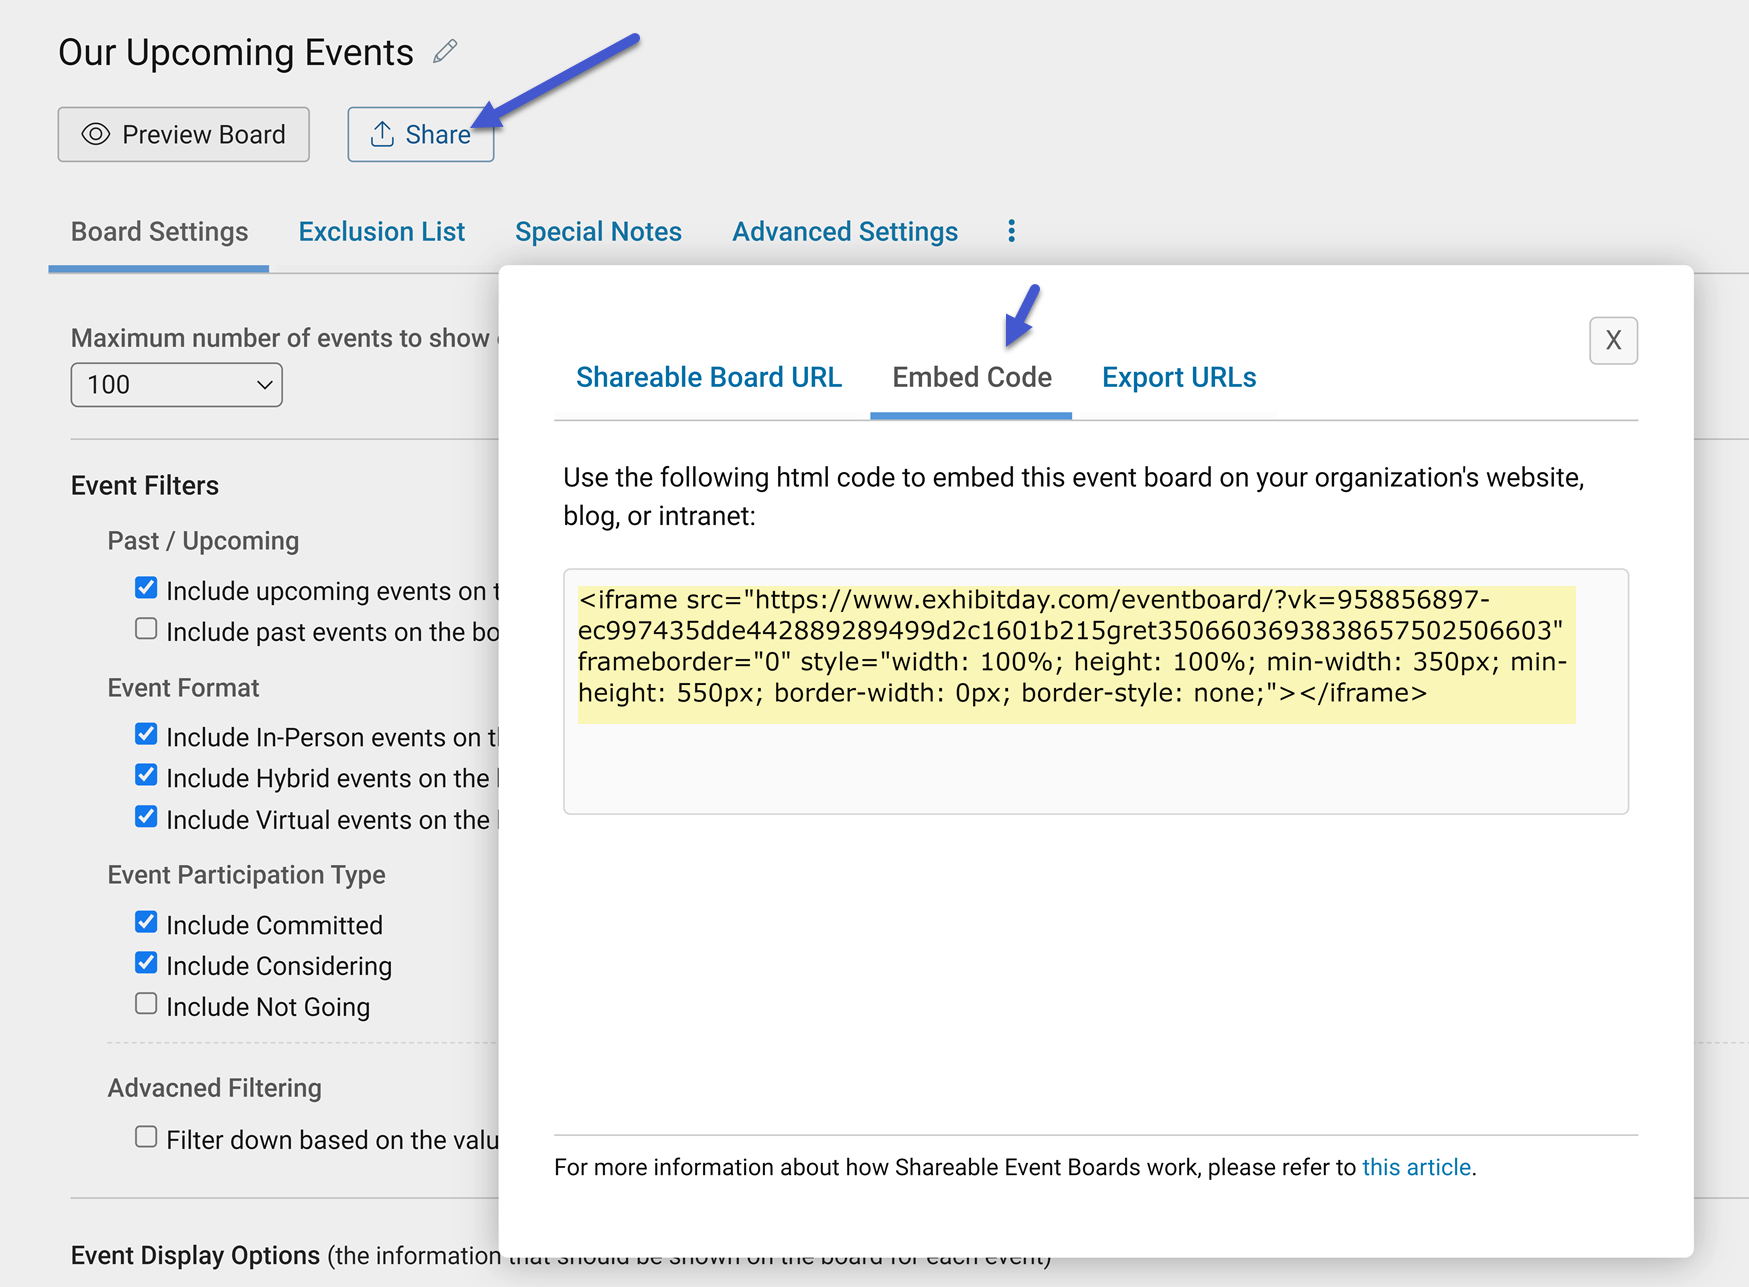
Event Board Embed Code

Note: if you are using the WordPress as your CMS, insert the embed code as a “Custom HTML” block.

Exporting the Board (.csv, JSON, XML)

The board can be exported in 3 formats: .csv (spreadsheet download), JSON, and XML. The unique URLs for exporting the board can be obtained from the “Export URLs” tab.
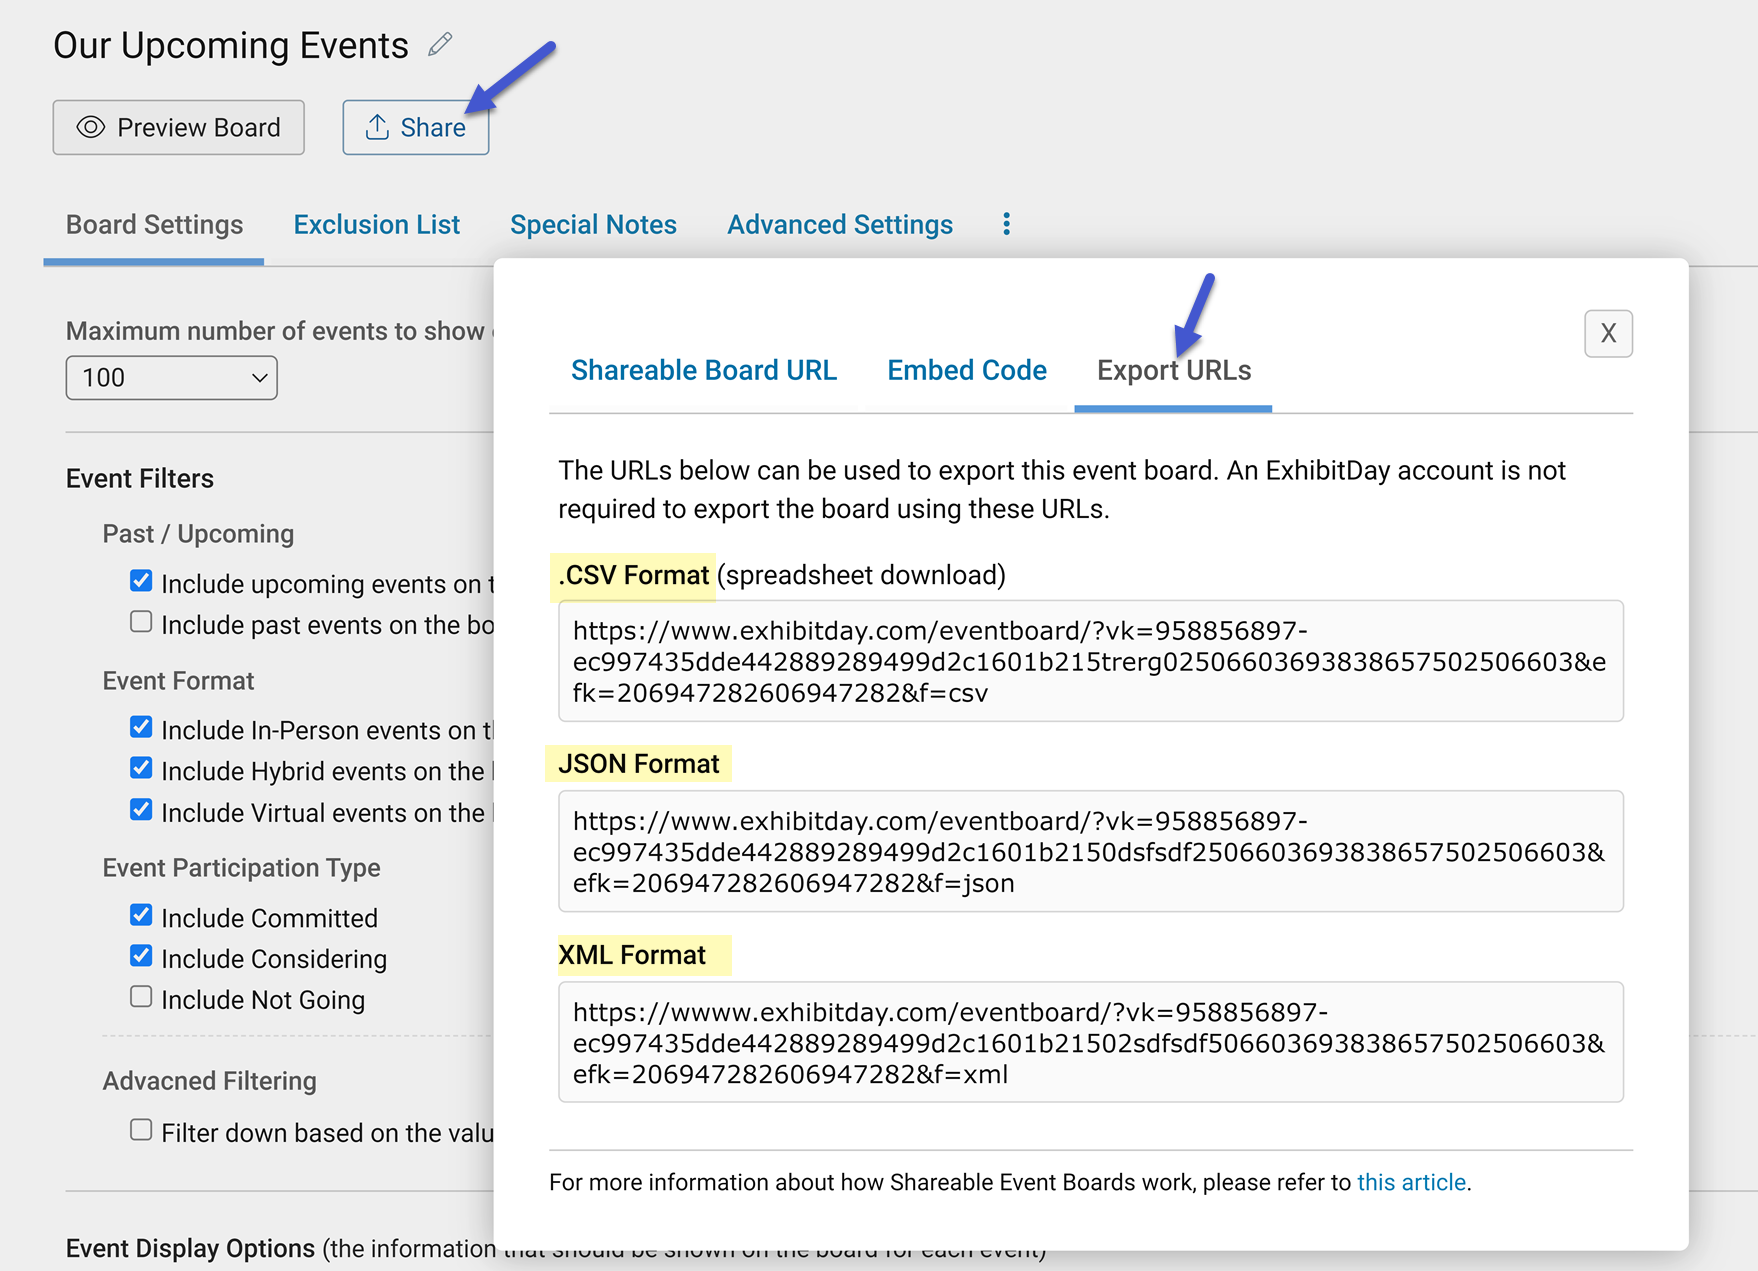
Export Event Board

Note: An ExhibitDay account is not required for exporting the event board using the export URLs. Anyone you share the export URLs with can export the board without having to log into ExhibitDay.

Changing the Event Board’s Look and Feel (using Custom CSS)

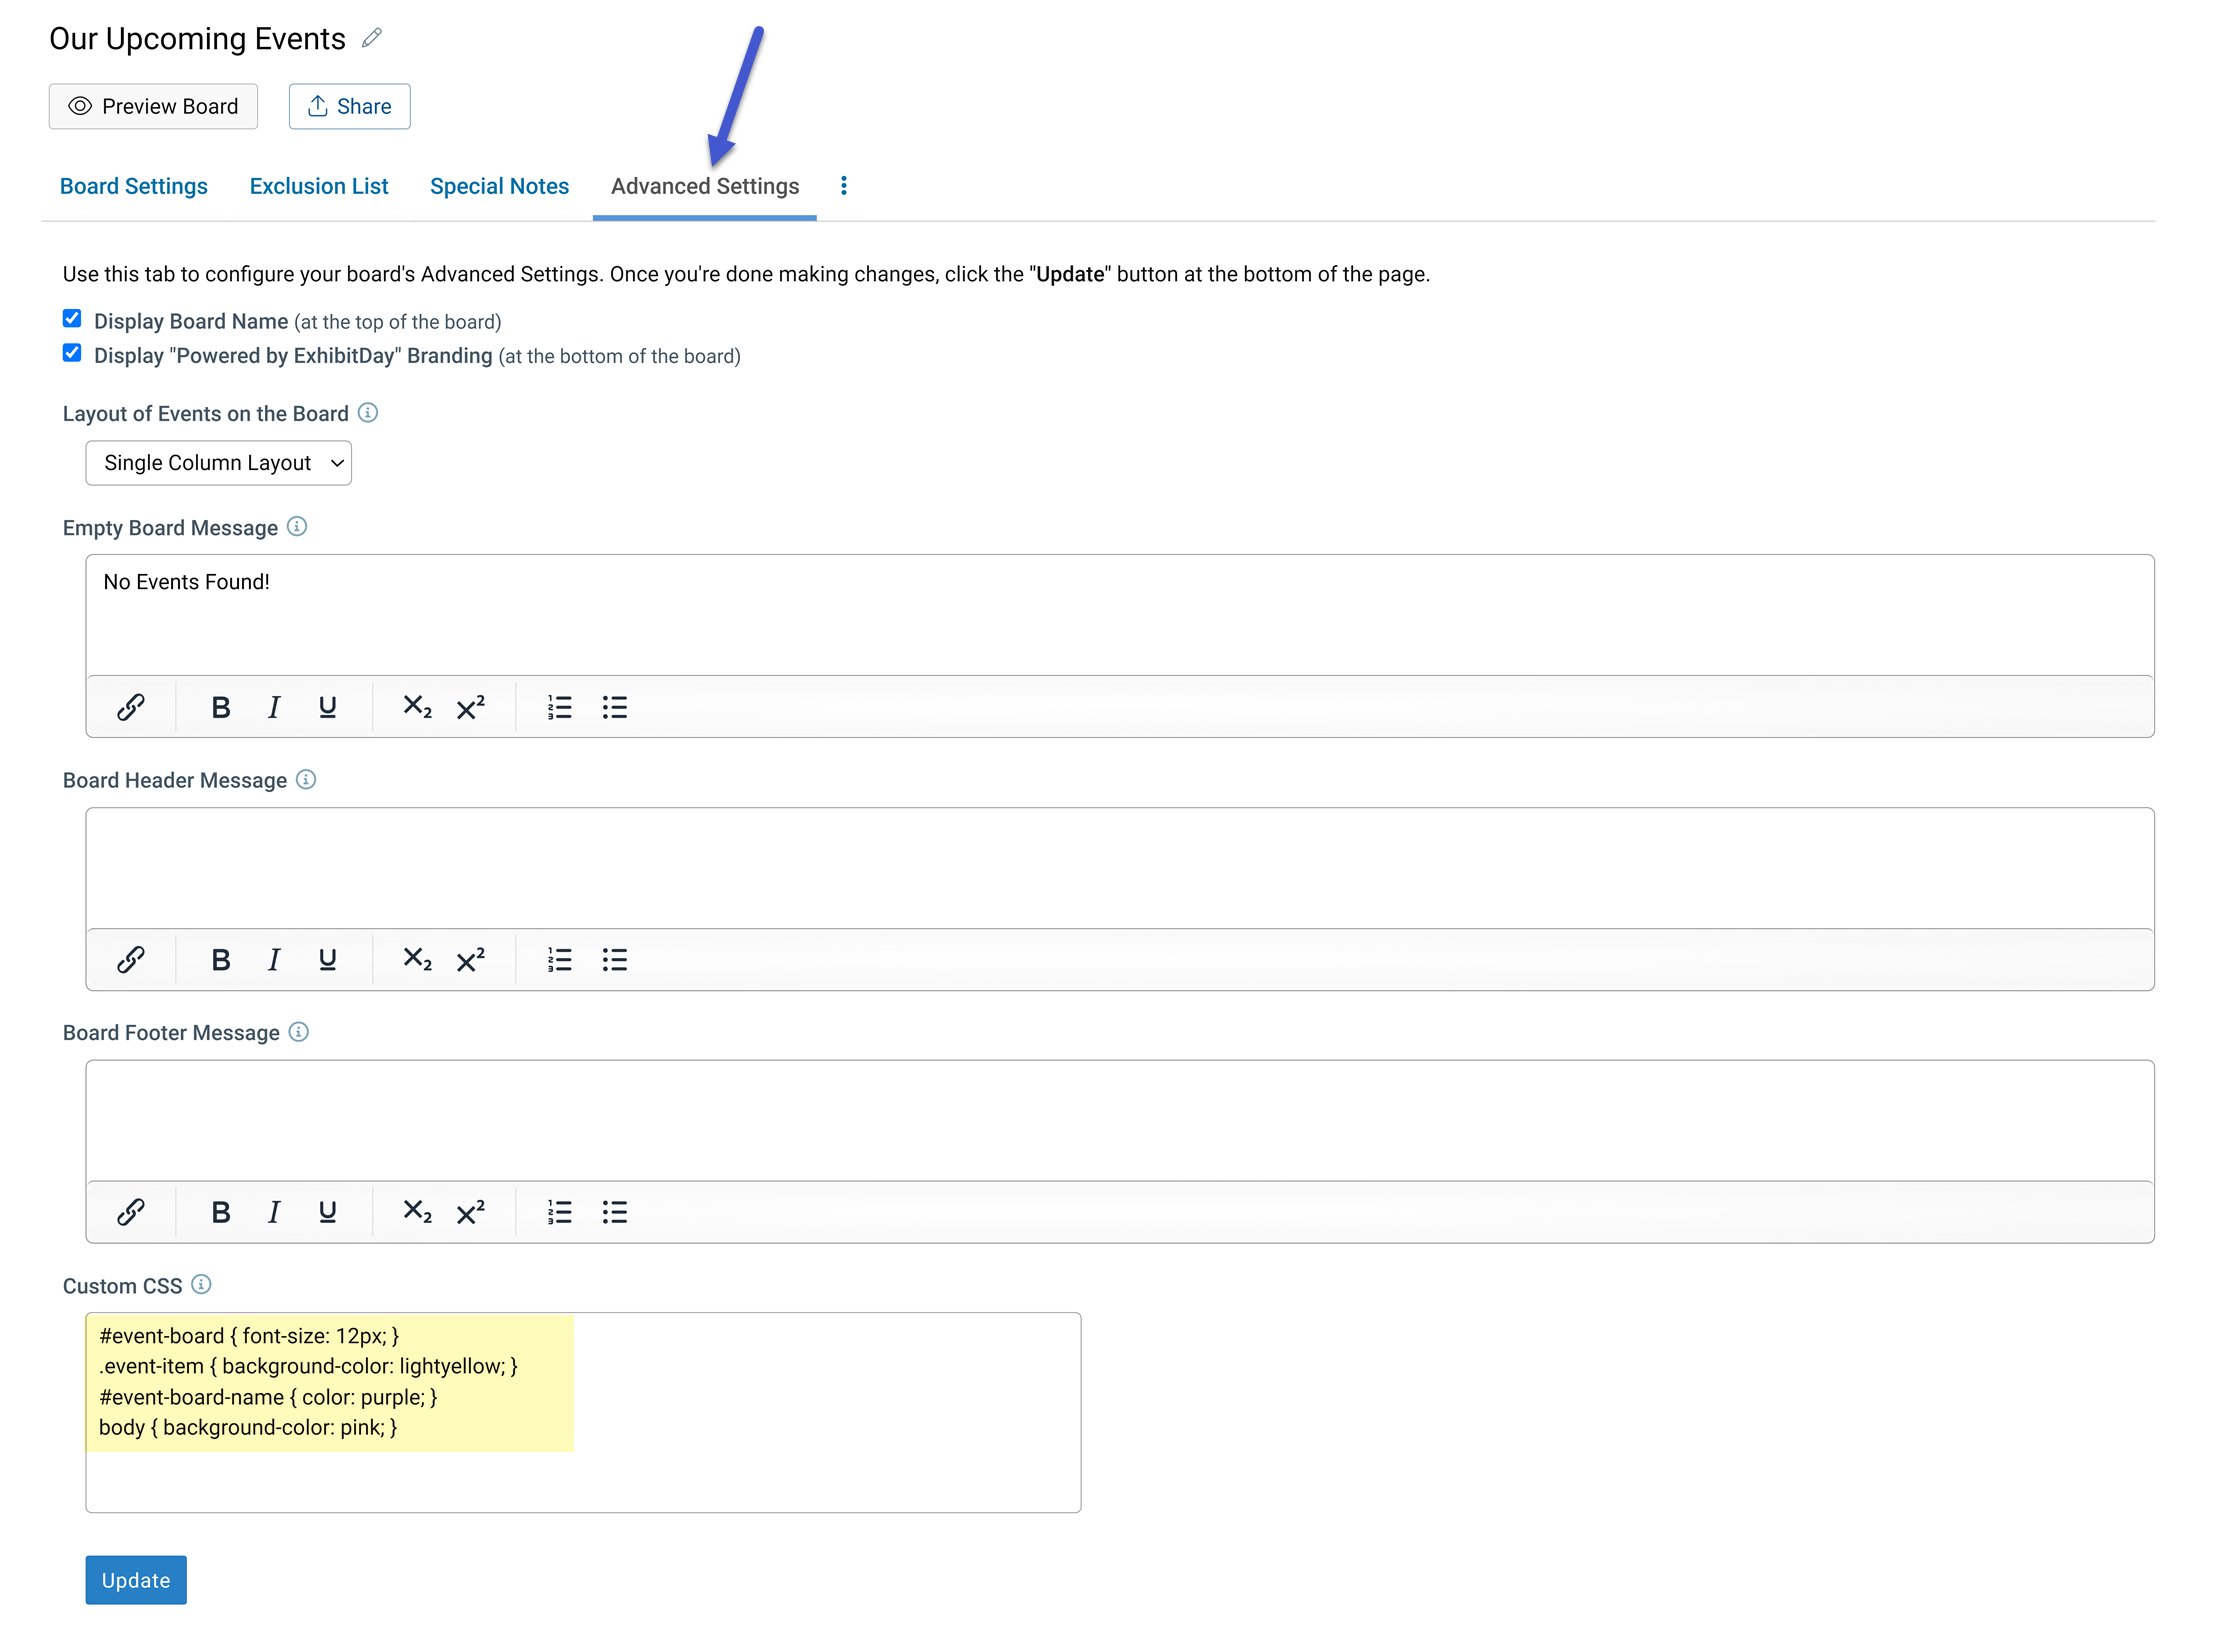
If you would like to change the look and feel of an event board, use the “Custom CSS” field under the “Advanced Settings” tab to override the default styles.

Note: The Custom CSS setting is an advanced/technical setting that requires familiarity with Cascading Style Sheets (a design language used by programmers and web developers).

As an example, if you add the CSS styles below into the “Custom CSS” field, the board’s font size will be smaller, the background color will change to purple, the board name will be purple, and the background color of each event on the board will be light yellow.

#event-board { font-size: 12px; }
.event-item { background-color: lightyellow; }  
#event-board-name { color: purple; }    
body { background-color: pink; }
You can obtain a full list of default styles from following css file (which is referenced when viewing an event board): https://www.exhibitday.com/content/eventboard/eventboard.css

Deleting an Event Board

You can delete an event board by clicking the “Delete Board” option under the extended menu of the event board tab strip.
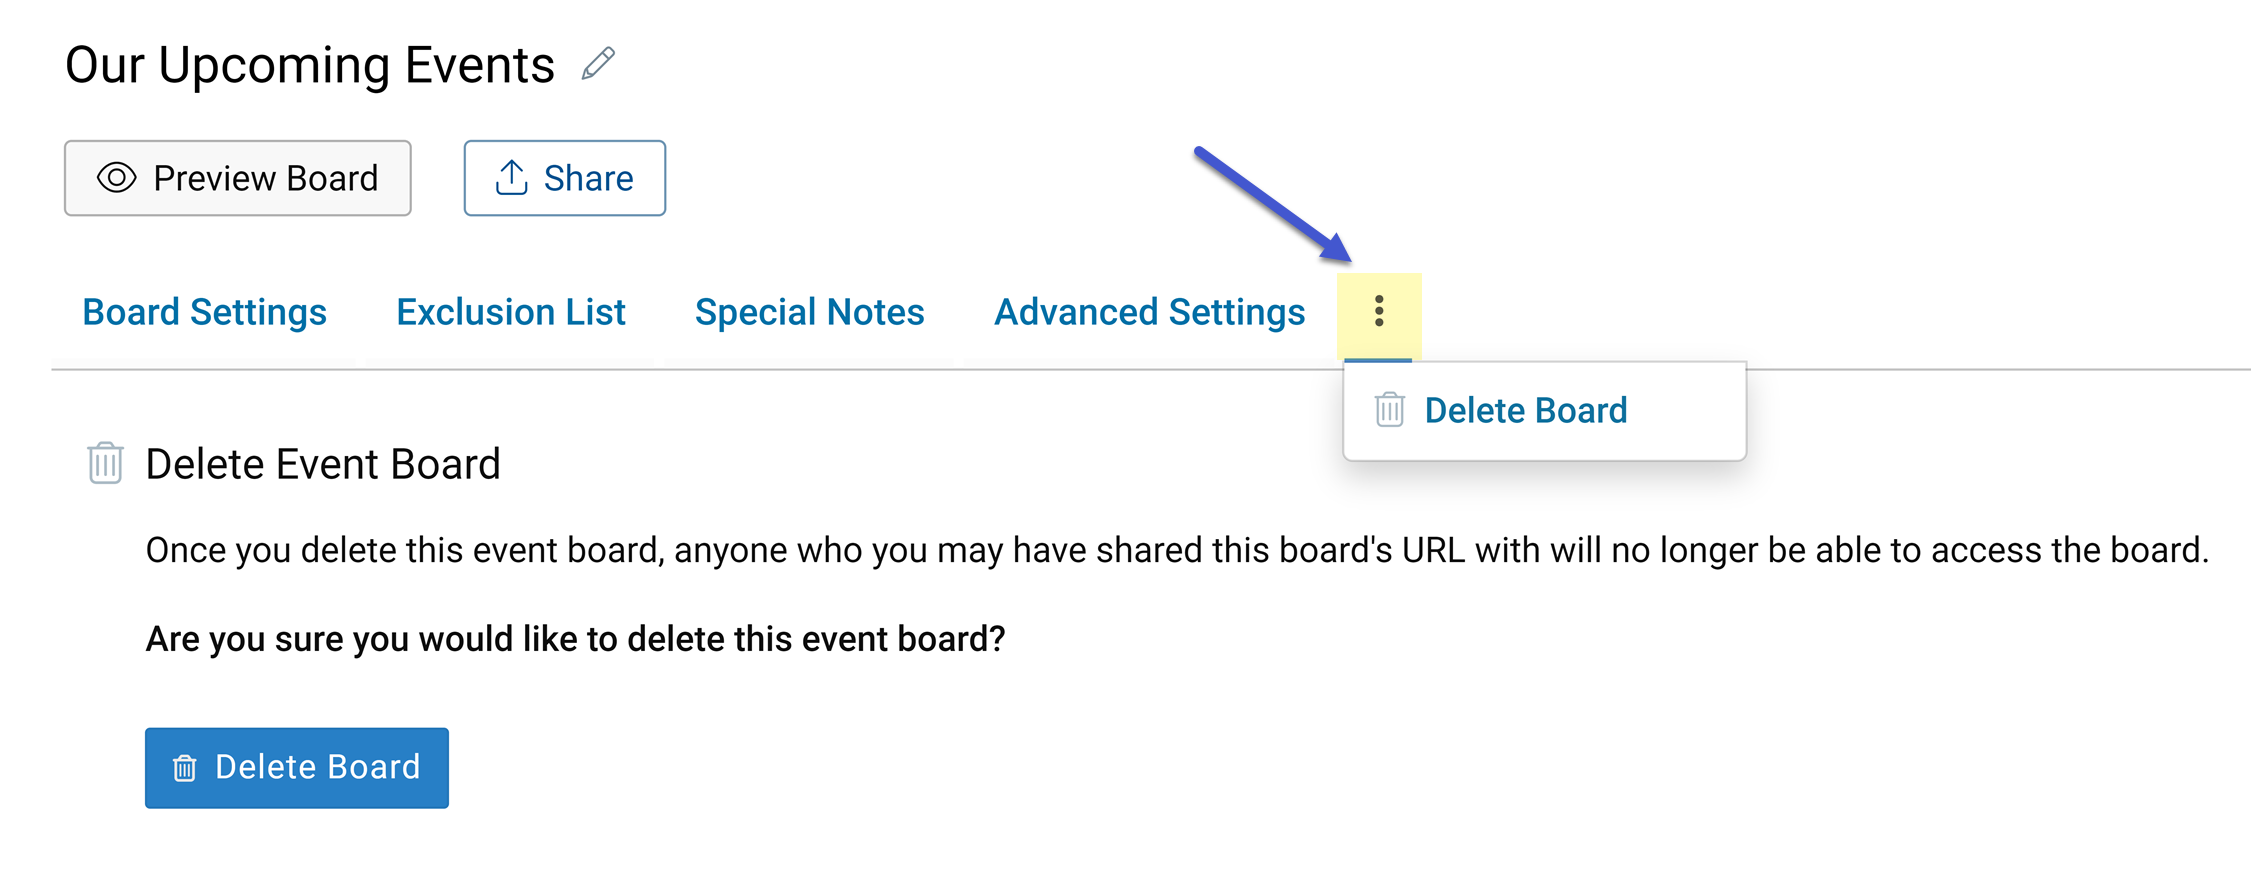
Delete Event Board

Event Board Limitations (for Lower Tier Plans)

While the ExhibitDay Enterprise plan offers unrestricted access to all the features of Sharable Event Boards, the Lite, Professional, and Premium plans come with the following restrictions:

  • Only one Event Board can be created.
  • A maximum of 3 events can be displayed on the board.
  • The board’s advanced settings cannot be modified.

Charging Expenses to Cost Centers

You can now charge expenses for your trade shows and exhibits to Cost Centers in ExhibitDay.

Cost Centers

Cost Centers are Departments or Business Units within your organization to which costs can be charged (for accounting purposes).

When entering the cost of specific items for your Events (e.g. Booth Reservation, Travel, Shipments, Sponsorship, etc.), you can optionally specify the Cost Center(s) that the cost should be charged to.

Configuring Cost Centers in your Workspace

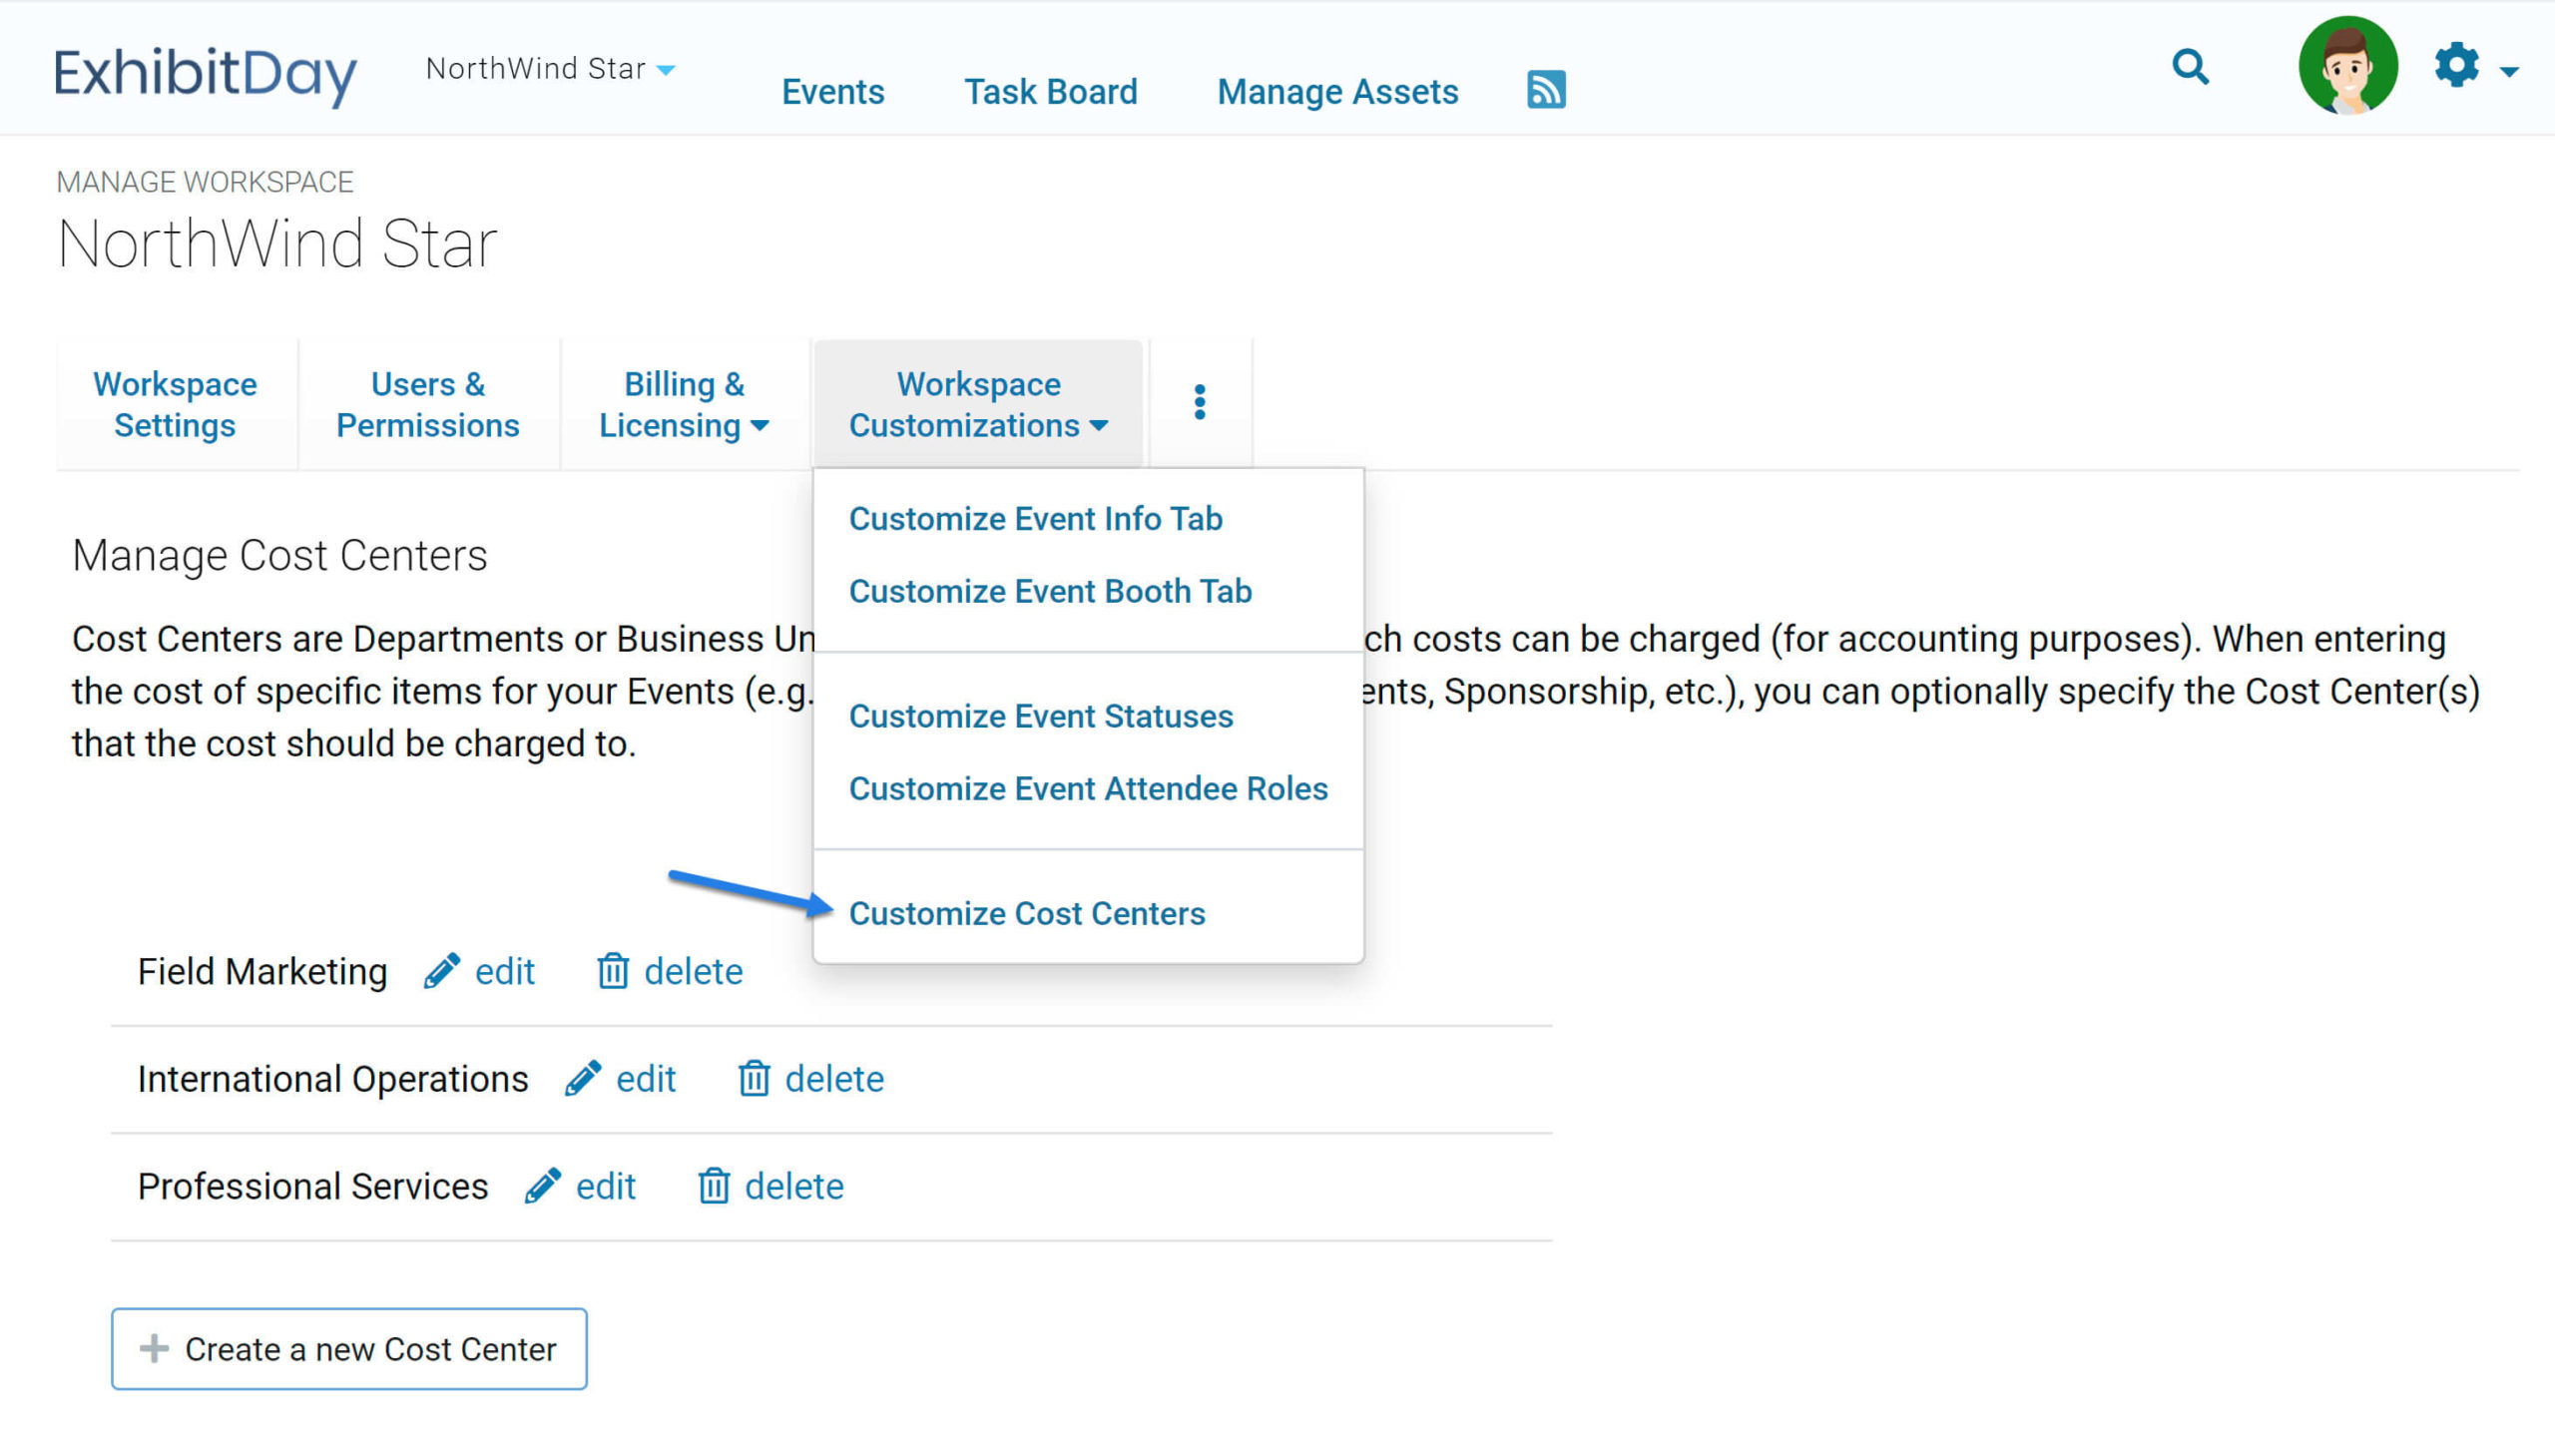
You can manage your list of Cost Centers under Workspace Settings > Workspace Customizations > Customize Cost Centers.

Manage Cost Centers for Trade Shows and Exhibitions

Charging a Cost to a Cost Center

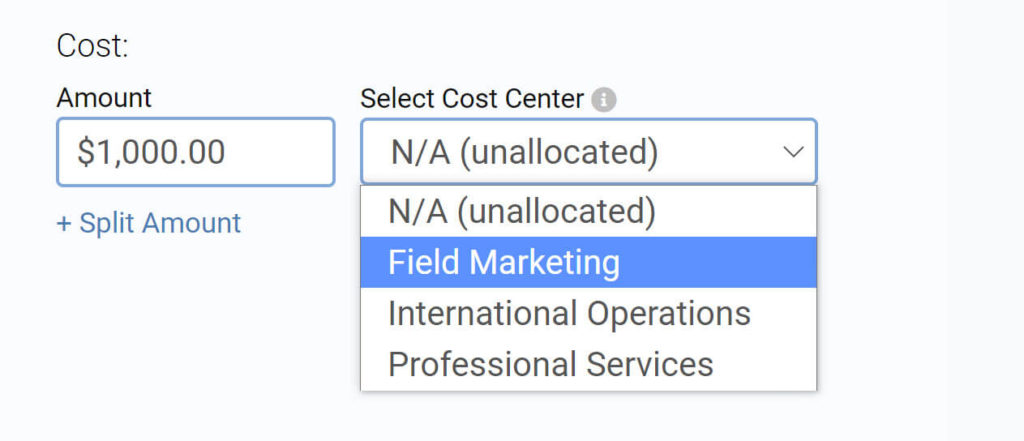
To specify a Cost Center to charge to (when entering the cost of an item), click the ‘Specify Cost Center’ link next to the text-box for the cost, then select the Cost Center you would like to charge the amount to.

Select the Cost Center to allocate a cost to

Charging a Cost to Multiple Cost Centers

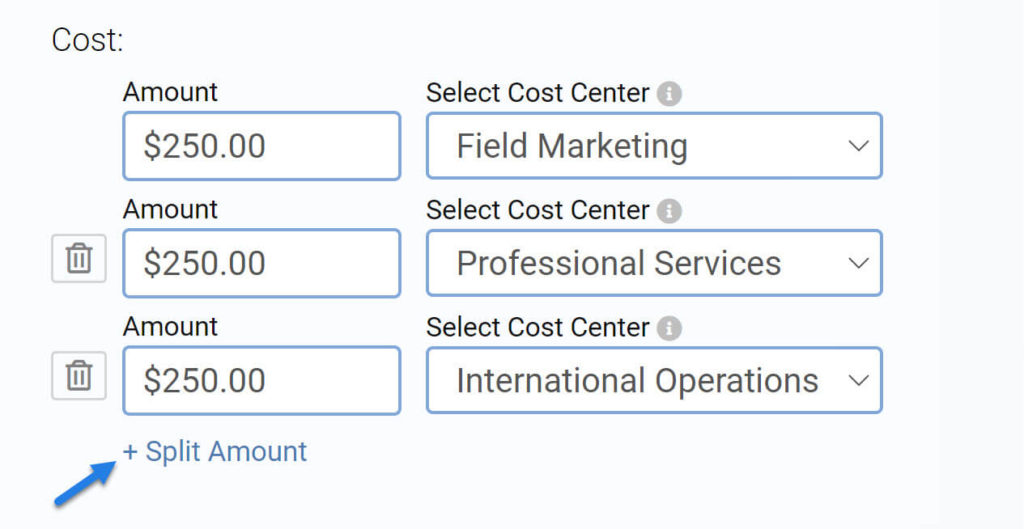
If the amount being entered should be charged to multiple Cost Centers, use the ‘Split Amount’ link to specify the Amount/Cost Center breakdown. For example, if the total amount for an item is $750, and that amount should be charged evenly across three Cost Centers ( ‘CC1’, ‘CC2’ and ‘CC3’), enter $250 and select ‘CC1’, then, click ‘Split Amount’ and enter $250 and select ‘CC2’; do the same thing for ‘CC3’…

Split Expenses Across Multiple Cost Centers

Expenses by Cost Center Report

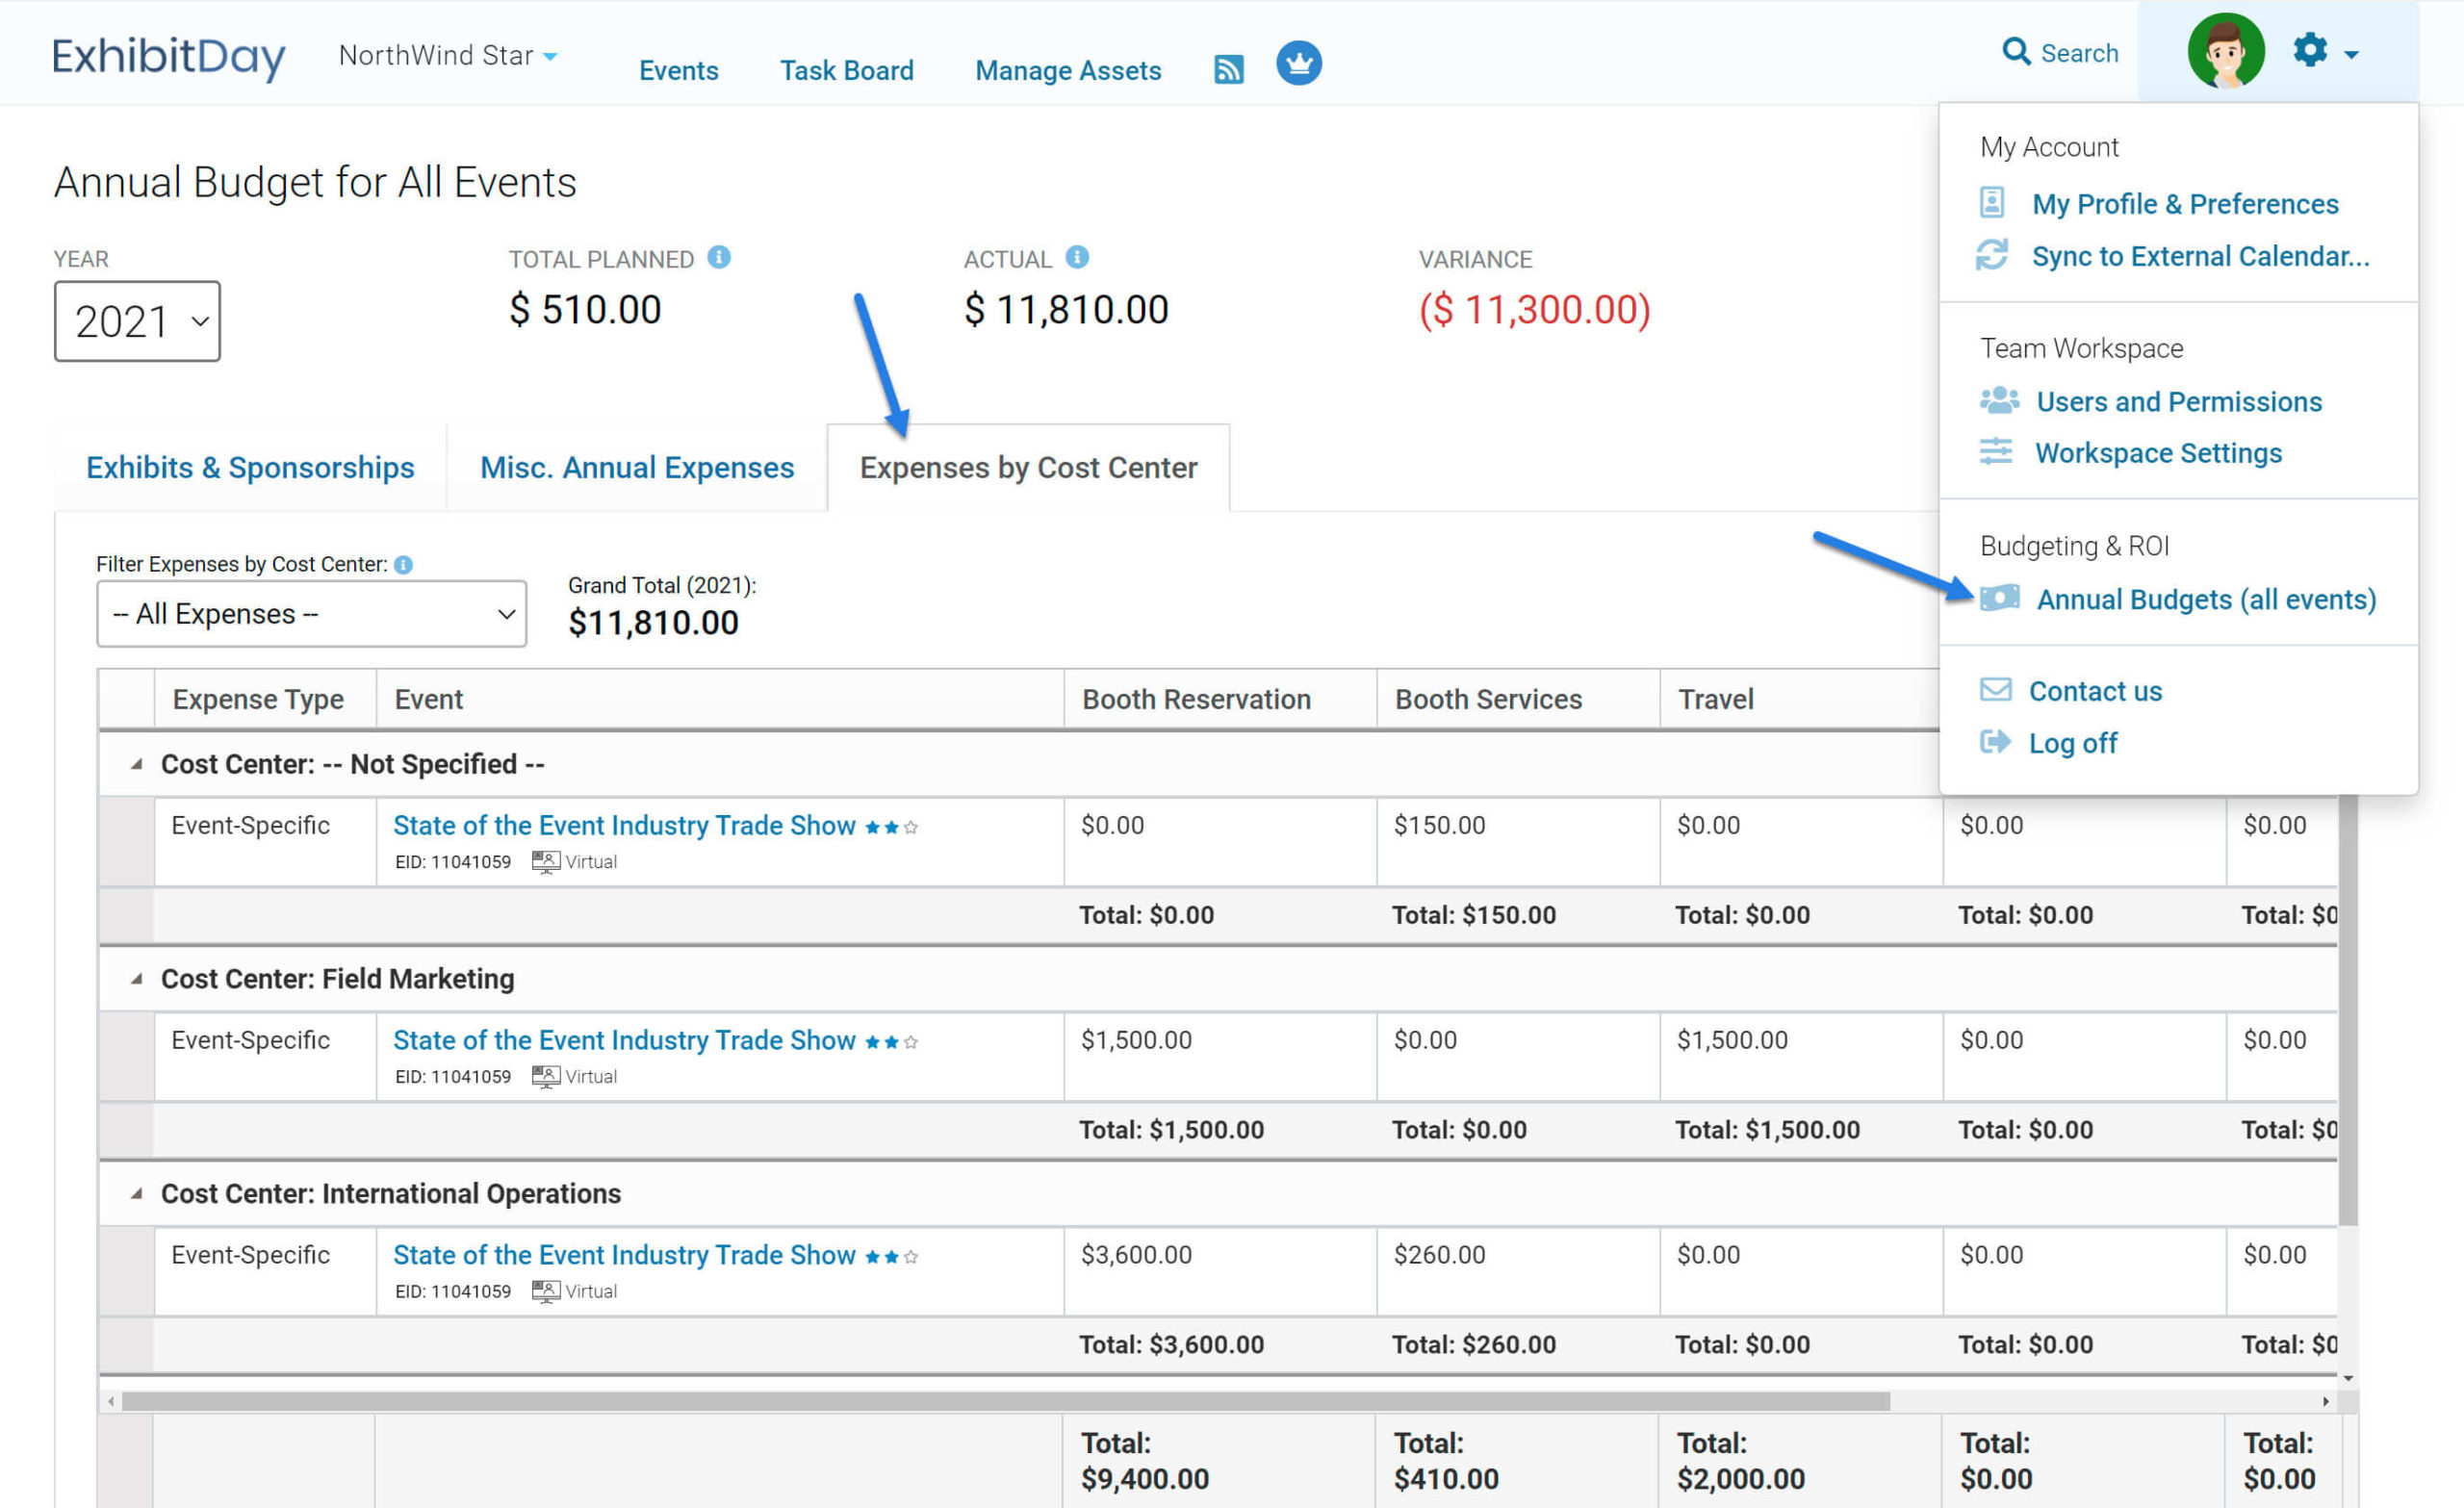
To view a report of your annual expenses broken down by Cost Center, click on the Annual Budgets (all events) link in the top-right navigation menu. Then, click on the Expenses by Cost Center tab.

You can filter the report by Cost Center and export all expenses (for the budget year) to a spreadsheet (in .csv format).

Trade Show Expenses by Cost Center Report

Note: The ability to specify Cost Centers for expenses is only offered to ExhibitDay Workspaces that are on the ‘Enterprise’ plan. If you wish to enable this feature, please contact us about setting up a custom Enterprise engagement with your organization.

Sign up for a free ExhibitDay account to plan your trade shows, manage your trade event budgets, and collaborate on tasks with your event team.

Adding Tags to Assets

You can now add tags to Assets in your ExhibitDay Workspace.

Tagging Assets

Tags are keywords or phrases that can be added to your Assets in order to classify and categorize them — however way you see fit. For example, you can tag an Asset with the name of the department/division that the Asset belongs to. Or, you can tag Assets as “Custom-made” or “Perishable” or “Fragile”, etc.

The tags for each asset can be specified when you add a new asset or edit an existing one.

Filtering your Assets by Tag

On the Manage Assets page, you can see all the tags for each Asset. Use the Asset Filter (top-right corner) to filter down your Assets by any number of tags.

Asset Tags Filter

Sign up for a free ExhibitDay account to plan your trade shows, manage your trade show assets, and collaborate on tasks with your event team.

Enabling Event IDs in your ExhibitDay Workspace

The Event Id (EID) is an auto-generated, 8-digit unique number for each event in your ExhibitDay workspace. By default, event IDs are not displayed in ExhibitDay — they are just kept in our backend systems while the front-end ExhibitDay magic strives to maintain a simple, clutter-free, user experience. However, in certain cases, there might be a need for you to see these Event IDs (i.e. reference them in other bookkeeping systems, etc.). If you want to make Event IDs visible in ExhibitDay, you can do so by enabling them under Workspace Settings > Display Event IDs.

Once you enable Display of Event IDs, you’ll see the Event ID listed next to each event in the main Events page; you’ll also see the Event ID on the individual event pages.

Enable Event ID

Pro-tip: in the Event Search window you can search for events by their 8-digit Event Id (EID).

Sign up for a free ExhibitDay account to plan your trade shows, manage your trade show assets, and collaborate on tasks with your event team.

Specifying the Location for Scheduled Items in the Event Playbook

We just released the ability to specify the location for a scheduled item in your Event Playbook in ExhibitDay.

The New Location Field

You can now use the new Location field in the scheduled items in your Event Playbook to specify where the scheduled item takes place. For example, for a meeting with a client, you can specify which meeting room the meeting will take place in; or, for speaking engagements, you can specify where the speaker will be presenting.

Location for Scheduled Playbook Items for Trade Shows and Exhibits

Sign up for a free ExhibitDay account to plan your trade shows and collaborate on tasks with your event team.